Remove Background After Effects A Complete Guide
Discover how to professionally remove background After Effects using the Roto Brush, Keylight, and other advanced techniques for flawless video cutouts.
Removing a video background is one of those fundamental skills in After Effects that opens up a world of creative possibilities. It’s the key to professional compositing, whether you're dealing with a perfect green screen setup or a messy, real-world shot. The two main weapons in your arsenal for this are keying and rotoscoping.
Why Bother With After Effects for Background Removal?
Look, I get it. There are tons of apps and online tools that promise one-click background removal. And for a quick social media post, maybe that's good enough. But when you need pixel-perfect precision and complete creative control, nothing beats a powerhouse like Adobe After Effects.
Mastering this skill isn't just a technical flex; it’s essential for producing high-quality work. Think about it: isolating a product for a slick commercial, creating a clean facecam overlay for a Twitch stream, or dropping an actor into a fantastic sci-fi environment—it all starts with a clean separation. This control lets you place your subject anywhere, tuck graphics behind them, or just get rid of a distracting background that ruins an otherwise perfect take.
The Two Core Methods Explained
Before we jump into the nitty-gritty, you need to understand the two main paths you can take. Your choice almost always comes down to one simple question: how was the footage shot?
Keying: This is your best friend when you’ve got footage shot against a solid-colored background, like a classic green or blue screen. Keying works by targeting that specific color and making it transparent. When your lighting is even and your screen is clean, this method is incredibly fast and precise. The industry-standard tool for this is the Keylight effect, and it's built right into After Effects.
Rotoscoping: This is what you turn to when a green screen wasn't an option. Rotoscoping is the process of manually tracing your subject, frame by painful frame, to create a matte that separates them from the background. It sounds tedious—and it used to be—but the modern Roto Brush tool in After Effects uses some clever AI assistance to make the process much, much faster. It's the go-to for isolating a person walking down a busy street or any other complex shot.
The Bottom Line: If you have a green screen, you key it. If you don't, you roto it.
Knowing when to use which technique is half the battle. Picking the right tool from the start will save you a massive headache and get you a much cleaner result. In the next few sections, we'll walk through exactly how to use both of these powerful methods.
Using the Roto Brush for Scenes Without a Green Screen
So, you've got a shot that needs the background removed, but there's no green screen in sight. This is where you roll up your sleeves and dive into rotoscoping, and in After Effects, your best friend for this task is the Roto Brush tool.
Rotoscoping used to be the stuff of nightmares—a brutally slow, frame-by-frame masking job. Thankfully, modern tools have made it so much smarter. The Roto Brush is a lifesaver for dynamic shots, like an athlete sprinting across a field or someone walking through a busy street. Instead of drawing a new mask for every single frame, you just give After Effects a starting point, and it does most of the heavy lifting.

As you can see, while keying is perfect for controlled studio shots, rotoscoping is the only real option for messy, real-world footage.
Making Your Initial Selection
First things first, you need to get into the right workspace. Double-click your video layer, and it’ll pop open in the Layer panel. This is where the magic happens. Grab the Roto Brush tool from the toolbar up top—it’s the icon with a little person next to a paintbrush. Your cursor will become a green circle.
Now, simply paint over your subject. Don't stress about being perfectly neat; just scribble a rough line inside the person or object you want to cut out. After Effects will analyze the pixels and throw a magenta line around what it thinks you want to keep.
If it grabs too much, just hold down Alt (or Option on a Mac). Your brush will turn red, and you can paint over the areas you want to remove from the selection. It’s a simple back-and-forth process of adding and subtracting until the outline looks right.
Pro Tip: Your starting frame is everything. Don’t start on a frame with heavy motion blur or where your subject is partially hidden. Find a clear, representative "base frame" where the subject’s outline is sharp. This gives the Roto Brush a solid foundation to track from, saving you a ton of cleanup later.
Refining Edges and Handling Fine Details
Getting a solid initial selection is one thing, but nailing the details is what sells the effect. Wispy hair, fuzzy fabric edges, or fur are notoriously tough to isolate cleanly with a hard outline. That's what the Refine Edge tool is for. It sits right next to the Roto Brush in the toolbar.
Switch over to it and gently paint along those tricky edges. You're essentially telling After Effects, "Hey, pay extra attention here and create a softer, more detailed matte." This tool is amazing for getting natural-looking composites. For an even deeper dive into fine-tuning with feathering and motion blur settings, check out our detailed guide on the Roto Brush.
Freezing Your Work for Better Performance
Once you’ve gone through your clip and are happy with the matte, you'll probably notice your computer starting to chug. That’s because After Effects is recalculating that complex selection on every single frame, which is a massive performance hit.
The solution is simple: hit the Freeze button at the bottom of the Layer panel. This tells After Effects to lock in your Roto Brush work and cache the results. It essentially bakes the matte, which frees up your system resources and gives you smooth playback and much faster rendering. Don’t skip this step
Nailing Green Screen Removal with Keylight
If you’re working with footage shot on a green or blue screen, forget the painstaking process of rotoscoping. This is a job for chroma keying, and in After Effects, the undisputed king is the Keylight effect. It’s a powerful, built-in tool that has been the industry standard for years, and for good reason—it’s fast, precise, and gives you incredible control for professional-level results.
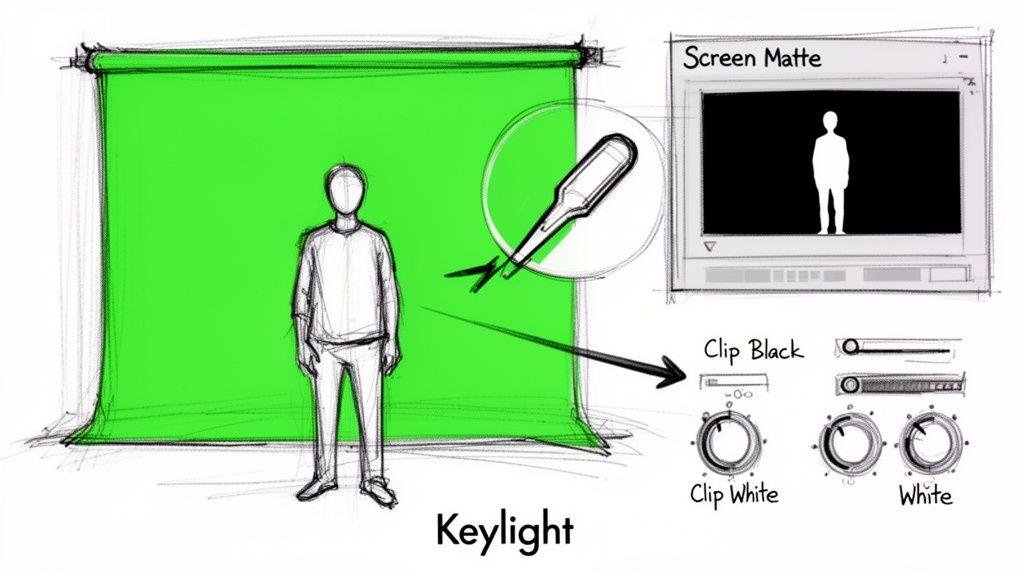
Getting started is easy. Find "Keylight" in your Effects & Presets panel and drag it onto your footage. The very first thing you’ll do is grab the Screen Colour eyedropper and click on a patch of green in your background. Try to pick an area that’s a good mid-tone—not too bright, not too dark. Honestly, this single click often gets you about 80% of the way there, and you'll see the background disappear instantly.
But that's just the start. The real artistry is in the fine-tuning that comes next.
Dialing in the Perfect Matte
A great key is one nobody notices. To get there, you need to see what After Effects is really doing by switching your view. In the Keylight settings, change the View dropdown from "Final Result" to "Screen Matte." This is your truth-teller. It shows you a high-contrast, black-and-white version of your transparency.
Here's the simple breakdown:
- Solid White: This is your subject, the part you're keeping.
- Solid Black: This is the background you're removing.
- Gray Areas: These are your problem spots—semi-transparent pixels that will look messy.
This is where the Clip Black and Clip White settings become your best friends.
- Clip Black: Seeing little gray flecks or noise in the black areas? Slowly dial up the Clip Black value. Watch as it "crushes" that noise into pure, solid black, cleaning up your background.
- Clip White: Is your subject looking a bit transparent or "holey"? Gently lower the Clip White value to bring back the solidity. A word of caution: don't push this too far, or you'll start eating away at fine details like hair.
A clean Screen Matte is the bedrock of a believable composite. Taking the time to get a solid white subject against a pure black background is the one step that separates amateur keys from professional ones.
Refining Edges and Killing Green Spill
Once your matte is looking solid, switch the view back to "Final Result." You’ll probably see a faint green halo or "spill" around your subject, especially noticeable in their hair or around their shoulders. This is a dead giveaway of a green screen, but Keylight has the tools to fix it.
Under the Screen Matte section, you’ll find a couple of game-changing properties:
- Shrink/Grow: Using a small negative number here, like -1.5, can subtly tighten the matte right around your subject, nipping away at those last bits of green fringe.
- Softness: Adding just a touch of softness (maybe 0.5 to 1.0) helps to blend the edge into your new background. It removes that sharp, "cookie-cutter" look.
As a final step, you'll want to tackle any green light reflecting on your subject. While Keylight has some spill suppression built-in, I often prefer using the dedicated Spill Suppressor effect (found under the Keying category). Drag it onto your layer so it sits after the Keylight effect in the stack. It does an amazing job of neutralizing those unwanted green tones.
This entire keying workflow is a cornerstone of the industry, accounting for up to 40% of all background removal tasks in professional video. For a deeper dive, our guide on After Effects green screen techniques has even more tips to help you master the process.
The settings below are a great starting point for dialing in a clean key.
Keylight Settings for a Perfect Green Screen Key
This table gives you a quick rundown of the most critical Keylight settings and where to start with your values. Remember, every shot is different, so use these as a guide and adjust based on what your footage needs.
| Setting | Purpose | Recommended Starting Range |
|---|---|---|
| Screen Colour | Samples the green screen color to be removed. | Use the eyedropper on a mid-tone green area. |
| Clip Black | Cleans up noise in the background (black areas of the matte). | 0 - 15 |
| Clip White | Solidifies the foreground (white areas of the matte). | 85 - 100 |
| Shrink/Grow | Tightens or expands the matte edge to remove halos. | -1.5 to 0 |
| Softness | Blurs the matte edge for a more natural composite. | 0.5 - 2.0 |
Tweaking these five controls will solve the vast majority of your green screen challenges and get you that seamless, professional look you're after.
When an AI Tool Is Your Best Bet for a Faster Workflow
Look, After Effects is a powerhouse. For pixel-perfect control, it's unmatched. But let’s be real—that power demands a serious time commitment. Not every project needs that level of precision, and sometimes, speed is everything. That’s where a dedicated AI background removal tool can be a game-changer for an efficient workflow.
Imagine you're running a User-Generated Content (UGC) campaign. You've got dozens of short clips flooding in from different creators, each with a different background. Manually rotoscoping every single one would be a nightmare, easily eating up days of your time. An AI tool, on the other hand, can chew through that workload in a fraction of the time, batch-processing the videos and giving you clean cutouts ready for your edit. The same goes for those quick-turnaround social media clips that need to go live now.
The time savings aren't just a small perk; they're huge. A decent Roto Brush job on a 30-second clip can easily take 20-30 minutes of intense, focused work. An AI service just asks you to upload the file. You grab a coffee, and a few minutes later, you download a finished clip. This hands-off approach frees you up to actually be creative instead of just tracing lines for hours.
Finding the Right Tool for the Job
Deciding to use an AI tool doesn't mean you're ditching After Effects. The smartest editors know how to use them together. It’s all about understanding the demands of the project in front of you.
Here are a few scenarios where I’d reach for an automated solution without hesitation:
- High-Volume Work: If I'm building a montage or a series of social posts from tons of different clips, AI is the only practical choice.
- Simple and Clean Edits: Need to place a speaker on a simple graphic background for a webinar? An AI tool gets it done perfectly well and saves a ton of time.
- Impossible Deadlines: We've all been there. When a client needs something by the end of the day, manual rotoscoping is off the table.
When you're working with footage of people, using an AI-powered video background cutout service is a fantastic shortcut. These tools are often trained specifically on human forms, so they can produce surprisingly clean results with almost no effort on your part.
Bringing Your AI Clips Back into After Effects
Here’s the best part: you're not stuck with a final product from the AI tool. You can have the best of both worlds. Most modern AI removers can export in professional formats that maintain the alpha channel (transparency). Just export as a ProRes 4444 file or a PNG sequence, and you can drop the perfectly isolated subject right back into your After Effects timeline.
Think of it this way: you're using AI to handle the grunt work. By letting the algorithm do the time-consuming isolation, you save your energy and After Effects' power for what they do best—sophisticated color grades, motion graphics, and high-end compositing.
This hybrid workflow gives you the raw speed of automation with the creative finesse of After Effects. To get a better handle on how these platforms fit into a professional pipeline, you can dig deeper into our guide on AI video background removal.
Solving Common Background Removal Problems
Even with a perfect plan, things can go sideways. When you need to remove background after effects footage, nailing the tricky details is what separates a decent result from a great one. Let's dig into some of the most common headaches you'll run into, from wispy hair to chaotic motion blur.
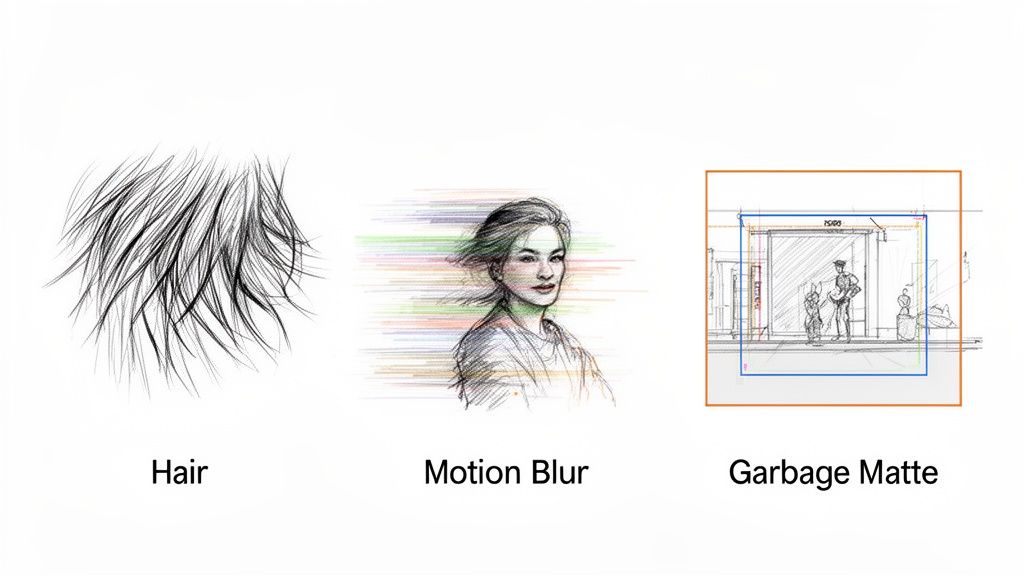
The biggest challenge, almost without fail, is fine detail. Think delicate strands of hair, the fuzzy edge of a sweater, or semi-transparent fabric—these things can quickly turn a clean key or a smooth rotoscope into a pixelated, choppy mess. For these situations, one tool is rarely enough.
Handling Fine Hair and Fuzzy Edges
One of my go-to techniques for rescuing hair is to stack keyers. Start by pulling a "hard" key using Keylight to get the solid parts of your subject looking good. Then, just duplicate that layer and pull an entirely separate, much softer key that’s focused only on the hair and edges. When you combine these two mattes, you get the best of both worlds: a solid core and natural, detailed edges.
If you're going the rotoscoping route, the Refine Edge tool becomes your best friend. After you’ve got your main selection with the Roto Brush, you can switch to this tool and gently paint over the hairline. This tells After Effects to take a much closer, more nuanced look at those specific pixels, giving you a far more natural separation than a hard mask ever could.
Taming Motion Blur
Motion blur is the absolute enemy of clean rotoscoping. When a subject moves fast, their edges soften and become semi-transparent, making it impossible to draw a single, clean line that works. Trying to fight it is a losing battle. The trick is to work with the blur.
The key here is to animate your mask feathering from one frame to the next. You can keyframe the Mask Feather property, cranking it up on frames with heavy blur and pulling it back down when the subject is more static. This dynamic approach helps the matte blend naturally with the motion, avoiding that jarring, hard edge that just screams "cutout."
Pro Tip: Don't just feather outwards. I always use the Mask Expansion property with a negative value to choke the matte in a bit before applying the feather. This ensures the feathering starts from inside the subject, which creates a much more believable blur transition.
Fixing Poorly Lit Green Screens
Let's be real—a perfectly flat, evenly lit green screen is a rare luxury. Most of the time, we’re dealing with shadows, wrinkles, or hotspots that completely confuse the keyer. This is exactly where garbage mattes save the day.
A garbage matte is just a quick, rough mask you draw around your subject to hide the worst parts of the background, like C-stands or wrinkly corners. By doing this, you’re telling Keylight to ignore the junk and only analyze the clean green pixels right behind the actor.
For more subtle lighting problems, like one side of the screen being slightly darker than the other, you can use secondary color correction.
- Apply a Lumetri Color effect to your footage, making sure it’s before the Keylight effect in your stack.
- Jump into the HSL Secondary controls to isolate just the problematic shade of green.
- Gently tweak its brightness or saturation until it blends in with the rest of the screen.
By pre-processing the footage like this, you’re feeding Keylight a much cleaner plate to start with. This almost always results in a better initial key that requires far less cleanup later on.
Common Questions About Background Removal
When you're deep in an edit, questions about removing a background always pop up. It's one of those tasks that can either be a quick fix or a major time sink. I've been there, so let's walk through some of the most common hurdles you'll face when trying to remove background after effects footage.
Getting these answers straight can save you a world of headaches down the line, especially when a deadline is looming.
Can I Remove a Background Without a Green Screen?
Absolutely. A green screen is a luxury, not a necessity. For footage shot "in the wild," your go-to technique is going to be rotoscoping.
Thankfully, the days of painstakingly tracing frame-by-frame are mostly behind us. After Effects has a brilliant tool called the Roto Brush that does a lot of the heavy lifting. You just paint over your subject on a keyframe, and its built-in smart tracking figures out the rest, following the motion through the clip. It takes some finessing, for sure, but it’s a lifesaver for isolating people or objects in busy, real-world scenes.
What Is the Fastest Way to Remove a Video Background?
This one really depends on what you're starting with. There's no single "fastest" way, just the fastest way for your specific shot.
- If you have green screen footage: The Keylight effect is your best friend. Hands down, it's the quickest path in After Effects. On a well-lit shot, you can pull a clean, professional key in a matter of minutes.
- For everything else: If speed is the name of the game, an AI-powered background removal tool is the clear winner. These services are built to do one thing and do it fast, automating the entire rotoscoping process. You just upload your clip and get back a clean cutout, saving you potentially hours of manual work.
How Do I Export a Video with a Transparent Background?
This is a critical final step that trips up a lot of people. You’ve done all the hard work to isolate your subject, but if you export with the wrong settings, you’ll just end up with a black background.
To keep that transparency, you need a format and codec that supports an alpha channel.
Inside the After Effects Render Queue, click on your Output Module to bring up the settings. Here’s the recipe for success:
- Change the Format to QuickTime. It's the industry standard for a reason.
- Click Format Options and pick a codec that can handle transparency. Apple ProRes 4444 is a fantastic choice for quality and compatibility. The Animation codec also works well.
- Most importantly, find the Channels dropdown and switch it from "RGB" to RGB + Alpha.
That's it. This tells After Effects to include all that transparency data in the final file, so you can drop it onto any other background in your NLE and have it composite perfectly.
Ready to skip the manual labor and get perfect cutouts in minutes? With VideoBGRemover, you can use powerful AI to handle the heavy lifting. Just upload your clip, let our tool work its magic, and download a professional-quality video with a transparent background. Try it for free today at https://videobgremover.com.
Tagged with
Ready to Remove Your Video Background?
See a free preview before you buy.
No credit card required • Free preview on every video