How to Improve Video Quality A Creator's Essential Guide
Learn how to improve video quality with our expert guide. Master camera settings, lighting, audio, and post-production for professional, polished results.
If you want to improve your video quality, you really need to focus on three key things: getting the shooting environment right with solid lighting and a stable camera, dialing in the best camera settings like resolution and frame rate, and finally, using post-production to fix colors and export the file correctly. Honestly, nailing these fundamentals is the fastest way to get that professional look that makes your content pop.
Why High-Quality Video Is Your Greatest Asset
In a world overflowing with content, the quality of your video is the first handshake you have with a viewer. It’s what tells them, in a split second, whether you’re worth their time. We’ve all been there—clicking on a video only to be met with a grainy, poorly lit, or shaky mess. We click away almost instantly. That reaction isn’t just about looks; it's a gut check on credibility.

Making video quality a priority is no longer optional. It's essential for anyone who wants to communicate effectively online. Whether you're a YouTuber growing a channel or a business trying to build trust, the clarity of your video is directly linked to the clarity of your message.
The Psychology of Visual Trust
Think about the videos you personally trust and enjoy. They’re probably sharp, well-composed, and signal a certain level of care and authority. On the flip side, a low-quality video can make even the most insightful message feel amateurish or unreliable. This isn't just a feeling; the numbers back it up.
For instance, if you're making videos for social media, a messy background can completely torpedo your message. A huge 87% of consumers say that video quality directly impacts how much they trust a brand. That’s not a small preference—it's a massive factor that shapes your reputation. With video set to make up over 82% of all internet traffic, you have to aim for that polished look to stand out.
High-quality video isn't just about looking good. It’s a strategic tool for building authority, fostering connection, and driving action. It’s the difference between being scrolled past and being remembered.
From Your Phone to Professional Polish
The best part? You don't need a Hollywood budget to create high-quality videos anymore. The camera in your pocket is probably more powerful than you think, often rivaling professional cameras from just a few years ago. Choosing the right device is a great first step, and you can find helpful insights into which iPhone models offer the best camera quality to see just how capable that little studio in your pocket really is.
This guide will walk you through turning your raw footage into something you're proud of. We'll break down the essential pillars:
- Pre-production planning: How to set up your space for success before you even hit record.
- Camera settings: We'll demystify the technical jargon to help you get crisp, clean results.
- Post-production magic: Using editing and even AI tools to enhance what you've shot.
- Export best practices: Making sure your video looks just as good on social media as it does on your computer.
By focusing on these areas, you can create content that not only looks professional but actually helps you reach your goals. And if you're looking for platform-specific advice, these social media video tips are a great place to start.
Building Your Perfect Shooting Environment
The secret to incredible video quality often comes down to the work you do before you hit record. Think of it this way: a carefully controlled environment is the foundation for everything else. Get this part right, and you're giving your camera the best possible information to capture, which will save you a ton of headaches in post-production.
And no, you don't need a professional studio. Whether you’re carving out a corner of your bedroom or using a dedicated office, mastering a few core principles of lighting, composition, and stability will completely transform your final product.
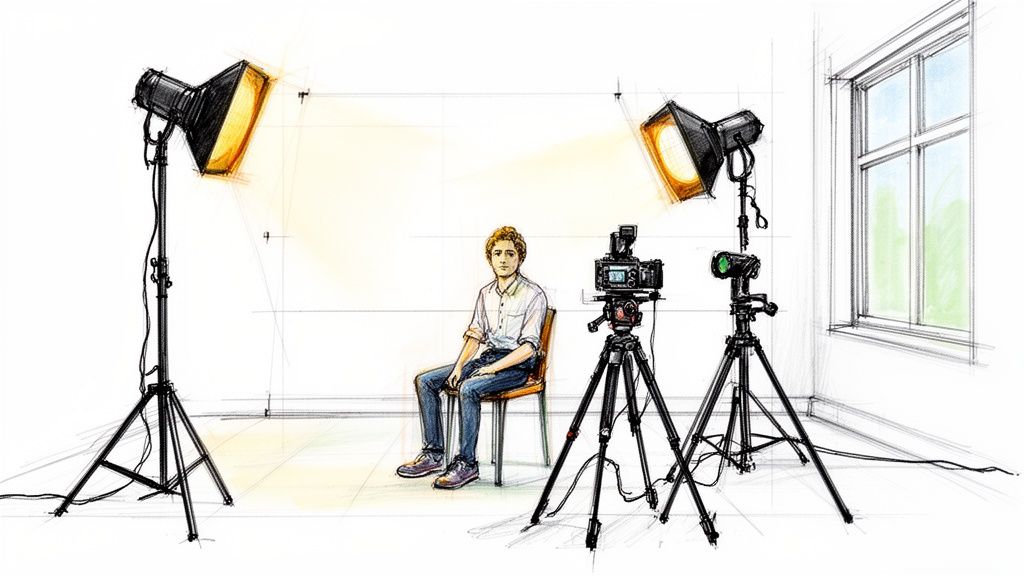
Master Your Lighting with a Three-Point Setup
Lighting isn't just important; it's arguably the most important factor in video quality. A well-lit scene instantly separates you from the background, gets rid of ugly, distracting shadows, and feeds your camera's sensor the clean information it needs to produce a sharp, vibrant image.
The industry-standard approach for this is the classic three-point lighting setup. It uses three distinct lights to shape your subject, creating depth and a polished, professional look.
- Key Light: This is your workhorse, the main and brightest light. You'll typically place it at a 45-degree angle to one side of the camera, aimed right at you. Its job is to provide the bulk of the illumination.
- Fill Light: Set up on the opposite side of the camera from the key light, this one is softer and less intense. Its only purpose is to "fill in" the harsh shadows created by the key light, softening the overall look.
- Back Light: Sometimes called a hair light, this one goes behind you, usually slightly above your head and out of the frame. It creates a subtle rim of light around your hair and shoulders, which is the magic ingredient for separating you from the background and adding that crucial sense of depth.
You don't need to break the bank to get this done. A big, bright window can be a fantastic key light. For a fill light, a simple desk lamp with a white shade to diffuse the light works wonders, or you can even use a cheap white foam board to bounce light back onto your face. A small, inexpensive LED panel is perfect for a backlight.
Frame Your Shot Like a Pro
With your lighting dialed in, it's time to think about composition. How you frame yourself in the shot is the difference between a static, boring video and one that feels dynamic and engaging. The most fundamental tool in your toolbox here is the rule of thirds.
Imagine your screen has a tic-tac-toe grid drawn over it. The rule of thirds suggests placing your main subject along those lines or where they intersect, rather than plopping them dead center.
Positioning yourself slightly off-center creates a more balanced and visually interesting image. It gives the viewer's eye a natural path to follow, making the composition feel more intentional and professional.
If you're shooting a talking-head video, try lining up one of your eyes with one of the top intersections. It’s a small tweak that instantly makes your shot feel more composed and thoughtfully planned. Play around with different placements to see what looks best for your scene.
Eliminate Shaky Footage with Proper Stabilization
Nothing screams "amateur" more than shaky footage. It’s distracting, unprofessional, and can even be a bit nauseating for your audience. The solution is simple: get your camera stable.
You've got a few options, depending on your budget and needs:
- Tripod: This is the most essential, non-negotiable tool for stabilization. A solid tripod guarantees your shot is perfectly still, which is a must for static shots like interviews, tutorials, or product reviews.
- Gimbal: If you need to move the camera while you film, a gimbal is a total game-changer. These devices use motors to counteract your movements, resulting in those incredibly smooth, cinematic shots that look like they're floating.
- DIY Hacks: Working with a tight budget? Get creative. You can prop a smartphone against a stack of books or use a rubber band to strap it to something sturdy. The goal is just to eliminate that tell-tale hand-held shake.
The Power of a Clean Background
Finally, let’s talk about what’s behind you. A cluttered or distracting background pulls focus away from you and your message. You want your viewer's attention right where it belongs: on you.
A clean, simple background—a solid-colored wall, a tidy bookshelf, maybe a nice plant—adds an instant layer of professionalism. It shows that you’ve put thought into every element of your video.
For the ultimate control, many creators turn to a green screen. This allows them to completely replace the background with any image or video they want during editing. To dive deeper, check out this excellent guide on using a background green screen for video to nail a perfect, professional look. This method opens up endless creative possibilities and ensures your backdrop is always flawless.
Getting Your Camera Settings Right for a Pro Look
Jumping into your camera’s menu can feel overwhelming, but honestly, you only need to master a few key settings to see a massive jump in your video quality. Getting these dialed in is the difference between letting the camera guess what you want and telling it exactly how to capture your vision.
The biggest mistake I see beginners make? Leaving everything on "Auto." It's tempting, I get it, but auto mode is built for average scenarios and almost always delivers flat, boring footage. Taking manual control is your ticket to creating video that looks intentional and professional.
Resolution and Frame Rate: The Building Blocks of Your Video
Let's start with the two most important decisions you'll make: resolution and frame rate. These dictate the clarity and smoothness of your video, so getting them right from the start is crucial.
Resolution is all about detail. It’s the number of pixels packed into your image. You’ll usually be choosing between:
- 1080p (Full HD): This is your workhorse. It’s the standard for most online content, looks fantastic on phones and laptops, and won't hog all your storage space. Plus, it's way easier for most computers to handle during editing.
- 4K (Ultra HD): With four times the pixels of 1080p, 4K gives you incredibly sharp, detailed video. It's a must for high-end projects or if you think you'll need to crop in on a shot later without losing quality. Just be prepared—4K files are huge and require a beefy computer to edit smoothly.
Frame Rate (FPS) is the number of individual pictures your camera grabs every second. This single setting has a huge impact on the feel of your video.
A standard talking-head video or tutorial shot in 1080p at 24fps or 30fps is a fantastic starting point. This combo gives you a clean, professional look without creating massive files that are a pain to work with.
For example, shooting at 24fps gives you that classic, slightly dreamy motion blur you see in movies—perfect for a cinematic interview. A crisp 30fps is a solid, clean choice for most YouTube or corporate videos. If you're shooting action or want that buttery-smooth slow-motion effect, crank it up to 60fps or even 120fps.
Nailing Your Exposure: Aperture, Shutter Speed, and ISO
Exposure is just a fancy word for how bright or dark your video is. It's a balancing act between three settings: aperture, shutter speed, and ISO. Tweak one, and you have to adjust another to compensate.
Aperture (Your Lens's Iris)
Aperture, measured in f-stops (like f/1.8 or f/4), is the opening in your lens that lets light through. A low f-stop number like f/1.8 means a wider opening. This lets in more light and creates that beautiful, blurry background (shallow depth of field) that makes your subject stand out. A higher f-stop like f/8 does the opposite—less light gets in, and more of your scene stays in sharp focus.
Of course, great video is more than just technical settings. Once you're comfortable with exposure, you can elevate your work by mastering camera shot angles for storytelling to create more dynamic and engaging visuals.
Shutter Speed (Capturing Motion)
Shutter speed controls how long your camera's sensor is exposed to light for each individual frame. For video, there’s a simple rule that works wonders: the 180-degree shutter rule.
The idea is to set your shutter speed to double your frame rate. So, if you’re shooting at 24fps, your shutter speed should be 1/50th of a second. This simple trick produces a natural-looking motion blur that’s just right for the human eye.
ISO (Digital Light Sensitivity)
Think of ISO as a digital way to brighten your image when you can't add more light. In a perfect world, you'd keep your ISO as low as possible—usually 100 or 200—for the cleanest, most detailed image. As you increase the ISO for darker scenes, you're essentially telling the camera to artificially boost the brightness. The trade-off? You introduce digital "noise" or grain, which can quickly make your video look cheap. Always, always try to add more light before you crank up the ISO.
Don't Forget Bitrate
One last thing: bitrate. This is the amount of data your camera uses to record one second of video. A higher bitrate means more data, which results in higher quality and fewer ugly compression artifacts (those blocky pixels you see in low-quality streams).
You can have a perfectly lit, beautifully composed shot, but if you choose a low bitrate when you export, you'll throw all that hard work away. Make sure your bitrate matches your resolution and frame rate to keep all that beautiful detail intact.
To make things easier, I've put together a quick cheat sheet with some common settings I use for different types of video projects.
Recommended Camera Settings for Popular Video Formats
This table is a great starting point for dialing in your settings. Use it as a guide, but don't be afraid to experiment to find what works best for your specific camera and creative style.
| Video Type | Resolution | Frame Rate (FPS) | Best Use Case |
|---|---|---|---|
| Talking Head/Interview | 1080p or 4K | 24 / 30 fps | A cinematic feel or standard crisp look for YouTube. |
| Product Showcase | 4K | 30 / 60 fps | Capturing fine details with smooth motion. |
| Action/Sports Vlog | 1080p | 60 / 120 fps | Creating fluid slow-motion sequences. |
| Social Media Reel | 1080p | 30 / 60 fps | Optimized for mobile viewing and smooth playback. |
Ultimately, these numbers are just a foundation. The real magic happens when you understand what each setting does and start making creative choices to shape the final look and feel of your video.
Bringing Your Footage to Life in Post-Production
Shooting great footage is only half the job. Honestly, the real magic—the part that turns good video into something truly memorable—happens in the edit. Post-production is your opportunity to fix, polish, and inject your unique creative voice into every frame.
This is where you can smooth over minor on-set mistakes, dial in the mood, and make sure every shot flows together perfectly. From tweaking colors to cleaning up audio, these final touches are what separate amateur clips from professional-grade content.
First, Nail Your Color Correction
Before you start getting artistic with cinematic color grades, you have to get the basics right. Think of color correction as your foundation. The goal here isn't to be stylish; it's to make the video look natural and true to life. You’re fixing things like white balance, exposure, and contrast to create a clean, neutral canvas.
Maybe your footage has a slight blue tint because you were shooting in the shade. You'll warm it up. If a shot is a bit underexposed, you can gently lift the shadows. Most editing software like DaVinci Resolve or Adobe Premiere Pro gives you tools like color wheels, curves, and sliders to make these fixes pretty intuitive.
The main goal here is consistency. If you shot in different locations or at different times of day, color correction is what makes it all look like it belongs in the same video.
Now, Create a Mood with Color Grading
Once your footage is corrected and looking natural, it's time for the fun part: color grading. This is where you get to be an artist. You apply a specific look or style to evoke an emotion. Think of the cool, desaturated blues in a gritty thriller or the warm, golden glow of a nostalgic travel video.
This decision is all about matching the visuals to your message. This handy decision tree can help you figure out what direction to take.
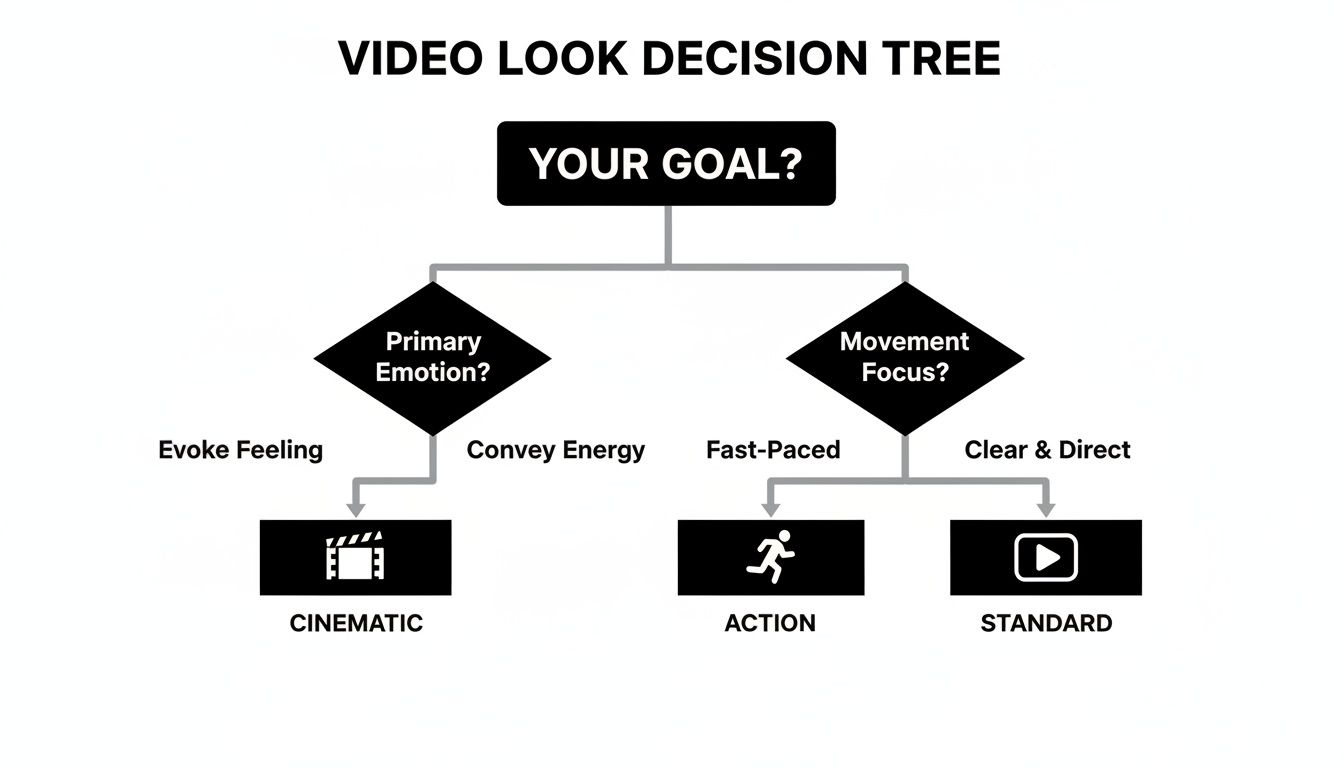
As you can see, a cinematic goal might push you toward film-like textures, while something action-oriented needs a look that pops with energy and motion.
Audio Is Over Half the Experience
I'm going to say it: you can have the most beautiful 4K footage in the world, but if your audio is trash, people will click away. It's just a fact. Muffled dialogue, a distracting background hum, or volume that jumps all over the place will ruin the viewing experience faster than anything else.
Luckily, modern editing software has some powerful tools to fix common audio headaches:
- Noise Reduction: Most programs have one-click filters that can identify and remove persistent background noise, like the drone of an air conditioner or the buzz from a light.
- Equalization (EQ): An EQ lets you surgically boost or cut specific audio frequencies. A classic move is to give a slight boost to the mid-range frequencies of a person's voice to make it sound richer and clearer.
- Leveling and Normalization: Use these tools to make sure your audio volume is consistent from start to finish. No one wants to keep reaching for the volume knob.
A simple rule of thumb I always use: close your eyes and just listen. If anything sounds off, jarring, or unclear, your audience is going to notice it, too. Clean audio is non-negotiable.
The New Secret Weapon: AI in Post-Production
Artificial intelligence has moved from a futuristic buzzword to a genuinely practical tool that can seriously speed up your editing workflow. The impact is undeniable, especially as short-form video continues to dominate. When 21% of marketers are citing it for top ROI, quality becomes a massive differentiator.
It’s no surprise that 88% of video marketers report positive ROI from high-quality work, and the adoption of AI in video creation has skyrocketed from 18% to 41% in just one year. You can dig deeper into how AI is fueling this video marketing boom on filmdivision.video. These tools are incredible for automating the tedious tasks that used to eat up hours, freeing you up to focus on the creative side of things.
AI-Powered Background Removal
One of the most practical AI tools out there is instant background removal. This used to be a huge pain, requiring a physical green screen and perfect lighting to get a clean key. Now, tools like VideoBGRemover can analyze your footage and precisely cut you out from your background with just a click.
This unlocks a ton of creative options:
- Get a clean, professional look: Instantly swap out a messy home office for a simple, solid color or a slick virtual studio.
- Lock in brand consistency: Use a specific branded background across all your videos for a cohesive feel.
- Unleash your creativity: Place yourself in any environment you can dream up without ever leaving your room.
For creators on a tight deadline, this tech is a lifesaver. It lets you achieve that clean, distraction-free look we talked about in pre-production, but without all the complex physical setup. It's a must-have technique for anyone serious about improving their video quality.
Nailing Your Export Settings for Every Platform
You’ve poured hours into getting everything just right. The lighting was perfect, your camera settings were dialed in, and the edit is a masterpiece. But there's one final hurdle that can make or break all that effort: the export.
Getting this last step wrong can sabotage your video, introducing those dreaded compression artifacts that make your hard work look amateurish. This is your final chance to preserve all that quality you fought for.
Think of your raw footage as a massive, uncompressed file bursting with visual information. To get it onto the web, it has to be squeezed down into a much smaller package. Your export settings are the instructions you give the computer on how to do that squeezing—what to keep, what to toss, and how to do it without wrecking the final product.
Codecs and Containers, Made Simple
Before we get into the nitty-gritty of platform settings, you need to know about two terms that pop up every single time you export: codecs and containers.
Codec: This is short for coder-decoder, and it’s the algorithm that physically compresses your video. The undisputed champion for online video is H.264. It's the go-to for a reason, offering a fantastic balance between high quality and manageable file sizes.
Container: This is the digital file—the "box"—that holds your compressed video, your audio, and any other metadata. The most common containers you'll see are .MP4 and .MOV.
For pretty much any video you plan on uploading, your winning combo will be the H.264 codec inside an .MP4 container. It's the universal standard that just works everywhere.
Platform-Specific Export Presets
Here's a crucial piece of inside baseball: every social media platform has its own compression algorithm. When you upload a video, they're going to re-compress it no matter what. Your goal is to give them a file that’s as close to their final, preferred specs as possible.
This minimizes the damage they do during their re-compression, which is where most quality loss happens.
Here are my go-to presets for the big three platforms:
| Platform | Recommended Resolution | Frame Rate | Target Bitrate (VBR) |
|---|---|---|---|
| YouTube | 1920x1080 (HD) or 3840x2160 (4K) | Match Source (24/30/60 fps) | 10-15 Mbps (for HD) |
| Instagram/Reels | 1080x1920 (9:16 Vertical) | 30 or 60 fps | 8-12 Mbps |
| TikTok | 1080x1920 (9:16 Vertical) | 30 or 60 fps | 8-12 Mbps |
Pro Tip: If your software gives you the option, always choose VBR (Variable Bitrate). This is a smarter way to compress, as it dedicates more data to complex, fast-moving scenes and less to simple, static shots. It’s a much more efficient way to maintain quality. For a deeper look, check out our guide to video compression without losing quality.
Exporting with Transparency for Pro-Level Overlays
What if you're not exporting a final video, but an element like a logo, animation, or a lower-third graphic? You'll need to preserve its transparent background so you can stack it on top of other footage later.
A standard H.264 export won't work here; it will just fill in the transparent areas with black.
To keep that transparency (often called an "alpha channel"), you need a specialized codec. Your best bets are:
- Apple ProRes 4444: The gold standard for professional editors who need top-tier quality plus an alpha channel.
- PNG Sequence: This method exports every frame of your animation as a separate, transparent PNG image.
- WebM (VP9): A great, modern choice for web-based projects that also supports transparency.
These formats are non-negotiable for creating layered, professional graphics and effects.
In an age where attention spans have plummeted 30% in 15 years to just 8.25 seconds, your video’s quality is your first impression. A polished, professional look is why marketers see a 93% strong ROI from video. It’s what drives up to 87% more website traffic and sales. Don't let a sloppy export be the reason a viewer scrolls past all your hard work.
A Few Common Questions About Video Quality
Even when you've got the basics down, you're bound to run into some specific, nagging questions. Let's tackle a few of the most common ones I hear from creators. Think of this as a quick-reference guide for those moments when you're stuck on a particular problem.
Getting past these little hurdles is what separates good video from great video. Whether you're wrestling with grainy footage or wondering if your phone is good enough, these answers should point you in the right direction.
How Can I Fix Grainy Video Footage?
Ah, the classic grainy video problem. That staticky, "noisy" look is almost always caused by one thing: not enough light. When your camera's sensor is starved for light, it electronically boosts the signal—what we call the ISO—which unfortunately introduces that distracting grain.
The best fix is always prevention. Add more light to your scene before you hit record. But if you're stuck with noisy footage, don't despair. Most video editing software has a noise reduction effect built right in. Just be careful with it. A little goes a long way. If you push it too hard, your subject will start to look soft and waxy, almost like plastic. The goal is to clean up the distraction, not erase all the detail.
My Two Cents: Think of noise reduction as a rescue tool, not your main strategy. Your number one priority should always be getting great light in the first place. It makes everything that follows so much easier.
Do I Really Need a 4K Camera?
Honestly? Probably not. It's easy to get caught up in the numbers, but 1080p is still the undisputed king for most online video. It looks fantastic on everything from a phone to a laptop, which is where most people will be watching your content. Plus, 4K files are massive. They’ll eat up your storage and can bring even a powerful computer to its knees during editing.
So, when does 4K make sense? It's all about flexibility. The extra resolution is a powerful tool in the edit.
- You can crop your shots. Ever wished you got a close-up? With 4K, you can punch in on a wide shot and create a new frame without losing any quality. It's like having a second camera angle for free.
- You're future-proofing. As 4K screens become the norm, your content will still look crisp and clean years down the line.
- It helps with stabilization. The extra pixels give stabilization software more information to work with, which can lead to incredibly smooth results, even with handheld footage.
For most people starting out, a solid 1080p camera is all you need to create beautiful, professional-looking video.
Can I Get Pro Quality with Just My Smartphone?
You absolutely can. The cameras in today's flagship phones are shockingly good—they easily outperform dedicated cameras from just a few years back. The sensors are sharp, and the internal processing is incredibly smart.
The secret isn't the phone itself, but how you support it. You can't just point and shoot and expect cinematic results. The trick is to take control of all the other elements that make a video look and sound professional.
Focus on these three things:
- Light it well. This is non-negotiable. Whether you use a simple ring light or soft light from a window, good lighting is a game-changer.
- Keep it steady. Get your phone on a tripod. Nothing screams "amateur" faster than shaky, handheld footage.
- Capture clean audio. Never rely on the built-in phone mic. A simple, inexpensive lavalier mic will make you sound ten times more professional.
Master those three areas, and you'll be amazed at the quality you can get from the device that's already in your pocket.
Ready to instantly elevate your videos with a clean, professional background? VideoBGRemover uses AI to remove or replace your background in minutes—no green screen needed. Get studio-quality results today at videobgremover.com.
Tagged with
Ready to Remove Your Video Background?
See a free preview before you buy.
No credit card required • Free preview on every video