Video Compression Without Losing Quality The Real Guide
Learn how to achieve video compression without losing quality. This guide demystifies codecs, bitrate, and FFmpeg for visually perfect results every time.
Let's be honest: true, mathematically perfect video compression without losing quality is mostly a myth for practical, everyday use. The real goal, and the one that actually matters, is what we call perceptually lossless compression. This is where clever algorithms shrink your file size by tossing out data your eyes won't miss anyway, leaving you with a video that looks identical to the original.
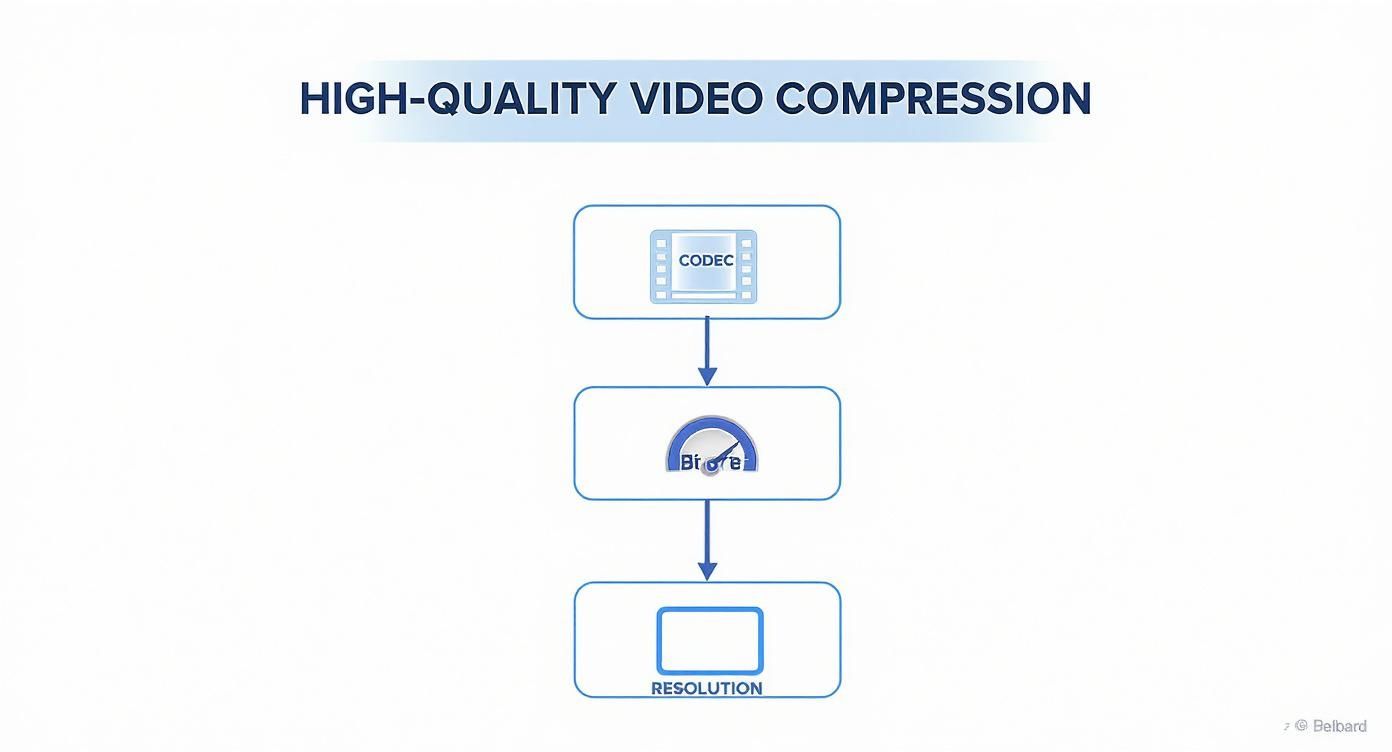
Getting there is a balancing act between three key things: codecs, bitrate, and resolution.
The Truth About Lossless Video Compression
When you hear "lossless," you probably think of a ZIP file. You put a file in, you get the exact same file out, bit for bit. While lossless video codecs do exist, their file size savings are so minimal they're not really useful for things like uploading to YouTube or sending a file to a client.
For most of us, the aim isn't zero data loss; it's zero perceptible quality loss.
This is the mindset you need to adopt for professional video work. You're essentially making a strategic trade-off, giving the encoder permission to discard information that's redundant or visually unimportant. The magic is in how skillfully it does this, making it impossible for the human eye to tell the difference.
Setting Realistic Expectations
Before you start tweaking settings, it's critical to know what you're actually trying to achieve. You're searching for that sweet spot where the file is small and easy to handle, but the visual quality is still top-notch. There's no magic button here; it’s all about making smart choices based on your specific video and where it’s going to live.
Think about it: a chaotic action scene with tons of motion needs a lot more data to stay sharp than a simple talking-head shot against a plain wall. A smart compression strategy knows this and allocates data where it's needed most, which is always better than just slapping a generic preset on everything.
The Three Pillars of Quality Compression
Nailing this balance really comes down to mastering three core components. I like to think of them as the main levers you can pull to dial in your final output.
- Codecs: These are the algorithms, the "engines," that actually do the compressing. Modern codecs like H.265 (HEVC) are way more efficient than older ones like H.264, giving you the same quality for a much smaller file.
- Bitrate: This is how much data you assign to each second of video. Instead of locking in a fixed number, newer methods like Constant Rate Factor (CRF) let the encoder use data more intelligently, applying more to complex scenes and less to simple ones.
- Resolution: This is just the number of pixels in your frame (1080p, 4K, etc.). Lowering the resolution is a surefire way to reduce file size, but it should always be your last resort because you're permanently throwing away detail.
The core idea behind modern compression has surprisingly deep roots. The whole field had a major breakthrough back in 1972 when Nasir Ahmed developed the Discrete Cosine Transform (DCT). This technique converts image data into frequencies, allowing encoders to discard the ones we're less likely to notice. It's a foundational concept that still powers a lot of what we do today. If you're a history buff, you can explore the early days of video compression to see how it all evolved.
Once you get a feel for these three pillars, you're no longer just guessing. You can start making deliberate, effective choices that give you files that are dramatically smaller than your originals but look every bit as stunning. That's how you achieve video compression without losing quality in a way that actually matters to your audience.
Choosing Your Codecs and Containers
Let's get one thing straight: you can't talk about "lossless" compression without first understanding your tools. The key players are the container (think MP4 or MOV) and the codec (like H.264 or AV1). The container is just the box that holds everything—video, audio, metadata—but the codec is the magic inside that actually shrinks your file.
Making the right call here is the single most important decision you'll make for efficient, high-quality video compression.
So, What's the Deal With Codecs?
A codec is an algorithm that cleverly analyzes your video, frame by frame, and throws out data that the human eye won't miss. Different codecs have different tricks up their sleeves, which is why your choice has a huge impact on both file size and visual fidelity.
For most of us, the choice boils down to a few industry-standard options. Even if you're using powerful AI video editing software, a solid grasp of codecs is non-negotiable for getting professional results.
H.264 (AVC): This is the old reliable. H.264 is the undisputed king of compatibility, playing nicely on virtually every device and platform you can think of. If your top priority is making sure everyone can watch your video without a hiccup, an H.264 file in an MP4 container is your safest bet.
H.265 (HEVC): As the successor to H.264, this codec is all about efficiency. It's roughly 50% more efficient, meaning it can produce the same stunning visual quality at half the file size. This makes it an absolute lifesaver for 4K and 8K footage, where file sizes can get out of hand fast.
AV1: The new kid on the block. AV1 is a royalty-free codec backed by heavy hitters like Google and Netflix. It manages to be about 30% more efficient than even H.265. While it's still finding its footing, it’s rapidly becoming the go-to for major streaming platforms like YouTube.
This whole process is a bit of a balancing act, as you can see below.
As the infographic shows, your codec choice is the foundation. From there, you'll fine-tune things like bitrate and resolution to hit that sweet spot between quality and file size.
Modern Video Codec Comparison
To make things even clearer, here’s a quick rundown of how these modern codecs stack up against each other.
| Codec | Compression Efficiency | Device Compatibility | Ideal Use Case |
|---|---|---|---|
| H.264 (AVC) | Good | Universal | Social media, web video, maximum compatibility |
| H.265 (HEVC) | Excellent | Very Good (Modern Devices) | 4K/8K video, streaming, reducing large file sizes |
| AV1 | Exceptional | Growing (Web-focused) | High-end streaming (YouTube, Netflix), web video |
Ultimately, the "best" codec depends entirely on where your video is headed and who will be watching it.
A Quick History of Squeezing Pixels
This isn't new technology; we've been getting better at this for decades. The MPEG-2 standard used for DVDs managed a compression ratio close to 100:1, which was incredible at the time. When H.264 showed up in 2003, it practically doubled that efficiency. Then H.265 (HEVC) arrived in 2013 and did it again, offering 50% better compression than H.264.
This relentless drive for efficiency is why we can stream crystal-clear 4K movies today. Choosing a modern codec is like upgrading from a sedan to a sports car—you get way more performance out of every bit of data.
Pro Tip: Don't sleep on your audio settings! The most common audio codec is AAC (Advanced Audio Coding). For almost any online video, an AAC bitrate between 128 and 192 kbps will sound great to the human ear without bloating your final file size.
Picking the Right Container
While the codec is the brain, the container is the body. It determines where your video can live and play. Thankfully, this choice is usually much simpler.
- .MP4: This is the universal language of video. It works everywhere. Use it for YouTube, social media, and pretty much any web delivery.
- .MOV: An Apple native, this container is a powerhouse in editing workflows, especially if you're using high-quality codecs like ProRes or need to preserve transparency (alpha channels).
- .WebM: An open-source container built specifically for the web. You'll often see it paired with AV1 or VP9 codecs for embedding videos directly into websites.
If you want a tool that handles all this for you, check out our guide to the best video compressors to find one that fits your workflow. A good tool lets you focus on creating, not on export settings.
Mastering Bitrate for Perfect Visual Quality
If you think of your video's codec as its engine, then the bitrate is the fuel. It's the amount of data you're giving the encoder to work with for every single second of video, and it has a massive impact on both visual quality and the final file size. Honestly, getting a handle on bitrate is the most powerful tool you have for achieving smart, efficient video compression without losing quality.
A common mistake is to stick with a constant bitrate (CBR). CBR assigns the exact same amount of data to every second of your video, which sounds simple but is actually incredibly inefficient. Think about it: a quiet, static shot of a person talking doesn't need nearly as much data as a chaotic action scene, but CBR treats them as equals. This starves the complex parts of your video and wastes data on the simple parts.
The smarter way to work is with a variable bitrate (VBR) approach. VBR is flexible, giving the encoder permission to ramp up the data for high-motion scenes and pull back for static ones. Just making this one switch is a huge step toward professional-grade compression.
The Power of Constant Rate Factor (CRF)
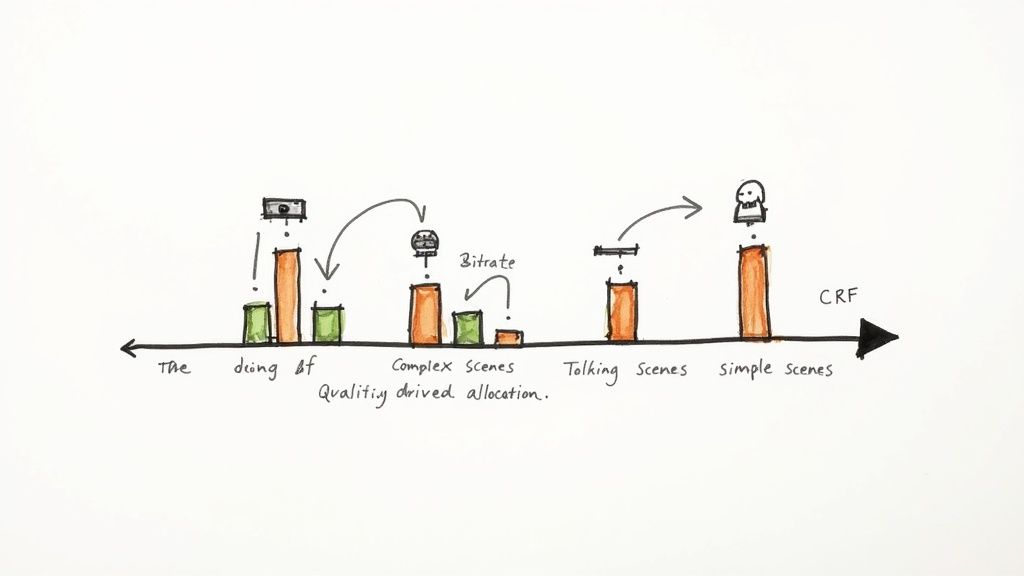
Once you're in the VBR world, the real magic happens with Constant Rate Factor, or CRF. This method flips the script entirely. Instead of telling the encoder to hit a specific data rate (like 10 Mbps), you tell it to achieve a specific level of visual quality.
The encoder then uses whatever bitrate it needs—frame by frame—to maintain that consistent quality you asked for. This is a game-changer.
With CRF, a busy scene might spike to 20 Mbps while a simple one drops to 2 Mbps, but to your eyes, they will look equally good. The result is a brilliantly efficient file where no data is wasted. It’s the closest thing we have to a "set it and forget it" quality control for video exports.
For anyone who deals with a lot of Apple formats, knowing how to manage these settings is key. You can find more specific guidance in this deep dive on how to compress an MOV file.
Practical CRF Values You Can Use Today
The CRF scale typically runs from 0 (completely lossless, gigantic file) to 51 (heavily compressed, looks terrible). For the H.264 codec, which is everywhere, the sweet spot for quality that looks lossless to the human eye is usually between CRF 18 and 23.
Here are some real-world starting points I use all the time:
- CRF 18: This is my go-to for master files or archival copies. It's considered visually lossless for H.264. The file will be large, but you'd be hard-pressed to spot any difference from the original source.
- CRF 23: This is the default in many encoding tools, and for good reason. It hits a perfect balance between fantastic visual quality and a much smaller file size. It's ideal for web uploads to places like YouTube or Vimeo.
- CRF 28: If file size is the absolute priority and you can live with some small visual imperfections, a CRF around 28 will get you a tiny file. This is better suited for sending quick previews or drafts, not for final delivery.
Key Takeaway: For your web videos, start with a CRF value of 23. Export a small clip and check the quality. If it looks perfect, you're golden. If you notice any blockiness, just nudge the value down to 22 or 21 and try again. This little bit of testing will help you find the perfect setting for your specific footage.
How Bitrate, Resolution, and Frame Rate Connect
It’s easy to forget that bitrate doesn't exist in a vacuum. It's directly tied to your video's resolution and frame rate. It just makes sense: a 4K video has way more pixels to describe than a 1080p video, so it needs more data to maintain the same level of perceived quality.
Think of it like painting a wall. A bigger wall (higher resolution) needs more paint (higher bitrate) to get the same smooth, even coverage.
This is why presets that use a fixed bitrate often fail. A 10 Mbps bitrate might look stunning on a 1080p video at 24fps, but that same setting will make a 4K 60fps video look like a blocky mess. The beauty of CRF is that it handles all this complexity for you, automatically adjusting the bitrate based on the source video's demands.
This becomes especially important when you're targeting specific platforms. Each has its own recommendations for social media video sizes and data rates to ensure smooth playback. By using CRF, you can focus on the quality target and let the encoder figure out the math, ensuring your video looks great everywhere it's posted.
Practical Compression Recipes Using FFmpeg

Alright, let's roll up our sleeves and get to the good stuff. Theory is one thing, but the real learning happens when you start typing. For this, we’ll be using FFmpeg—the command-line tool that’s the unsung hero of the video world.
Don't let the terminal scare you. While graphical interfaces are convenient, the command line gives you a level of surgical precision you just can't get anywhere else. I've put together a few go-to "recipes" that you can copy and paste for some of the most common situations you'll face.
I'll break down what each command does, so you're not just flying blind. The goal is for you to understand the why behind each flag, so you can eventually start building your own custom commands.
The Everyday Workhorse: High-Quality H.264 Conversion
This is the command you'll probably reach for 90% of the time. It’s perfect for turning almost any video file into a high-quality, universally compatible MP4. Think uploads to YouTube, Vimeo, or just sharing with a client.
Here's the command:
ffmpeg -i input.mov -c:v libx264 -crf 23 -preset medium -c:a aac -b:a 192k output.mp4
So, what’s going on here? Let’s take a look under the hood:
-i input.mov: This is your starting point—the input file you want to compress.-c:v libx264: We're telling FFmpeg to use thelibx264encoder, which creates an H.264 video. It’s the gold standard for compatibility.-crf 23: Here’s that Constant Rate Factor we talked about. A CRF of 23 is a fantastic sweet spot for web video, balancing quality and file size beautifully.-preset medium: This controls how hard the encoder works.mediumis a solid default that gives great compression without taking all day to finish.-c:a aac -b:a 192k: These two handle the audio. We’re encoding to the standard AAC codec with a quality bitrate of 192 kbps.output.mp4: And finally, the name of your new, much smaller file.
Pushing Efficiency with H.265 for 4K and Beyond
When you step up to 4K footage, file sizes can get out of hand fast. This is where H.265 (also known as HEVC) really shines. It can deliver the same visual punch as H.264 but in a file that's up to 50% smaller. It’s a game-changer for archiving or streaming ultra-high-def content.
The command looks very similar:
ffmpeg -i input_4K.mov -c:v libx265 -crf 28 -preset medium -tag:v hvc1 -c:a aac -b:a 192k output_4K.mp4
Here are the key differences:
-c:v libx265: Simple enough—we've just switched to the more modern H.265 encoder.-crf 28: The CRF scale works a bit differently for H.265. A value of 28 here is a great starting point, roughly equivalent in quality to H.264's 23.-tag:v hvc1: This little tag is an insider tip. It’s essential for making sure your video plays nice with Apple devices like iPhones and Macs. Don't forget it!
Preserving Transparency for Motion Graphics and Overlays
What if your video has a transparent background? Maybe it's a lower-third graphic from After Effects or something you've processed with a tool like VideoBGRemover. Standard codecs like H.264 and H.265 will just flatten that transparency into a black background.
To keep that alpha channel intact, you need a codec built for it. The industry standard for this is Apple ProRes 4444.
ffmpeg -i input_with_alpha.mov -c:v prores_ks -profile:v 4444 output_prores.mov
This command tells FFmpeg to use the prores_ks encoder and specifically the 4444 profile, which is the one that includes support for an alpha channel. Note that the output needs to be a .MOV container.
The chase for better compression never stops. Codecs like AV1, which started development around 2016, can squeeze files down about 30% more than H.265. This is why giants like Netflix and YouTube are embracing it for 4K and 8K streaming. It’s this constant innovation that makes global video possible. To appreciate the journey, you can discover more insights about video compression standards and see just how far we've come.
Optimizing Video for Fast Web Streaming
Ever wondered why some videos on a website start playing instantly, while others make you wait? Often, it comes down to where the video's "table of contents"—called the moov atom—is located. For fast streaming, it needs to be at the very beginning of the file.
By default, FFmpeg places it at the end. Luckily, fixing this is incredibly easy. We just add one little flag to our trusty H.264 command.
ffmpeg -i input.mov -c:v libx264 -crf 23 -preset medium -movflags +faststart -c:a aac -b:a 192k output_web.mp4
See that -movflags +faststart? That one simple addition tells FFmpeg to reorganize the file for streaming. It's a small change that has a massive impact on the user experience.
These recipes are your foundation. Once you get comfortable with them, you'll find yourself tweaking and combining them for all sorts of projects. To go even deeper, check out our complete FFmpeg guide for more advanced techniques.
Common Compression Mistakes to Avoid
Getting that perfect, crisp video with a tiny file size isn’t just about what you do—it’s also about what you don’t do. I’ve seen countless hours of great footage get mangled by a few simple, avoidable mistakes during the final export. Let's walk through the most common traps so you can sidestep them completely.
One of the worst offenders, and something that will absolutely wreck your quality, is re-compressing a video that’s already been compressed. This triggers what we call generational loss, where each new export bakes in and magnifies the artifacts of the last. It's the digital equivalent of making a photocopy of a photocopy; the image just gets worse and worse.
The Pitfall of Re-Compressing Video
Every time you save a video with a lossy codec like H.264 or H.265, you're permanently discarding data to shrink the file. If you take that file and compress it again, the new encoder has less information to work with and starts compressing the artifacts from the previous round. This is how you end up with a blocky, blurry mess.
To get around this, you have to work from your highest-quality source file. Always start with your master file or an intermediate format like ProRes. A classic mistake is grabbing a video from YouTube and trying to re-compress it for another platform. You're starting with a file that's already heavily compromised, and the final output will definitely show it.
The golden rule of video compression is simple: compress once, from the best possible source, for your final delivery format. Treat your original camera files or master exports like gold, and only compress them as the very last step in your workflow.
Mismanaging Frame Rates and Audio
Another easy mistake is exporting at a frame rate that doesn't match your source footage. Let's say you shot at 24 frames per second (fps) but export at 30 fps. To make up the difference, the software has to invent new frames by duplicating or blending existing ones. This often introduces stuttering or weird motion blur, and it bloats your file size for no good reason.
Unless you have a specific creative need to change it, always match your export frame rate to your source.
Audio is another sneaky culprit. While the video stream takes up most of the space, unoptimized audio settings can add a surprising amount of bulk to your file.
- Excessive Audio Bitrate: For most web video, an AAC audio bitrate of 128-192 kbps is perfectly fine. Exporting at 320 kbps is usually overkill for online content; most people won't hear the difference, but your file size will be noticeably larger.
- Uncompressed Audio: Never use uncompressed audio formats like WAV in your final MP4 delivery file. They are fantastic for the editing bay but are a massive waste of space for web distribution.
Overlooking Color Space and Accuracy
Have you ever exported a video, uploaded it, and then watched in horror as all the colors look washed out or just... wrong? This is an incredibly common and frustrating problem, usually caused by a mismatch in color spaces.
Your editing software probably works in a standard color space like Rec. 709. But if that information isn't correctly tagged in the file's metadata, different web browsers and media players can interpret it incorrectly. This can lead to gamma shifts (making your video too dark or bright) or color shifts (turning your vibrant reds into a dull orange).
When you export, especially with a command-line tool like FFmpeg, double-check that your color space information is properly tagged. Most modern editors handle this automatically with standard presets, but it's the first thing you should investigate if your colors look off. Getting this right ensures the video you worked so hard on is the same one everyone else sees.
Answering Your Toughest Video Compression Questions
Once you start dialing in codecs and bitrates, you'll inevitably run into a few tricky situations. That's completely normal. Getting that perfect export often comes down to navigating a handful of specific challenges. This is where we clear up those final, nagging questions.
Think of this as the expert FAQ that bridges the gap between knowing the theory and confidently putting it into practice.
Is Truly Lossless Video Compression a Thing?
Technically, yes, but it’s almost never the right tool for the job. True lossless compression—think of it like a ZIP file for video—barely shrinks the file size, making it impractical for sharing or streaming. What we’re really after in the professional world is perceptually lossless compression.
This is the sweet spot. It's the art of intelligently throwing away data your eyes can't perceive anyway. The video looks identical to the original, but it’s a fraction of the size. You can hit this target using a great codec like H.264 with a low CRF value (around 18) or by using a pro format like Apple ProRes 422 HQ.
High Bitrate vs. Low CRF: Which Wins for Quality?
A low CRF (Constant Rate Factor) value will give you a better-looking result almost every single time. It's just a smarter way to compress. CRF mode is dynamic; it gives more data to complex, fast-moving scenes and dials it back for simple, static shots.
This approach keeps the perceived quality incredibly consistent throughout the entire video. A high constant bitrate (CBR), on the other hand, is clumsy. It can waste data on a simple shot of a blue sky and then starve a complex action scene, causing noticeable artifacts right when you don't want them.
My Advice: Always go with CRF for top-tier visual quality. A CRF value between 18 and 23 for H.264 will consistently deliver a more efficient and better-looking file than just cranking up the bitrate.
Should I Lower the Resolution to Shrink the File?
Only if you have no other choice. Dropping a video from 4K to 1080p will absolutely make the file smaller, but you're permanently destroying pixel data you can never recover. This should be your last resort, not your first step.
A much better strategy is to start with a more efficient codec. For example, simply switching from the old standby H.264 to the newer H.265 (HEVC) can deliver massive file size savings on its own. Always try optimizing your compression settings first—you can often get the file size you need without sacrificing a single pixel of resolution.
How Do I Handle Videos with Transparency?
This is a big one. Standard codecs like H.264 and H.265 simply don't support transparency (known as the alpha channel). If you try to export a video with a transparent background using them, you’ll just get a solid black background instead.
To keep that transparency intact, you need a codec and container that are built for it.
- For professional workflows: The gold standard is Apple ProRes 4444 in a .MOV container. It’s what editors and motion graphics artists rely on.
- For the web: Your best bet is the VP9 or AV1 codec packed into a .WebM container. This is the modern, browser-friendly solution.
Choosing the right format here is critical for any work involving overlays, lower thirds, or visual effects where the background needs to show through.
Not long ago, creating videos with transparent backgrounds required expensive software and a lot of patience. Now, tools like VideoBGRemover make it simple. You can remove any background and export directly to pro-level formats like ProRes 4444 or web-ready WebM in just a couple of clicks. See for yourself by visiting the VideoBGRemover website and trying it for free.
Ready to Remove Your Video Background?
See a free preview before you buy.
No credit card required • Free preview on every video