Rotoscope After Effects: Master the rotoscope after effects workflow
Master rotoscope after effects with our complete guide. Learn Roto Brush 2, refine edges, and explore faster AI cutouts for flawless results.
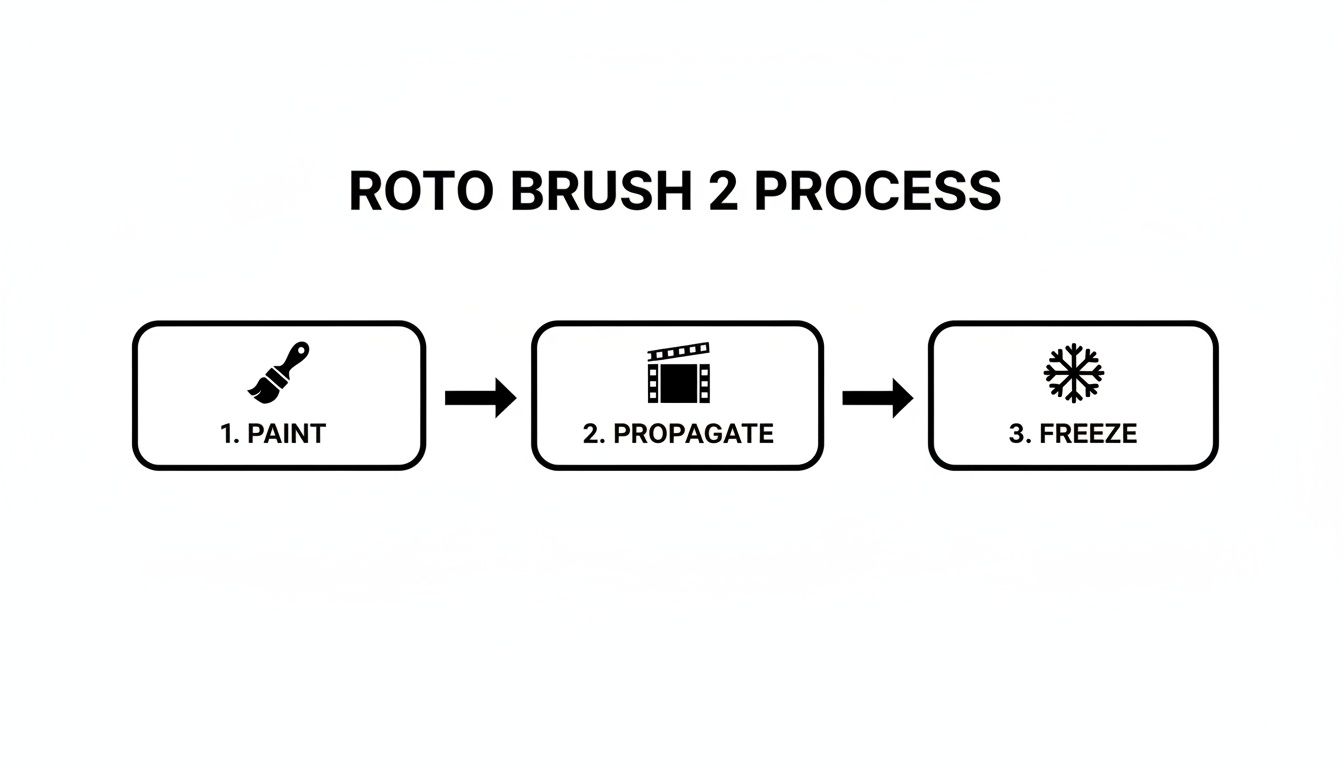
When you need to rotoscope in After Effects, your first and best option is usually the AI-powered Roto Brush 2 tool. It's designed to automate the incredibly tedious process of isolating a subject from its background.
Essentially, you just paint a rough selection on your subject in a single frame, and After Effects is smart enough to follow that subject across the entire clip. This can save you hours, even days, of work compared to the old-school manual methods.
The Evolution of Rotoscope in After Effects
Rotoscoping has been around forever, starting way back with early animation. It’s the art of tracing over footage, frame by painful frame, to create a cutout or matte. For decades, it was the only way to pull a character out of their environment to add visual effects. While the core concept is the same, the tools we use today are a world away from what they used to be.
Modern workflows in Adobe After Effects give you a whole range of options that go far beyond just tracing with the Pen Tool. The game really changed with the introduction of the Roto Brush tool, and especially its AI-powered successor, Roto Brush 2. A task that once required days of meticulous keyframing can now often be knocked out in a matter of minutes. This has opened up complex compositing to a much wider group of creators.
Understanding Your Rotoscope Options
A smart workflow is all about picking the right tool for the job. Your decision will really come down to how complex the shot is, the quality of your footage, and how tight your deadline is.
Not sure where to start? Here’s a quick look at the main methods to help you decide.
Choosing Your After Effects Rotoscope Method
This table breaks down the primary rotoscoping methods to help you figure out which one is best for your specific project.
| Method | Best For | Speed | Precision |
|---|---|---|---|
| Roto Brush 2 | Clear subjects against uncomplicated backgrounds. Great for people, objects. | Fast | High (with refinement) |
| Manual Masking | Complex shots, hair, heavy motion blur, or when AI fails. | Very Slow | Pixel-Perfect |
| AI Web Tools | Social media clips, quick drafts, simple backgrounds. | Very Fast | Low to Medium |
Ultimately, the best choice is the one that gets you the result you need within the time you have. A quick social media post doesn't need the pixel-perfect precision that a feature film shot does.
The goal isn't just to cut something out; it's to make the final composite look believable. Choosing the right rotoscoping method from the start is the most critical decision you'll make in the entire process, directly impacting both your timeline and the final quality.
This guide is all about getting hands-on with both Roto Brush 2 and the manual methods inside After Effects. Getting comfortable with both will give you the flexibility to tackle anything that comes your way, from a quick edit for Instagram to a demanding VFX shot.
Each method has its place, and knowing when to use which is what really separates a pro from a novice. To learn more about what this software can do, check out this comprehensive After Effects guide.
With that said, let's dive into the most powerful tool in your native AE arsenal: the Roto Brush 2.
A Hands-On Guide to the Roto Brush 2 Workflow
The Roto Brush 2 is your best friend inside After Effects for pulling a clean matte without spending hours tracing frame by frame. It’s an AI-powered tool that intelligently figures out what's foreground and what's background, which can be a massive time-saver. But getting a great result isn't automatic; it all comes down to a smart setup and understanding how the tool "thinks."
Before you even touch the brush, get your composition right. The Roto Brush algorithm feeds on data, so higher-resolution footage gives it more pixels to analyze, usually leading to a much better starting point. It’s also absolutely critical to match your composition’s frame rate to your source footage. A mismatch here is a recipe for headaches and unpredictable tracking.
Painting Your First Frame
To get started, just double-click your footage layer in the timeline. This pops it open in its own dedicated panel, which is where all the rotoscoping happens. Grab the Roto Brush tool from the top toolbar, and you'll see your cursor change to a green circle.
Now, find a clear frame to begin with—ideally, one where your subject is easy to see and isn't cut off. This is your "base frame," and getting it right makes everything that follows much easier.
- Green Means Go: Click and drag a green stroke inside the subject you want to cut out. You don't have to be perfect. A quick, rough line through the middle of the object is often all the AI needs to find the edges.
- Red Means Stop: If the tool gets a little overzealous and grabs part of the background, just hold down the Alt key (Windows) or Option key (Mac). Your cursor will turn red, and you can paint over any areas you want to remove from the selection.
After a few quick strokes, you should see a crisp magenta line—the "segmentation boundary"—hugging the outline of your subject. That's your matte.
The whole process is a pretty straightforward sequence of painting, letting the AI do its thing, and then locking it all down.
Letting It Propagate (With a Little Help)
Once you've nailed that base frame, the real magic starts. As you move the playhead forward or hit the spacebar, After Effects begins to "propagate" that selection from one frame to the next. The AI analyzes the motion and does its best to adjust the magenta line automatically.
This is where you need to play an active role.
My Pro Tip: Don't just hit play and walk away. That rarely works perfectly. Instead, move forward just a few frames at a time. Stop, check the matte, and make tiny corrections with green or red strokes where needed. This gives the AI constant feedback, helping it learn and preventing small errors from turning into big ones.
This iterative approach is far more efficient than letting a bad track run for hundreds of frames and then trying to fix it all at the end.
Don't Forget to Freeze!
After the Roto Brush has analyzed your whole clip and you’re happy with the result, there's one last, crucial step: hit the Freeze button. It’s sitting at the bottom-right of the Layer panel, and it’s non-negotiable.
Freezing your Roto Brush work does two incredibly important things:
- It locks in the matte. This saves the rotoscope data to your disk cache, which means After Effects won't try to re-calculate it every time you make a change elsewhere in your project. Your selection is safe from any weird, unexpected shifts.
- It supercharges your performance. Once the data is cached, playback is way smoother. After Effects just has to read the saved data instead of running that complex AI analysis on every single frame, every single time.
Honestly, skipping this step is one of the most common mistakes I see. It leads to frustration and results that seem to change on their own. Think of freezing as hitting "save" on all your hard rotoscoping work.
To really get the hang of this powerful tool, you can get more in-depth tips from our complete guide on the After Effects Roto Brush tool.
When Manual Rotoscoping Is the Only Answer
Let's be real: as amazing as the AI-powered Roto Brush 2 is, it's not a silver bullet. There are plenty of times when automated tools just can't hack it. You'll see flickering edges, parts of your subject disappearing, or the selection completely losing track. This is where you have to roll up your sleeves and go old-school with manual, frame-by-frame rotoscoping.
This classic technique gives you absolute, pixel-perfect control. It’s the only way to nail those high-end commercial projects or complex VFX shots where the AI gets confused. If you're dealing with poorly lit footage, erratic motion, or a subject that blends into a noisy, low-contrast background, going manual is often the faster route to a clean, professional result.

Mastering the Pen Tool for Precision
Manual rotoscoping in Adobe After Effects boils down to two things: Masks and the Pen Tool. Forget painting a selection; here, you're drawing a vector shape—a mask—that traces the exact outline of your subject. The Pen Tool (shortcut G) is your weapon of choice.
Unlike a brush, the Pen Tool creates anchor points connected by lines, forming a mask path. A simple click sets a sharp corner. A click-and-drag creates a smooth, curved Bézier path. This is what gives you the control to trace anything, from the hard edges of a car to the organic curves of a person.
Think of it this way: tracing a building would be mostly sharp corners. Tracing a dancer, on the other hand, is all about mastering those Bézier curves to match the natural flow of their movement.
Animating the Mask Path Efficiently
The idea of adjusting a mask on every single frame is enough to make anyone quit. But that's not how the pros work. The key is to set keyframes only when the subject's shape changes in a meaningful way. This is the secret to efficient manual rotoscoping.
Here’s a practical approach to animating a mask:
- Draw Your Initial Shape: Jump to the first frame of your clip and use the Pen Tool to trace a tight, accurate mask around your subject. Nailing this first one saves a lot of headaches later.
- Set the First Keyframe: Select the layer and hit the M key to show the Mask Path property. Click that little stopwatch icon next to it to lock in your first keyframe.
- Jump Ahead in Time: Don't just go to the next frame. Scrub forward 5, 10, or even 20 frames—look for a point where the subject has moved enough that your mask is clearly off.
- Adjust and Repeat: Now, double-click the mask path to start editing. Drag the individual points or the whole shape to realign it with the subject. As soon as you make a change, After Effects automatically adds a new keyframe for you.
You just repeat this process. After Effects handles the in-between frames, smoothly morphing the mask's shape from one keyframe to the next. Your job is to step in only when that automatic transition isn't quite right.
The secret to fast manual rotoscoping isn't about working on every frame. It’s about identifying the most extreme points of motion—the 'peaks' and 'valleys' of the action—and setting your keyframes there first. You can then go back and add refinement keyframes in between only where necessary.
Refining Your Manual Matte
A perfect mask path is a great start, but a sharp edge rarely looks realistic. To make your cutout feel like it belongs in its new scene, you need to soften and refine those edges. You can do this right in the mask properties on your layer.
These three settings are your bread and butter for a seamless composite:
- Mask Feather (F): This is the most important one. It softens the mask's edge. A tiny feather, even just 2-5 pixels, is often all you need to take that harsh, digital "cutout" look off your subject.
- Mask Expansion: This control simply grows or shrinks your entire mask path. It's incredibly useful for getting rid of a thin line of background pixels (use a negative value) or if you find your mask is just a little too tight (use a positive value).
- Mask Opacity (T): You’ll usually leave this at 100%, but it’s keyframe-able, which is perfect if you need an object to fade in or out while staying perfectly masked.
For anything remotely complex, like a person whose arm creates a gap against their body, you'll need multiple masks on the same layer. You can set a main mask to "Add" mode for the body and then draw a second one set to "Subtract" mode to punch out the hole. This kind of granular control is something AI tools still struggle with, which is why mastering manual rotoscoping in After Effects remains a crucial skill for any serious motion designer.
Refining Edges for a Seamless Composite
Getting a rough matte with the Roto Brush tool is a great first step, but it’s rarely the last one. The real magic—what makes a composite look believable instead of like a sticker slapped onto a background—happens during refinement. This is where you focus on the subtle details along the edges to turn a good cutout into a great one.
When you start rotoscoping, After Effects automatically adds the Roto Brush & Refine Edge effect to your layer. Think of this as your control panel for all the crucial polishing work. It’s loaded with sliders that might look a bit intimidating at first, but each one has a specific job. Getting comfortable with these settings is what really separates amateur work from a professional-looking final product.
That last 10% of effort is what makes your subject feel like it truly belongs in its new home. Mastering the subtle art of rotoscoping and compositing is crucial for creating polished, professional-grade visual effects, which are essential when learning how to make marketing videos that actually convert.
Mastering the Core Refinement Sliders
Once your Roto Brush data is frozen, you can start fiddling with these settings without worrying about messing up the underlying matte. The best way to do this is in your main Composition panel with the new background visible, so you can see the real-time impact of your adjustments.
Here's what I find myself using most often:
- Feather: This is your go-to for softening up those hard, digital-looking edges. Just a small touch (maybe 2-5 pixels) can make a cutout feel much more natural. Just be careful not to push it too far, or you’ll end up with a blurry halo.
- Contrast: Think of this as the opposite of feathering. Cranking up the contrast will harden the matte’s edge. It’s incredibly useful for cleaning up any muddy or semi-transparent areas that look sloppy.
- Shift Edge: This slider is a total lifesaver. It lets you pull the entire matte in or push it out by a few pixels. If you've got a pesky thin line of the old background peeking through, a negative value like -15% will choke the matte inward and get rid of it.
- Reduce Chatter: This helps smooth out the matte's edge across multiple frames, killing that annoying flickering or "boiling" that can happen. I usually find a value between 20-50% is a good place to start.
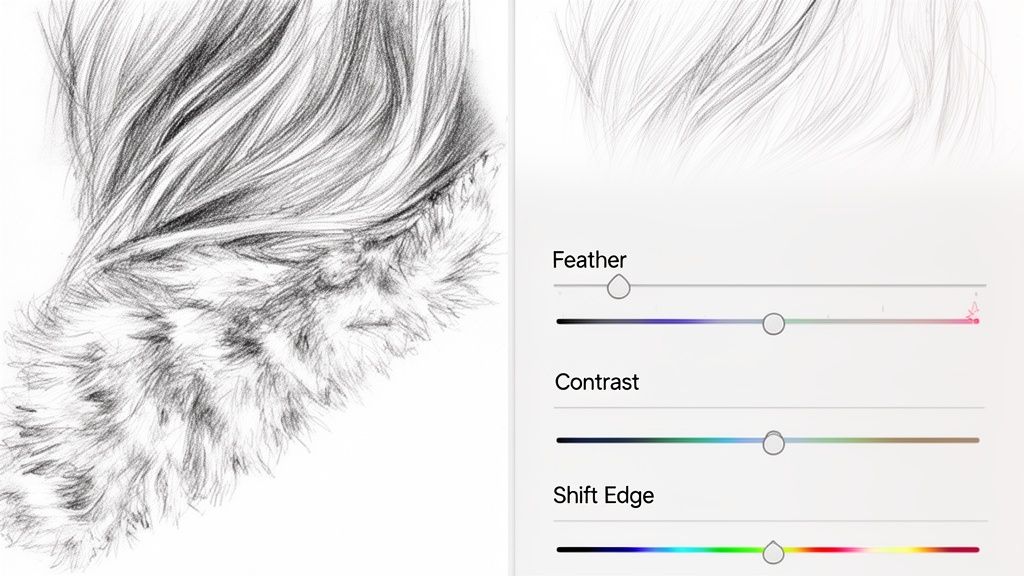
The Power of the Refine Edge Tool
Sometimes, sliders just won't cut it. This is especially true when you're dealing with incredibly tricky edges like hair, fur, or even the fuzz on a sweater. For these jobs, After Effects gives us the Refine Edge Tool, which you can find nested with the Roto Brush tool in the toolbar.
This tool is a game-changer. It lets you paint over those complex edges, telling After Effects to do a much deeper, more detailed analysis right where you need it. As you paint, the tool intelligently figures out what's a fine foreground detail and what's the background, creating a far more realistic matte than the standard Roto Brush ever could on its own. It's the secret weapon for making someone with flyaway hair look like they were actually filmed in the new scene.
For the best results, jump back into the Layer panel. Paint strokes that start in the background, cross over the detailed edge (like the hair), and end in the solid part of your subject. This gives the algorithm all the information it needs to make an intelligent separation.
Adding Realistic Motion Blur
Nothing screams "fake" like a perfectly sharp object dropped into a scene with motion. If your subject or the camera was moving in the original shot, you have to add that motion blur back in to sell the effect.
Thankfully, the Roto Brush effect has you covered.
Inside the effect controls, you’ll find a Motion Blur dropdown menu. Just switch this to "On" and adjust the Shutter Angle to match your new background footage. This will add a natural-looking, motion-aware blur to the edges of your rotoscoped subject. It’s a simple step that can make a massive difference in the realism of your composite. Getting this right is a key part of creating a high-quality asset. For those interested in advanced compositing, understanding how to work with a https://videobgremover.com/blog/transparent-video-background is essential for seamless integration.
A Faster AI Alternative for Tight Deadlines
Look, the Roto Brush and manual masking are fantastic tools inside After Effects, but they require you to be hands-on. You're the one guiding the brush, fixing errors, and tweaking keyframes. That's great for control, but what happens when the deadline is tomorrow and "good enough" is exactly what the project needs?
This is where dedicated, browser-based AI tools really shine. If you're cranking out content for social media daily or just need to get an idea in front of a client fast, spending hours rotoscoping in After Effects is a non-starter. Sometimes, you just need to hand the job off and get a clean result back in minutes.
The Zero-Input Workflow
Tools like VideoBGRemover operate on a completely different principle. There's no brush, no sliders, no keyframes. The entire process is boiled down to its simplest form: you upload a video, the AI does its thing, and you download a finished clip with a transparent background.
I find this approach is a lifesaver in a few specific situations:
- High-Volume Content: Think about a social media manager making multiple TikToks or Reels a day. This is a game-changer.
- Rapid Prototyping: Need to quickly see if a concept works? A fast AI cutout is perfect for testing an idea before you commit to a full manual rotoscope.
- Simple Background Removal: It's ideal for talking-head videos, product shots, or interviews where all you need to do is swap out a boring or messy background.
This shift toward automation is a huge trend. The AI segment of the visual effects market is exploding, largely because of tools that automate tedious tasks like rotoscoping. The market was valued at USD 4.87 billion in 2025 and is expected to rocket to USD 28.66 billion by 2035. You can read more about this market growth on snsinsider.com. It’s clear that AI is becoming a massive part of our workflows.
Bringing Your AI Asset Back into After Effects
So, you've got your perfectly cut-out video from the AI tool. Now what? Getting it back into your main After Effects project is simple, as long as you export it in a format that supports an alpha channel. That alpha channel is what holds all the transparency data.
You’ll usually have a few choices for your download:
- ProRes 4444: This is the gold standard for quality with transparency. The files are massive, but the results are pristine.
- PNG Sequence: A really flexible option that saves each frame as an individual PNG file. It's high-quality and easy to work with.
- WebM (VP9): A fantastic modern format. It supports transparency but keeps file sizes much smaller, which is great for web projects or just saving disk space.
Once downloaded, just import the file or image sequence into your After Effects project bin like any other footage. Drag it onto your timeline above your new background, and you're ready to start color grading, scaling, and blending it into your final composite. If you're curious about the tech behind this, check out our guide on AI video background removal.
The whole point here is efficiency. By letting a specialized AI handle the grunt work of the initial cutout, you get to spend your time on the fun stuff—the creative compositing, color work, and motion design that happens back in After Effects. It's not about replacing your skills; it's about making your workflow smarter and faster.
Got Roto Questions? We've Got Answers
Even with the best tools, rotoscoping can throw you a curveball. You're not alone—certain issues pop up for just about everyone, from beginners to seasoned pros.
Here, we'll tackle some of the most common questions and sticking points that artists run into when trying to rotoscope in After Effects. Let's get you unstuck and back to creating.
Why Is My Roto Brush Selection Changing Between Frames?
Ah, the dreaded "matte chatter" or "boiling edges." This happens when the Roto Brush algorithm re-evaluates the matte on every frame, and tiny inconsistencies cause the edge to flicker and crawl. It's incredibly frustrating to watch your perfect selection fall apart.
First, always start with clean, confident foreground and background strokes. If the chatter persists after Roto Brush has propagated through the clip, your best friend is the Freeze button. Clicking this locks in the existing rotoscope data and tells the AI to stop making any more changes.
For any minor boiling that still lingers, try tweaking the Reduce Chatter setting in the Roto Brush effect controls. It does a decent job of averaging out the jitter for a smoother final result.
How Long Should It Really Take to Rotoscope a 10-Second Clip?
This is the ultimate "it depends" question in visual effects. The answer can swing from a few minutes to a few days based entirely on the complexity of your shot and the method you choose.
To give you a realistic idea for a 10-second clip:
- Fully Automated AI Tool: Using a service like VideoBGRemover is the fastest route. We're talking a handful of minutes from upload to download.
- After Effects Roto Brush 2: For a subject with decent contrast and clear edges, you're probably looking at 20-40 minutes of work, including the initial painting and refinement passes.
- Manual Frame-by-Frame: Now, if you're dealing with something complex—like a dancer with flowing hair or intricate details—that same clip could easily take 8 to 20+ hours of meticulous, hands-on work.
The key is to match your technique to your deadline and quality needs. Don't sink a full day into manual masking for a quick social media post when a faster tool will do.
Can I Rotoscope a Low-Resolution or Blurry Video?
You can, but you have to be realistic about the outcome. Rotoscoping low-quality footage is significantly harder, and the final matte will never be as precise as one from a sharp, well-lit source.
AI tools like Roto Brush 2 really struggle here. They need clear data to define an edge, and blurry or compressed pixels make that nearly impossible. You’ll find the selection slipping and grabbing onto things you don't want.
In these cases, good old-fashioned manual rotoscoping is often the only reliable option. A human eye can interpret where an edge should be far better than an algorithm can. You'll also need to lean heavily on the Mask Feather property to help blend your subject's soft edges into its new background.
The demand for these skills is growing fast. The global visual effects market, valued at around USD 9.60 billion in 2023, is projected to hit USD 22.42 billion by 2032, with automation playing a huge role. You can dig into more of these visual effects market trends on skyquestt.com.
What’s the Best Format for Exporting with Transparency?
This is a critical step that trips a lot of people up. If you export your rotoscoped clip as a standard MP4 (H.264), all your transparent areas will just turn black. You need a format that supports an alpha channel—the part of the video file that holds the transparency information.
When you send your comp to the Render Queue in After Effects, make sure you choose one of these combinations:
- Apple ProRes 4444: This is the undisputed industry standard for high-quality video with an alpha channel. The files are large, but the quality is pristine.
- PNG Sequence: This exports every single frame as its own transparent PNG image. It's a lossless and flexible format, though managing thousands of individual files can be a bit of a hassle.
- GoPro CineForm: Another fantastic, high-quality codec that fully supports an alpha channel and works great on both Mac and Windows.
Getting your export settings right ensures that all the hours you spent rotoscoping are perfectly preserved for the next step in your pipeline.
Ready to skip the tedious parts of rotoscoping and get a perfect cutout in minutes? VideoBGRemover uses powerful AI to remove your video's background with zero manual effort. Just upload your clip, and get a professional, transparent result ready for your After Effects composite. Try it for free at https://videobgremover.com.
Ready to Remove Your Video Background?
See a free preview before you buy.
No credit card required • Free preview on every video