Master the After Effects Rotobrush Tool
Discover how to use the After Effects Rotobrush tool for flawless video cutouts. This guide covers pro techniques, edge refinement, and common fixes.
When you need to pull a subject out of a video and you don't have a green screen, the After Effects Rotobrush is your go-to tool. It’s an AI-driven feature that intelligently isolates moving subjects, turning what used to be days of tedious work into a much faster process. Mastering it is a must for anyone serious about creating clean composites and professional-level visual effects.
From Manual Frames to AI Precision
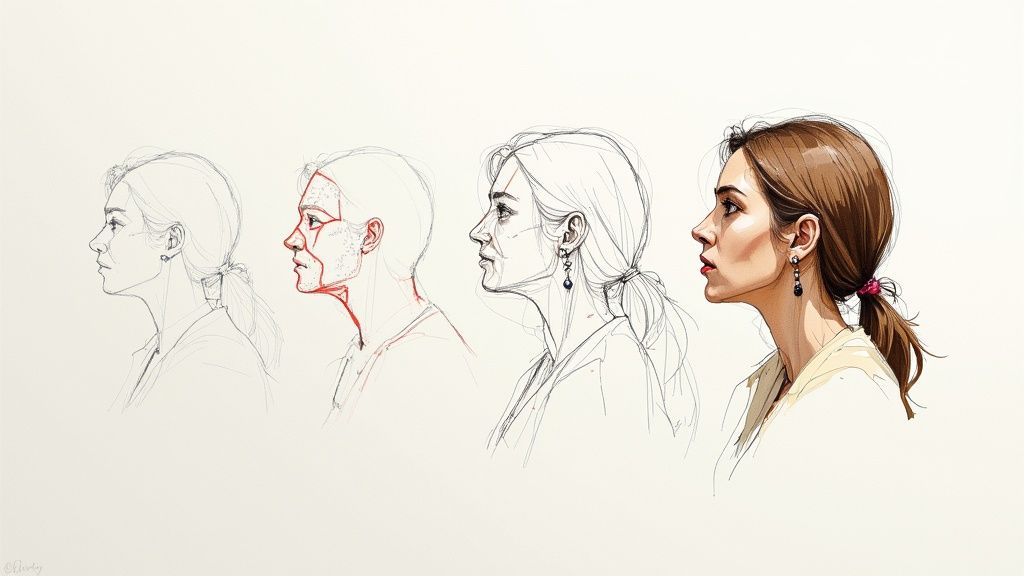
Before we get our hands dirty, it’s worth taking a moment to appreciate just how far this technology has come. Understanding the evolution of the Rotobrush helps you grasp why it works the way it does and how much of a game-changer it really is. Not long ago, isolating a subject from its background was one of the most dreaded tasks in all of post-production.
The Pain of Traditional Rotoscoping
In the old days, rotoscoping was a purely manual, frame-by-frame grind. An artist would have to painstakingly trace the outline of their subject on every single frame. Think about that for a second: a simple five-second clip at 24 frames per second meant drawing 120 individual masks by hand.
It took incredible patience and a super steady hand, and even then, the results often had that tell-tale jittery edge that gave away the manual effort. This grueling process meant that complex background removal was a luxury only big-budget productions could afford. For most creators, it just wasn't practical.
The Dawn of a Smarter Tool
The first version of the Roto Brush was a huge leap forward. You could paint a rough selection on one frame, and the tool would try to carry that selection forward. It was a major improvement, but it often got tripped up by tricky edges, fast motion, or fine details, meaning you still had to do a lot of manual cleanup.
This early version, however, paved the way for something much more powerful. Adobe knew the goal was to build a tool that could actually understand what it was looking at, not just track pixels.
You can see the core concept in action here, where you’re essentially telling After Effects what to keep and what to get rid of.
This simple act of painting green for the foreground and red for the background is the foundation of the entire workflow.
The AI-Powered Evolution: Roto Brush 2 and Next-Gen
The real magic arrived with Roto Brush 2, which Adobe released with After Effects 17.5 in October 2020. This was the version powered by Adobe Sensei, the company's AI and machine learning engine. The tool was no longer just tracking pixels; it was performing genuine object recognition. Roto Brush 2 could finally tell the difference between a person and the wall behind them, giving you far more accurate selections with way fewer corrections.
This evolution has only gotten better, with the AI-powered Next-Gen Roto Brush refining the model even further. The latest version is incredible at handling notoriously difficult elements like wisps of hair and transparent objects. It uses advanced algorithms to track subjects so well that the need for constant manual adjustments has dropped dramatically.
The real win here is time. A task that once took a full day of meticulous, mind-numbing work can now often be knocked out in less than an hour. This frees you up to focus on being creative instead of getting bogged down in technical chores.
This AI-driven approach isn't just happening in After Effects; it's a trend across the entire video editing industry. If you want to see how other tools are tackling this, it's worth checking out the best AI video editors on the market. While Rotobrush is a specialized feature, many other platforms offer powerful background removal, and we’ve even covered several great options in our guide to the best AI tools for video background removal.
Your Core Rotobrush Workflow
Alright, let's get our hands dirty. Forget the dry, technical manuals for a moment and think of this as an over-the-shoulder session where we'll tackle a real rotoscoping job. The secret to the After Effects Rotobrush isn't just knowing which button to click; it's about understanding why you're making each move to get a clean, stable matte that doesn't chatter or fall apart.
Before you even think about grabbing the tool, a little prep work will save you a world of hurt. Make sure your footage is isolated in its own composition. If you're wrestling with high-res footage like 4K, do yourself a favor and drop the preview quality down to Half or even Quarter. This won't touch your final output quality, but it will make the tool feel so much snappier and more responsive.
Choosing Your Starting Point: The Base Frame
Your very first decision is probably your most important one: picking the base frame. This is the single frame where you draw your initial selection, and it becomes the main reference point After Effects uses to figure out what it's supposed to be tracking.
A bad base frame can send you down a rabbit hole of endless corrections. Fight the urge to just start on frame one. Instead, take a moment to scrub through the clip and find that one perfect frame where your subject pops off the background.
I always look for a moment with:
- Clear Separation: The subject’s edges are crisp and easy to distinguish.
- Full View: As much of the subject is visible as possible, without being hidden by other elements.
- Minimal Motion Blur: A sharp frame gives the algorithm more concrete data to work with.
Once you’ve found your hero frame, double-click the layer in your timeline. This is key—it pops the footage open in the Layer panel, which is the only place the Rotobrush tool will work. Trying to use it in the main Composition panel is a classic rookie mistake. Now, grab the Rotobrush tool from the toolbar; it's the one that looks like a little person with a paintbrush.
Making Your First Selection
With the tool active, your cursor becomes a green circle. Time to tell After Effects what you want to isolate. Just click and drag a rough stroke inside your subject. Don't stress about being pixel-perfect here. Your goal is a simple green line that covers the main mass of your foreground element.
When you let go, the tool thinks for a second and then snaps a magenta outline around what it thinks you want. Honestly, it often gets impressively close on the first go, but it’s almost never perfect. You’ll usually see little bits of the background creeping in or parts of your subject that got left out.
This is where the real work begins. To subtract from the selection, just hold the Alt (Windows) or Option (Mac) key. Notice how your cursor turns red? Now you can paint over any areas you want to kick out. I’ve found that short, deliberate strokes work way better than trying to draw one giant, sweeping line.
Pro Tip: You can resize your brush on the fly by holding Ctrl (Windows) or Command (Mac) and dragging your mouse left or right. A tiny brush is your best friend for getting into tight corners and cleaning up hair, while a bigger brush is great for that initial rough pass.
Understanding and Managing Propagation
Once you’re happy with the selection on your base frame, it's time to let After Effects take over. This next step is called propagation, where the software intelligently tries to apply your selection to the rest of the clip. Just hit the spacebar to play forward.
You’ll see a green bar chugging along at the bottom of the Layer panel, showing you which frames have been processed. The most important thing you can do here is watch that magenta outline like a hawk. The AI is constantly re-evaluating, but it can easily get tripped up by fast motion, tricky lighting changes, or when the background color is too similar to your subject.
The second you see the selection wander off—maybe it loses track of a hand or grabs a chunk of a distracting background object—hit the spacebar to stop. Navigate right to that problem frame and give it a little guidance. A quick corrective stroke with the green brush to add something back, or the red brush to take something away, is all it takes. Once corrected, hit the spacebar again to continue propagating. You’re essentially acting as the supervisor, nudging the AI back on track whenever it gets confused.
Freezing Your Work to Save Your Sanity
After the propagation has run its course and you've cleaned up any problem spots, there’s one last critical step: Freezing the selection. Look for the "Freeze" button at the bottom right of the Layer panel and click it.
Why is this so non-negotiable? An unfrozen Rotobrush selection is "live," meaning After Effects is constantly using processing power to be ready to re-calculate it. This can absolutely cripple your project's performance.
Freezing does two beautiful things for you:
- Locks in the Matte: It caches all your hard work, preventing you from accidentally messing up the selection and ensuring it stays perfectly consistent.
- Boosts Performance: It frees up a massive amount of system resources, making playback and everything else you do in your project feel smooth again.
If you spot a mistake later, no sweat. You can just click the Freeze button again to unlock it, make your fix, and re-freeze. Making this a habit will save you from so many performance headaches.
Getting Clean Edges for a Seamless Composite
Nailing a rough selection with the After Effects Rotobrush is really just the first pass. The true magic happens when you start finessing the edges. A sharp, perfect outline is a dead giveaway that something's been cut out, and that's what we want to avoid. This is where you elevate a decent roto into a professional-looking composite, making your subject look like it actually belongs in its new scene.
Once you’ve frozen your initial rotoscope, the Refine Edge panel is where you'll spend your time. These sliders are your secret weapon for that delicate finishing work. They offer a level of control that can absolutely make or break your final composite. Let's dig into what each one really does and, more importantly, when to use it.
Mastering the Refine Edge Controls
Think of these settings as a constant balancing act. If you push one slider too far, you’ll just create new problems. The real trick is to make small, gradual adjustments and constantly flip back and forth, checking your work against the background you're actually compositing it onto.
Feather: This is your primary tool for softening the matte's edge. Even a tiny bit of feather—I'm talking just 1-3 pixels—can take that harsh digital sharpness off, making the edge feel much more organic. But go easy. Overdo it, and you’ll get a blurry, tell-tale halo effect that looks just as fake as a razor-sharp line.
Contrast: This slider does the opposite of Feather; it sharpens and hardens the edge. If you've softened things up a bit too much and lost definition, a slight bump in contrast can bring it right back. I often find myself nudging Feather up slightly, then adding a little Contrast to find that sweet spot where the edge is soft but still crisp.
Shift Edge: This one is a lifesaver for tightening up your selection boundary. A negative value sucks the matte inward, which is perfect for killing that thin sliver of the original background that might be peeking through. I find that a value somewhere between -5% and -10% is usually all you need to clean up minor edge contamination. Pushing it into positive values expands the edge, which I use less often, but it can help if your initial roto was too aggressive and ate into your subject.
Reduce Chatter: We've all seen it—that annoying jitter or "chatter" where the matte edge seems to flicker between frames. This setting is designed to fix exactly that. It averages the matte's position over a few frames to create a much more stable outline. Start low, around 20-30%, and only increase it if the flickering persists.
The goal is always subtlety. The audience should never even think about the edges of your rotoscope. The second they do, the illusion is shattered. Small, combined tweaks across these different sliders will always give you a better result than just cranking one of them to the max.
Tackling Tricky Details Like Hair and Motion Blur
The standard sliders are great for solid objects, but what about the really tough stuff? I'm talking about wispy hair, motion-blurred arms, or semi-transparent fabric. These require a more specialized approach, which is where the Refine Edge Tool comes into play.
This tool, which looks like the regular Rotobrush icon but with a jagged line next to it, is built for these complex edges. You just select it and paint along a problem area, like the edge of someone's hair. After Effects then takes a much closer look at the pixels in that area, trying to create a more detailed matte that preserves all those fine strands. It’s not quite magic, but it's incredibly good at capturing details that would otherwise be lost.
The AI baked into these tools is a huge part of why they work so well. In fact, industry data suggests that rotoscoping time has dropped by as much as 50% with the latest Roto Brush, mainly because its improved object tracking and edge detection mean far fewer manual fixes. This kind of efficiency is exactly why it's become a staple in professional VFX workflows. You can dive deeper into these AI enhancements on Adobe's official help page.
Blending Your Subject into the Scene
Finally, there are a couple of checkboxes that can be the final touch to make your subject look like it was actually filmed in the new environment.
Use Motion Blur: If your subject is moving, it should have motion blur. The Rotobrush can sometimes create an unnaturally crisp edge on a fast-moving object. Ticking this box tells After Effects to analyze that movement and reintroduce the appropriate blur back onto the matte's edges. It’s a simple click that makes a huge difference in realism.
Decontaminate Edge Colors: This is a seriously powerful feature for fixing "color spill"—that annoying halo of color from the original background that bleeds onto your subject's edges (like green from a greenscreen). This tool subtly pulls colors from just inside your subject's edge and pushes them outward, neutralizing that unwanted color tint. It’s an essential last step for a believable composite.
Ultimately, taking the time for these refinement steps is what separates a quick-and-dirty cutout from a professional-grade composite. If you're looking to use these skills to create videos with see-through backgrounds, our guide on how to make a video with a transparent background offers more tips and workflow ideas.
Solving Common Rotobrush Headaches
Even with its impressive AI, the After Effects Rotobrush isn't magic. Let’s be honest, it can get confused, leading to some truly frustrating moments that can throw your whole workflow off schedule. This is your field guide for figuring out what's gone wrong and how to fix it, so you can get back to creating instead of endlessly correcting.
From those annoying little edge flickers to a full-blown performance meltdown, most of these problems have a pretty straightforward solution. The trick is knowing what to look for.
This infographic breaks down how often people run into specific Rotobrush issues.
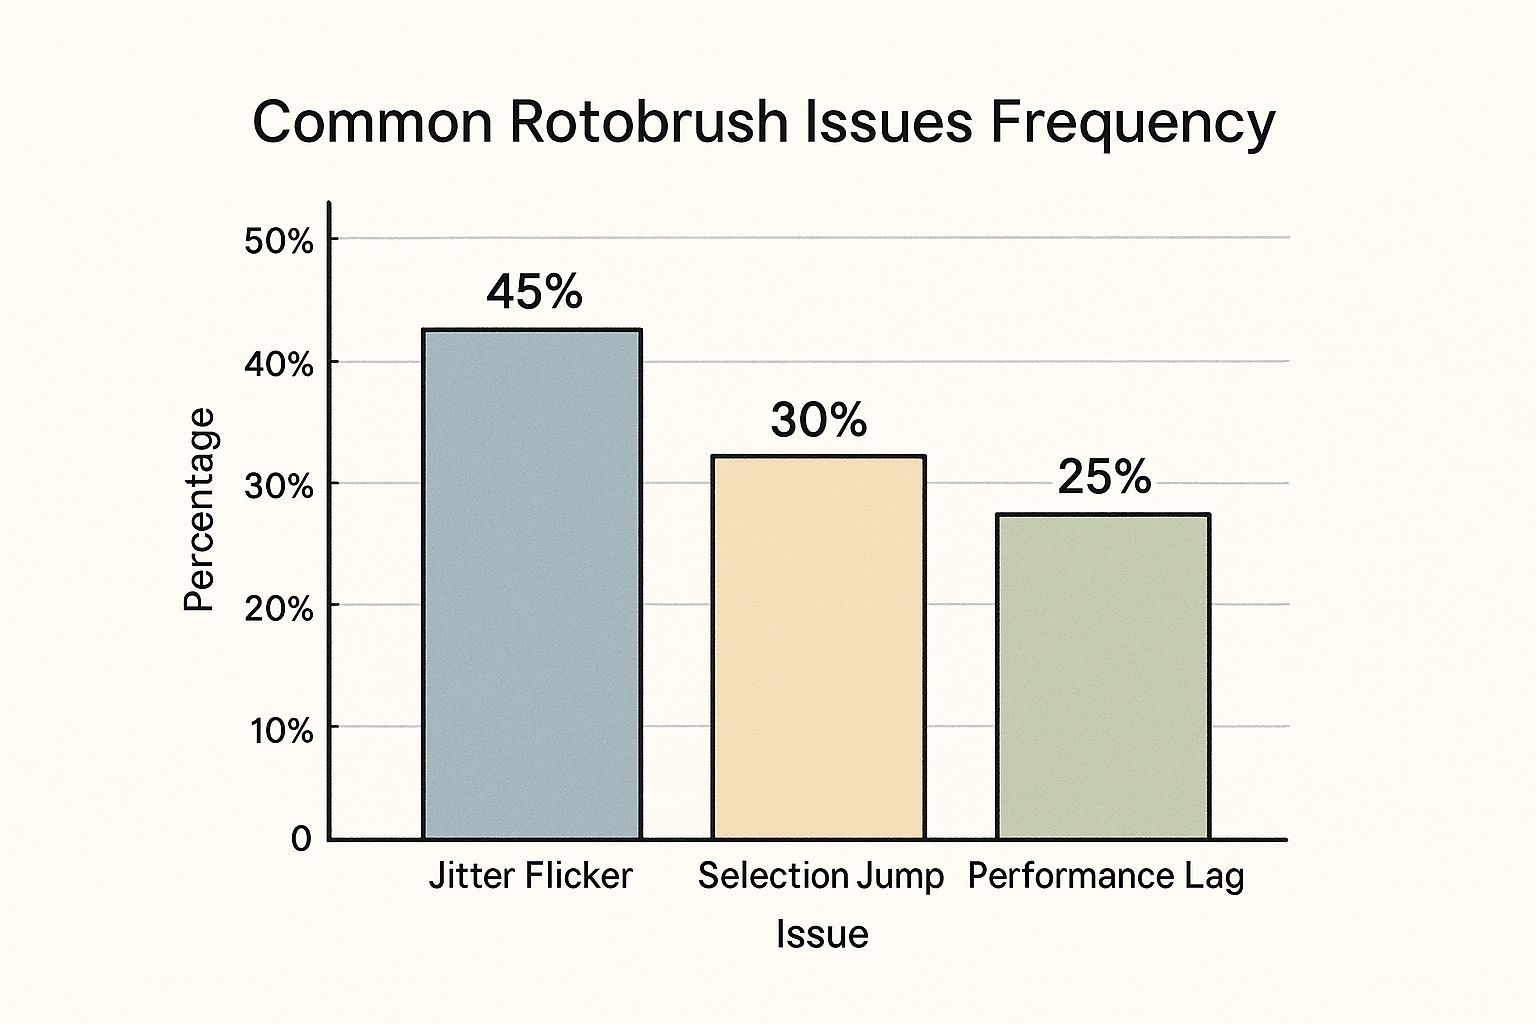
As you can see, jittery edges are the number one complaint, showing up in nearly half of all troubleshooting sessions. After that, it’s selections going rogue and the tool slowing your machine to a crawl.
Fixing Matte Chatter and Jittery Edges
The most common headache by far is "chatter"—that distracting flicker where the matte's edge seems to vibrate or "boil" from one frame to the next. It’s a dead giveaway of a rotoscoped shot and instantly makes your work look unstable. This usually crops up when the tool isn't quite sure where the edge is, often thanks to motion blur or low contrast between your subject and the background.
Your first move should always be the Reduce Chatter setting inside the Roto Brush & Refine Edge effect controls. Don't just crank it to 100%. Start low, maybe around 25%, and see what happens. This feature tells After Effects to average out the matte across a few frames, which almost always results in a more stable, clean line.
If the chatter hangs around, it's likely a propagation problem. Go frame-by-frame through the jittery section. I guarantee you'll find a frame or two where the selection is just slightly off. A tiny manual fix on these problem frames gives the AI new information, often smoothing out the rest of the sequence automatically.
When Your Selection Jumps Unexpectedly
We've all been there. You're cruising along, propagating your matte, and suddenly the selection snaps to a random object in the background. This usually means something back there has a similar color or brightness to your foreground subject, and the algorithm got confused.
When this happens, you need to be a more assertive director.
- Set Corrective Keyframes: As soon as you see the error, stop. Hold down Alt (or Option on Mac) and use the red brush to paint out the mistake. This tells After Effects exactly what not to include and creates a new keyframe to guide the propagation from that point forward.
- Check Your Base Frame: Sometimes, the problem started right at the beginning. Go back to your very first frame and make sure that initial selection is as tight and clean as possible. A tiny bit of background bleeding in at the start can cause major headaches down the line.
- Work in Shorter Bursts: If a particular section of your clip is a nightmare to roto (think fast motion or crossing objects), shorten the Roto Brush span in the controls. This forces you to create more base frames, but it also gives the tool less rope to hang itself with.
A classic rookie mistake is trying to fix a huge jump with one giant corrective stroke. It's much more effective to back up a few frames before the error, make a small, precise adjustment, and let the tool recalculate from that more stable point.
Tackling Performance Lag and Slowdowns
The Rotobrush is a beast, and it can bring even a powerful machine to its knees. If After Effects is chugging and stuttering, you can speed things up dramatically without hurting your final output. The golden rule is simple: Freeze your matte the second you’re happy with it.
An unfrozen matte is "live," which means After Effects is constantly keeping its calculations ready in case you make a change. When you hit the Freeze button, you lock in the matte, which frees up a massive amount of processing power for everything else.
Beyond that, you can also manage your system resources more effectively:
- Lower Your Preview Resolution: In the Composition panel, switch your preview from "Full" to "Half" or "Quarter." This only affects the preview you're looking at, not your final render quality.
- Purge Your Cache: Every so often, go to Edit > Purge > All Memory & Disk Cache. This clears out all the temporary files After Effects has been storing, which can really help clear the cobwebs.
- Shorten Your Work Area: Use the B and N keys to set your work area to just the clip you're actively working on. This prevents After Effects from trying to process the entire timeline in the background.
When to Use Rotobrush Over Other Tools
The After Effects Rotobrush is a massive time-saver, but it’s not a magic wand you wave at every background problem. The real mark of an experienced editor is knowing which tool to grab for the job. Making the right call from the start can be the difference between a few hours of work and a few days of headaches.
Rotobrush really comes into its own when you’re handed footage from the real world, not a controlled studio. Imagine trying to isolate a person walking through a crowded city street, a band playing on a stage with flashing lights, or an athlete sprinting across a field. The background is chaotic and has no single, consistent color, which instantly rules out simpler keying methods.
When Rotobrush Is Your Best Bet
This is exactly the kind of mess Rotobrush was designed to handle. Its semi-automated tracking is smart enough to follow a subject against a background that's constantly changing.
Here’s when you should definitely reach for the Rotobrush:
- Complex or “Dirty” Backgrounds: If the background is full of different colors, textures, and moving parts, Rotobrush is your champion.
- No Green Screen Available: It’s the essential tool for rescuing footage that was never intended for background removal.
- Moderate Subject Motion: The tool is fantastic for tracking subjects that move naturally. It can get tripped up by extreme motion blur, but for most standard movement, it’s perfect.
The impact of modern tools like the Next-Gen Roto Brush is huge. Some studios have seen productivity jump by 20-30% simply because they can turn around complex VFX shots much faster. This lets artists focus on creativity instead of mind-numbing manual work. You can find more details on these workflow improvements at VideoHelp.
When to Consider Alternatives
Just because you can use Rotobrush doesn't always mean you should. For certain shots, other methods will give you a better result in a fraction of the time.
Chroma Keying (Green Screen)
If your subject was filmed against a solid green or blue screen, don't even think about Rotobrush. Keying is the way to go. Tools like After Effects' Keylight or Premiere Pro's Ultra Key are built specifically for pulling a clean matte from a single color, and they do it beautifully. You can preserve incredibly fine details, like individual strands of hair, with very little effort. If you need a refresher, our guide explains how to use Chroma Key in Premiere Pro in detail.
Manual Rotoscoping (Frame-by-Frame)
It might sound old-school, but for super short clips (think a second or two) or when you need absolute, pixel-perfect control over a hard-edged object, drawing masks by hand can actually be faster. You skip the processing time of Rotobrush and avoid any of its potential AI quirks.
Fully Automated AI Services
When speed is everything and you don't need the granular control of After Effects, a browser-based tool like VideoBGRemover is a lifesaver. It’s ideal for social media clips, quick talking-head videos, or any project where "good enough" is all you need, and you need it now.
Rotoscoping Method Comparison
Choosing the right technique comes down to your source footage, your deadline, and the quality you're aiming for. This table breaks down the key differences to help you decide.
| Method | Best For | Speed | Precision | Learning Curve |
|---|---|---|---|---|
| After Effects Rotobrush | Complex, dynamic backgrounds | Medium | High | Medium |
| Chroma Key (Green Screen) | Studio shots with a solid background | Fast | Very High | Low |
| Manual Rotoscoping | Short clips needing pixel-perfect control | Slow | Highest | High |
| AI Services (VideoBGRemover) | Quick turnarounds, simple backgrounds | Very Fast | Good | Very Low |
Ultimately, the best approach is the one that gets you the desired result most efficiently.
Your choice of tool should always be dictated by the footage itself and your final goal. There is no single "best" method, only the most appropriate one for the job at hand.
Got Rotobrush Questions? Let's Get Them Answered.
Even after you've spent some time with the Rotobrush in After Effects, you're bound to run into some head-scratchers. It’s a deep tool, and certain situations can be a real pain. Here are a few of the most common questions I hear from editors, both new and old.
Can I Really Use The Roto Brush On Any Kind Of Footage?
Look, while the Rotobrush feels like magic, it’s not a silver bullet for every single clip. It truly shines when there's a good, clean separation between your subject and whatever is behind them. Think well-lit, high-resolution footage with sharp focus and not a ton of motion blur. That’s the kind of clean data the AI loves to chew on.
Where it really starts to stumble is with problem footage. You'll have a tough time with:
- Low-Light or Grainy Video: All that noise just confuses the heck out of the edge detection.
- Low-Contrast Scenes: If your actor is wearing a gray shirt against a gray wall, the tool is going to struggle to see the difference.
- Crazy Motion Blur: When the edges are smeared across the frame, there's just not enough distinct information for the tool to track properly.
Here’s a pro tip I use all the time: Do a quick and dirty color correction before you even touch the Rotobrush. Just crushing the blacks and boosting the contrast can make your subject pop, giving the tool a much easier job.
Why Is The Roto Brush Tool Crawling On My Machine?
If you feel your computer grinding to a halt, don't worry, it's not just you. The Rotobrush is an absolute beast on your processor. It’s analyzing pixel data, frame by frame, trying to figure out what’s what.
More often than not, the lag comes down to a few usual suspects. You might be working with massive 4K files, trying to rotoscope a really long clip, or your system is just running low on RAM. A quick fix is to knock your preview quality down to "Half" or even "Quarter" in the Composition panel. Also, get into the habit of clearing out your cache every so often by heading to Edit > Purge > All Memory & Disk Cache....
But honestly, the biggest game-changer for performance is this: Freeze your Roto Brush selection the second you’re happy with it. This locks the matte down and tells After Effects to stop re-analyzing it, freeing up a huge chunk of your system's resources.
What’s The Big Deal With Roto Brush 2 vs. Next-Gen?
Both are powered by AI, but the Next-Gen Roto Brush (which showed up in After Effects 24.0) is the latest and greatest version. The original Roto Brush 2 was a massive step up, bringing in Adobe Sensei AI for way better tracking. Next-Gen just takes that same foundation and dials it up with a much smarter AI model.
The real win for the Next-Gen version is how it handles the tricky stuff. It’s noticeably better at dealing with overlapping objects—like when an arm passes in front of someone’s face. It’s also way more reliable when a subject ducks out of the frame for a second and then comes back. The edge detection is just more refined, especially for things that used to be a nightmare, like wisps of hair or semi-transparent fabrics.
Bottom line: If you have Next-Gen Roto Brush available in your version of After Effects, just use it. It’s almost always going to give you a better, faster result.
And for those times when you just need the background gone now without diving into the complexities of After Effects, VideoBGRemover is an incredibly fast alternative. You just upload your video, and our AI does the heavy lifting in a few minutes, giving you a clean cutout without the manual labor. It's perfect for quick social media clips, ads, or any project where speed is your top priority. You can give it a try for free right here.
Ready to Remove Your Video Background?
See a free preview before you buy.
No credit card required • Free preview on every video