Professional Video Editing Tips to Instantly Elevate Your Content
Unlock your creative potential with professional video editing tips. Learn to master pacing, color grading, and audio to produce stunning, high-quality videos.
If you ask any seasoned editor for their top professional video editing tips, they'll likely skip the fancy effects and go straight to the basics: a rock-solid organization system, a sharp sense of story and pacing, and a command of the technical details like color and audio. Getting these fundamentals right is what truly elevates your work from amateur to professional.
Building Your Foundation For a Flawless Edit
Long before you even think about importing a clip, the real editing work begins. This setup phase is, without a doubt, the most important part of the entire process. Get it right, and you'll avoid lost files, frustratingly slow performance, and creative roadblocks later on. It’s all about creating a clean, structured environment so you can focus on being creative, not on hunting for assets.
An organized project is a fast project. Nothing kills your creative flow faster than digging through a dozen unnamed folders for that one perfect sound effect or graphic. The single most effective habit you can build is a strict, repeatable folder structure.
The Essential Folder Structure
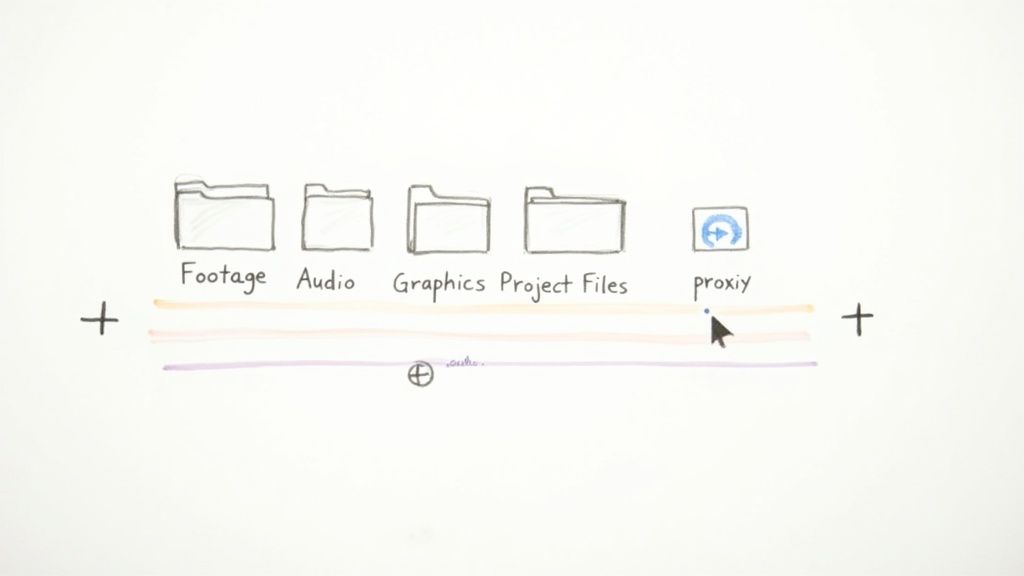
Kick off every single project by creating one master folder. Inside that, build out a clear hierarchy for every type of asset you'll be using. This isn't just about being tidy; it's a predictable system that will save you countless hours of pure frustration.
A solid, go-to setup looks something like this:
- 01_Project Files: This is home for your primary editing file—your Premiere Pro or DaVinci Resolve project. Keeping it separate is a simple way to make sure you never accidentally delete it.
- 02_Footage: All your raw video clips live here. I often create subfolders organized by camera or shooting date, which makes finding specific shots a breeze.
- 03_Audio: A dedicated spot for all external audio. Think dialogue from a separate recorder, sound effects, and, of course, your music tracks.
- 04_Graphics: Logos, lower thirds, animations, and any other visual elements should be stored here.
- 05_Exports: All your final rendered videos go in this folder, keeping them completely separate from your source material.
This simple structure means that no matter how big or complex the project gets, every single file has a logical home. It also makes handing off a project to another editor a completely painless process. If you want to see these principles in action within a specific niche, this expert guide to real estate video editing offers some fantastic, industry-specific insights.
The biggest time-saver in video editing isn't a fancy keyboard shortcut; it's knowing exactly where every file is the moment you need it. A disciplined folder structure is your best defense against chaos.
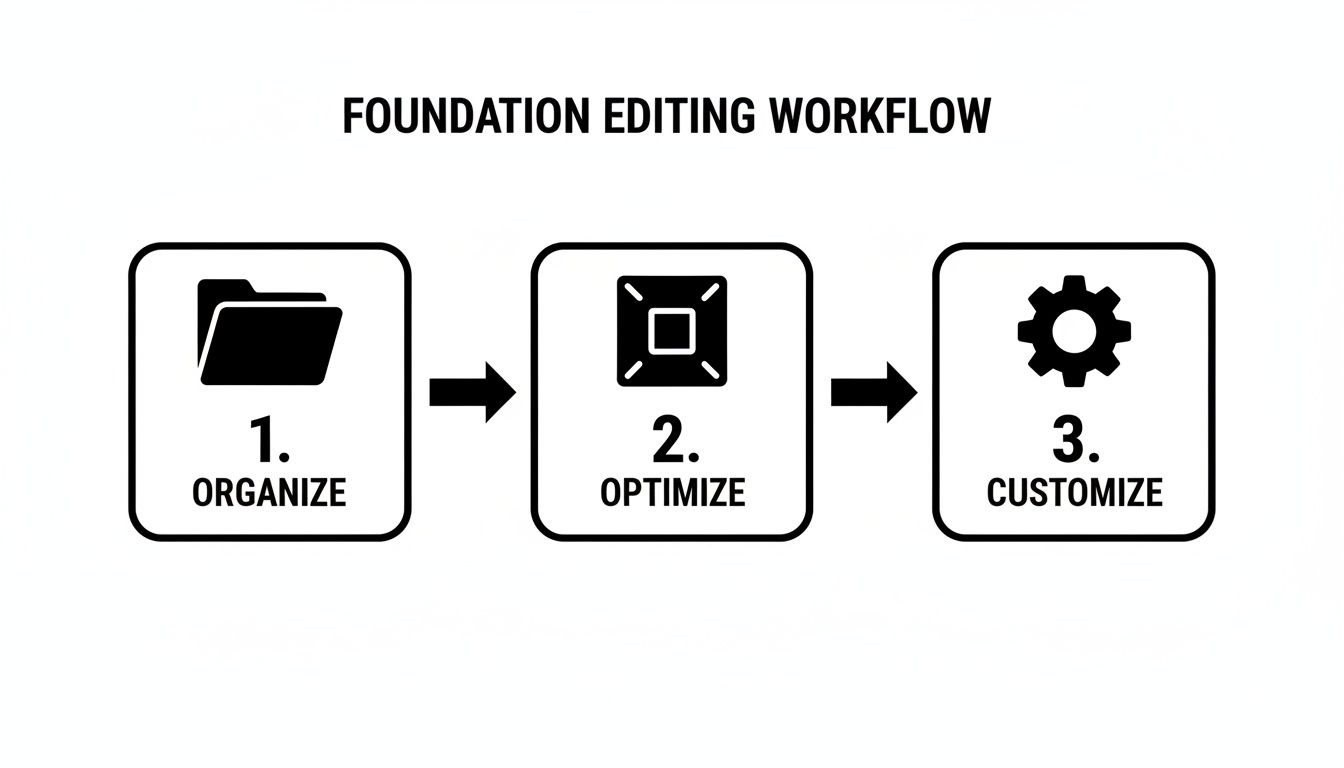
The workflow below really nails this foundational process: start by organizing your assets, then optimize your media for smooth playback, and finally, customize your workspace to fit your needs.
This just goes to show that the technical prep work is every bit as important as the creative side of the edit itself.
Choosing Your Tools And Optimizing Performance
The software you choose is your creative partner, defining the tools you have at your disposal. When it comes to professional video editing, a few titans dominate the industry. Adobe Premiere Pro is a massive player, holding an impressive 35% market share as of 2025, with Final Cut Pro at 25% and DaVinci Resolve growing fast at 15%. Each has its own army of devoted users for good reason.
Comparing Core Video Editing Software
A quick look at the top professional NLEs (Non-Linear Editors) and their primary strengths, helping you choose the right tool for your specific needs and workflow.
| Software | Best For | Key Feature |
|---|---|---|
| Adobe Premiere Pro | All-around versatility and integration with other Adobe apps (like After Effects). | Its seamless integration within the Adobe Creative Cloud ecosystem. |
| Apple Final Cut Pro | Mac users looking for speed, performance, and an intuitive interface. | The Magnetic Timeline, which makes rearranging clips incredibly fluid. |
| DaVinci Resolve | Editors who need top-tier color grading and audio tools in one package. | Its all-in-one workflow, combining editing, color, VFX, and audio. |
No matter which one you use, editing high-resolution footage like 4K or 6K can bring even a beast of a computer to its knees. This is where proxies become an editor's best friend.
Proxies are simply low-resolution copies of your original files that you use during the edit. Your software uses these smaller files for a smooth, lag-free timeline experience, then automatically swaps in the full-quality originals for the final export. Taking a little time to create them at the start of a project is a small investment that pays off big time in performance and sanity.
Crafting a Compelling Narrative with Pacing and Cuts
This is where the magic really happens. Editing isn't just about stringing clips together; it's the art of sculpting time and emotion. The rhythm of your cuts—your pacing—is the very heartbeat of your video. It's how you control the mood and guide how your audience feels, moment by moment.
Think about a high-energy movie trailer. It’s all about rapid-fire cuts, sometimes almost jarring, designed to build excitement and a sense of urgency. Now, picture a heartfelt documentary that might hold on a single shot for ten seconds or more. That long pause isn't dead space; it's an invitation for the viewer to reflect and connect emotionally. That’s pacing, and it’s one of the most powerful tools in your arsenal.
Before you even touch the razor tool, ask yourself: what emotion am I trying to create right now? Tension? Joy? Curiosity? Your answer will be the roadmap for how long each shot should last and how quickly you move to the next.
Moving Beyond Basic Cuts
Sure, the standard jump cut can get the job done, but to build a truly professional narrative, you need to go deeper. This is where J-cuts and L-cuts come in. These aren't just fancy terms; they are the secret to creating smooth audio bridges that pull the viewer through the story so naturally they don't even notice the transition.
Here’s a quick rundown of how they work in the real world:
- J-Cut: The audio from the next clip starts before its video appears. Picture an interview where you hear the subject begin their answer a split-second before you actually cut to their face. This simple trick hooks the viewer and pulls them seamlessly into the next shot.
- L-Cut: This is the reverse. The audio from the current clip continues playing over the start of the next one. Think of a character finishing a sentence while the camera cuts away to show someone else's reaction. It’s a beautiful way to link an action with its consequence.
Getting comfortable with these audio-led edits is a total game-changer. They make your work feel incredibly polished and keep the story moving forward, preventing any clunky visual changes from yanking the viewer out of the experience.
The best editing is the editing you don't notice. Sophisticated cuts like J-cuts and L-cuts are your secret weapon for creating a polished, immersive story that feels effortless to the viewer.
The software you use can also shape your workflow. When Apple launched Final Cut Pro X in 2011, its magnetic timeline was a revelation, sometimes reducing editing time by up to 30% for fast-paced projects. On the other end, DaVinci Resolve has become an industry powerhouse for color, now used in over 50% of major Hollywood films. Regardless of your tool, just customizing keyboard shortcuts can boost your speed by a solid 20-25%. You can dig into more industry stats over at ElectroIQ.
The Art of Killing Your Darlings
Here’s one of the toughest lessons every editor has to learn: you must be willing to "kill your darlings." Coined by writer William Faulkner, it’s about the painful but necessary act of deleting shots you absolutely love—even if they’re technically perfect or visually stunning—because they don't serve the story.
Maybe you captured a breathtaking drone shot, but it grinds the pace to a halt at a critical moment. Or perhaps an actor delivered a line perfectly, but it just doesn’t fit the emotional arc of the scene. A professional editor is ruthless in their service to the narrative. Every single second of screen time has to earn its keep.
This discipline applies just as much to your B-roll. B-roll isn't just filler footage to hide jump cuts; it's a storytelling device. Use it to add context, reveal a character's inner state, or build atmosphere. Don't just show someone talking about their work—cut to shots of them actually doing it. It's the classic "show, don't tell" rule, and it's what separates a decent video from an unforgettable one. By being selective and purposeful with every single clip, you craft a final edit that is tight, impactful, and relentlessly focused on the story.
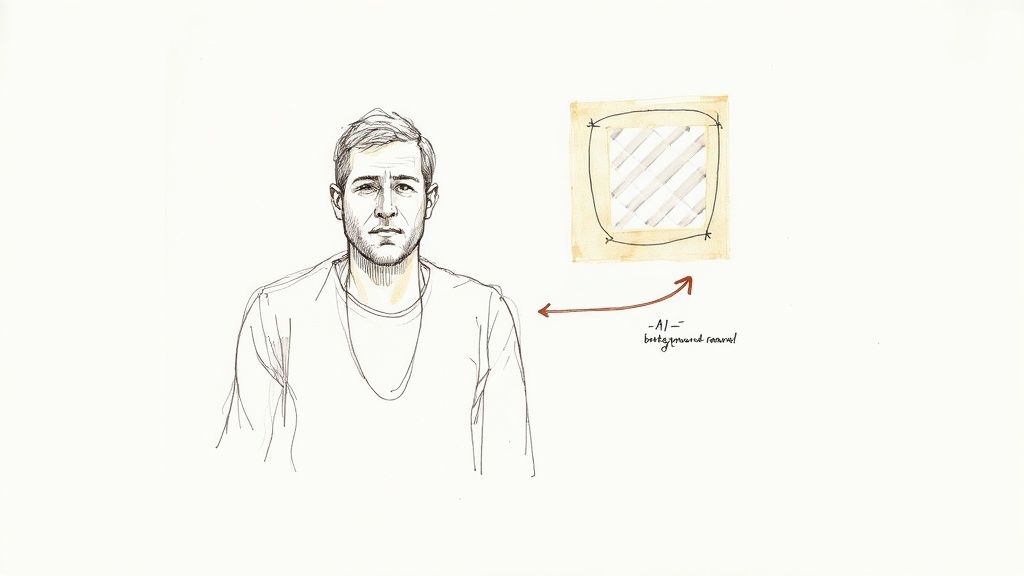
Making Background Removal a Breeze with AI
Not that long ago, if you wanted to remove a video's background, your only real option was to book a studio with a green screen. That meant hours of careful lighting setup, followed by even more hours in the edit bay meticulously keying out the green. It was a tedious, technical process that was really only accessible for projects with a serious budget.
But that's all changed. Today, artificial intelligence has completely flipped the script.
Tools like a dedicated AI video background remover can now do in minutes what used to be a full day's work for an experienced editor. These platforms analyze every single frame, intelligently separating your subject from their surroundings without any special gear. This opens up a whole new world of creative options, whether you're dropping an interview subject into a dynamic branded environment or creating clean product shots for an e-commerce campaign.
The process is refreshingly simple. Just upload your footage, and the AI does all the heavy lifting. You even get a preview before you download the final file.
As you can see, the workflow is built to be fast and direct. It’s all about getting you from your raw footage to a polished, professional result as quickly as possible.
Setting Your AI Up for Success
AI is an incredible tool, but it's not magic. You can get significantly better results by giving it a clean source video to work with. A few simple considerations during your shoot will make a night-and-day difference in the final cutout quality.
Think about the contrast between your subject and their background. If someone is wearing a dark blue shirt while standing in front of a navy blue wall, any algorithm is going to struggle to see the edges. A clear separation in color is your best friend here.
Here are a few practical tips to keep in mind when you’re filming:
- Light Your Subject Well: Good lighting is key. You want your subject to be clearly lit and to stand out from what's behind them. A basic three-point lighting setup (key, fill, and back light) works wonders for creating a crisp edge that the AI can easily lock onto.
- Avoid Busy Backgrounds: A cluttered or heavily patterned background can confuse the AI, especially if the colors are similar to your subject's clothing. A plain wall is ideal, but even a simple, uncluttered room will produce a much cleaner result than a chaotic scene.
- Keep Motion in Mind: Fast, jerky movements can create motion blur, which softens the edges of your subject and makes it harder for the AI to get a perfect cutout. For those crucial shots, aim for smoother, more deliberate actions.
AI background removal doesn't replace good production habits—it amplifies them. A well-shot video will always give you a better AI-driven result, saving you even more time down the line.
By putting in just a little bit of effort upfront, you’re essentially giving the AI a roadmap to a flawless result.
From Upload to Transparent Export
Once you've got your footage, the rest of the process is incredibly straightforward. The end goal is to get a clean video file with a transparent background that you can drop right into your editing software and layer over anything you want.
Here’s how it usually works:
- Upload Your Clip: First, you’ll select the video file you want to process—typically an MP4, MOV, or WebM—and upload it to the platform.
- Let the AI Work: The tool then goes to work, analyzing your video frame by frame to identify and isolate the subject from everything else.
- Preview and Download: Once it's done, you'll see a preview of the result. If you’re happy with how the cutout looks, you can download the final file.
For any professional workflow, the export format is critical. You need a file that supports an alpha channel, which is the part of the video data that holds all the transparency information. Look for export options like MOV ProRes 4444 or a PNG sequence. These formats will give you a perfect, background-free clip that’s ready to use in your main video edit.
Transforming Your Visuals with Color Correction and Grading
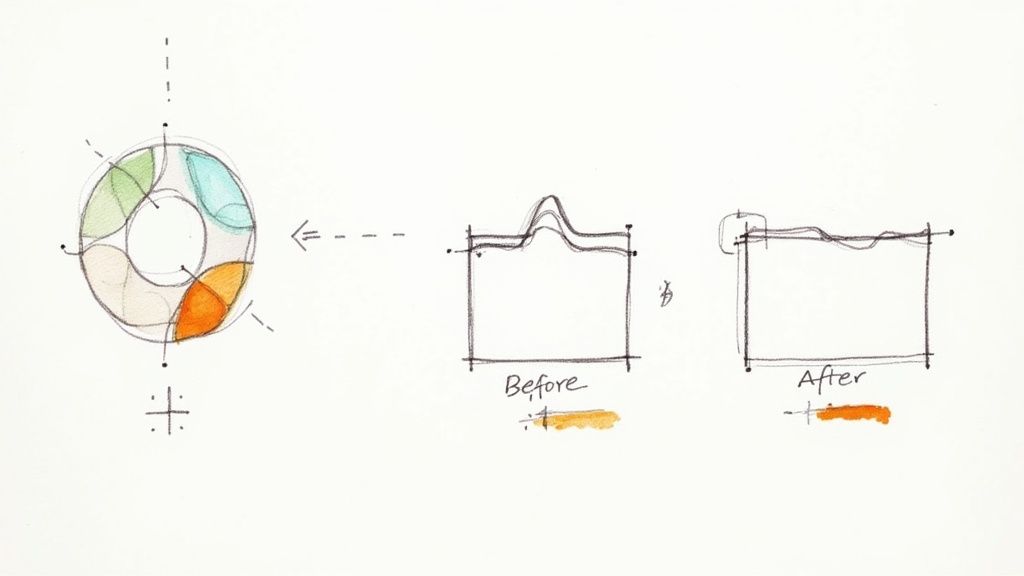
Color is hands-down the most powerful tool you have for setting the mood of your video. It’s a silent language that instantly tells your audience if a scene is warm and nostalgic, cold and sterile, or vibrant and energetic. Getting color right is a two-part dance: first comes the science of color correction, then comes the art of color grading.
Think of color correction as setting a clean, neutral foundation. The goal here isn't to get creative; it's to be technically accurate. This is where you fix the unavoidable problems from the shoot—maybe the lighting changed between takes or the camera's white balance was a bit off. Correction ensures your footage looks natural and consistent from one shot to the next.
This technical pass is non-negotiable for professional work. You simply can't build a beautiful, stylized look on top of a flawed foundation. The first job is always to make your footage look like it was shot in a perfectly controlled environment, even when it wasn't.
The Technical Side: Color Correction
Before you even think about pushing creative sliders, you need to trust your tools, not just your eyes. We rely on objective instruments called video scopes. Your perception can be easily fooled by the color of the walls in your edit suite or the time of day, but scopes give you the mathematical truth about your image.
Two scopes are absolutely essential to master:
- The Waveform Monitor: This is your best friend for judging exposure. It displays the brightness (luminance) values across your image, showing you instantly if your highlights are blown out (clipped) or if your shadows are crushed into pure black.
- The Vectorscope: This one is all about color. It maps out the hue and saturation of your footage, making it indispensable for nailing a correct white balance and ensuring skin tones look like actual human skin, not something overly orange or green.
To make any of this work, you need a monitor you can trust. Working with a color-accurate display is vital for making sure your work translates well across different screens. It's worth understanding how PC monitor backlights dictate color accuracy and contrast, as it can make or break your final grade. Once your scopes show a balanced image, you have a perfect canvas to start painting.
The Artistic Side: Color Grading
With a corrected, neutral image as your starting point, the fun can begin. Color grading is where you inject emotion and style into your video, crafting a specific look that supports the story you’re telling. This is how you make a video feel truly cinematic.
A great way to get started is with LUTs (Look-Up Tables). A LUT is essentially a color preset that applies a pre-determined grade to your footage. They are fantastic for quickly auditioning different looks or achieving a popular style, like the classic "teal and orange" aesthetic so common in Hollywood blockbusters.
But a word of warning: don't just slap a LUT on and call it a day. A pro workflow means using a LUT as a starting point, then dialing it in with tools like color wheels and curves to make the look your own. This is where you might push the shadows toward blue for a colder feel or warm up the midtones to make a scene feel more inviting.
Color grading is the final coat of paint on your edit. It’s not about fixing mistakes; it’s about making deliberate artistic choices that elevate your story and create a memorable emotional experience for the viewer.
This is also where secondary adjustments become crucial. These tools let you isolate and change a specific color without touching the rest of the image. You could, for instance, make a dull, gray sky a more vibrant blue or push the greens in a forest to look more lush and saturated. If you're ready to go deeper, we've got more specific techniques for advanced color correction.
A great tip from the trenches is to get comfortable with Premiere's Lumetri Color panel for fast, non-destructive color work. The value of this final polish can't be overstated. When 85% of companies using video marketing see 48% more engagement, it’s clear that high-quality visuals have a direct impact on performance. By mastering both correction and grading, you gain complete control over your video's visual language.
Achieving Crystal Clear Audio That Engages Viewers
Here’s a hard truth I learned early in my career: viewers will forgive shaky video, but they will never forgive bad audio. It’s an instant dealbreaker. While stunning visuals might catch their eye, it’s the sound that truly pulls them in and keeps them there.
Great audio is invisible. It just feels right. The goal of audio post-production is to create a clean, balanced, and immersive soundscape where dialogue, music, and effects all have their own space but work together to tell the story. This is about more than just turning up the volume; it’s a delicate balancing act.
Your first move should always be to make the dialogue the star of the show. Everything else—music, sound effects, ambient noise—is there to support what’s being said. A tried-and-true workflow is to get your dialogue levels sitting comfortably first, then mix all the other elements around it.
Sculpting Voice with EQ and Compression
Once your basic levels are set, it’s time to start shaping the sound. The two most powerful tools in your arsenal for this are the Equalizer (EQ) and the Compressor. They might sound intimidating, but their jobs are pretty straightforward.
An Equalizer (EQ) lets you surgically boost or cut specific frequencies. For voices, the main goal is clarity. I often find that a buildup of low-mid frequencies (think 200-500 Hz) can make dialogue sound "muddy" or "boomy." Applying a gentle cut in that range can instantly clean things up and add a professional sheen.
A Compressor, on the other hand, manages volume. It automatically tames the loudest parts of a clip and brings up the quietest parts. This smooths everything out, so your audience isn't constantly reaching for the volume knob. The result is dialogue that sits perfectly in the mix, never getting lost under the music or shouting over it.
Tackling Unwanted Background Noise
Even with the best gear, background noise is just a fact of life. That low hum from an air conditioner, a distant siren, or electrical hiss can easily pull a viewer out of the moment. This is where noise reduction tools save the day.
Most modern editing software has built-in noise reduction plugins that are surprisingly effective. They work by identifying a constant background noise—like a fan—and then carefully subtracting it from the entire clip. The key here is subtlety. If you push it too far, you’ll end up with a weird, watery, artificial sound that’s often more distracting than the original noise.
The goal of noise reduction isn't to create sterile silence. It's to remove distractions. A little bit of natural room tone often sounds far better than an over-processed, unnatural void.
If you’re wrestling with particularly stubborn noise, we have a guide that dives deeper into more advanced techniques. Check out our post on how to effectively remove background noise from video.
Mastering for Every Platform
The final touch on your audio is mastering. This is where you give the entire mix a final polish and make sure it’s loud enough—but not too loud—for the platform it’s destined for, whether that's YouTube or Instagram.
Don't skip this. Mastering ensures your video sounds consistent and clear whether someone is listening on studio headphones or tiny phone speakers. Without it, your audio might be too quiet, jarringly loud, or get crunched by a platform's own compression algorithms.
And one last thing: remember that a huge chunk of your audience will watch your video with the sound off. Adding captions is non-negotiable for accessibility and engagement. Today’s AI-powered auto-captioning tools can transcribe and sync subtitles in seconds. Considering 85% of videos on platforms like Facebook are watched on silent, it’s a no-brainer. Plus, captions can boost viewer retention by a solid 12%. To stay ahead of the curve, you can see more trends shaping the industry in this insightful article on creator strategies.
Exporting Your Video for Maximum Impact and Quality
You’ve poured hours into organizing, cutting, coloring, and mixing your project. Don't stumble at the final hurdle. The export window, with its wall of technical jargon, can feel overwhelming, but this is where you lock in the quality and ensure your video looks as good online as it does on your timeline.
Think of your export settings as the final packaging for your video. Get it right, and your work shines. Get it wrong, and all that hard work can go to waste.
Codecs and Containers: The Basics
Let's demystify the two most important terms you'll see: codec and container. They sound complex, but the concept is simple.
A codec is what compresses your video file. You'll almost always want to use H.264 for final delivery. It's the universal language of the web, giving you a fantastic balance of high quality and small file size that platforms like YouTube and Instagram love.
A container is the file wrapper that holds the compressed video, audio, and metadata together. For an H.264 codec, the best container is MP4. It’s the most compatible format on the planet.
What about other options like ProRes in a .MOV container? That’s more of a professional hand-off format. You'd use it to send a high-quality master file to another editor or a colorist, not for a direct upload to social media.
Why Bitrate is Everything
The bitrate is the amount of data dedicated to each second of your video. A higher bitrate generally means better quality but also a much larger file.
Here's the secret most new editors miss: uploading a video with a ridiculously high bitrate doesn't guarantee better quality. In fact, it can be worse. Every platform re-compresses your video to fit its own specs. If you send them a massive file, their automatic compression can be aggressive and unpredictable.
Your goal isn't to export the biggest file possible; it's to export the smartest file possible. Match your settings to the platform's specifications to preserve the maximum quality your audience will actually see.
By giving the platform a file that’s already close to what it wants, you stay in control of the final look.
Recommended Export Settings for Major Platforms
Use this cheat sheet to configure your export settings for optimal quality and performance on today's most common video platforms. This takes the guesswork out of the equation.
| Platform | Recommended Codec | Resolution | Target Bitrate (Mbps) |
|---|---|---|---|
| YouTube | H.264 (High Profile) | 1080p | 10-15 Mbps |
| Instagram Feed | H.264 (Main Profile) | 1080p | 5-10 Mbps |
| Instagram Reels | H.264 (Main Profile) | 1080x1920 | 5-10 Mbps |
Stick to these numbers, and you'll be delivering a high-quality file that's optimized for each platform's unique compression algorithm, ensuring your video looks sharp and professional every time.
Common Questions We Hear About Pro Video Editing
Stepping up your video editing game can feel a bit like drinking from a firehose. There are a million different tools and a hundred different opinions on the "right" way to do things. Let's cut through the noise and answer a few of the questions that come up all the time when editors are trying to go from hobbyist to pro.
First up, the big one: hardware. Do you really need a beast of a machine to edit professionally? While a powerful computer definitely makes life easier, especially when you're dealing with 4K footage, it's not the be-all and end-all. Smart workflow habits, like using low-res proxies, can make even a modest setup feel surprisingly snappy.
Honestly, if you're just starting, put your money into a color-accurate monitor and a good pair of headphones first. Those tools directly influence your creative choices and, frankly, are more critical than raw horsepower when you're building your skills.
What Skills Should I Actually Learn First?
It's tempting to dive right into the flashy visual effects you see on YouTube, but trust me, the skills that will make the biggest impact are the fundamentals.
If you're wondering where to start, focus on mastering these three areas:
- Storytelling with Pacing: Get a feel for how shot length creates emotion. Practice cutting together a high-energy, fast-paced sequence, and then try your hand at something slower and more thoughtful.
- J-Cuts and L-Cuts: These are your secret weapons for making edits invisible. Moving beyond simple jump cuts by letting the audio lead the picture (or vice-versa) is a true hallmark of professional work. It just feels smoother.
- Basic Audio Cleanup: Learn your way around an EQ to cut out muddy frequencies in dialogue and a compressor to balance volume levels. Bad audio is the fastest way to make a great video feel amateur.
The quickest way to look like a pro isn't a crazy new effect. It's flawless execution of the basics—clean audio, seamless cuts, and intentional pacing. That’s what separates the pros from everyone else.
We also can't ignore how AI is shaking things up. It's quickly automating the grunt work that used to eat up so much time. It’s estimated that by 2025, AI tools could save editors around 200 hours a year on tasks like generating subtitles or cleaning up noisy audio.
Take the Neural Engine in DaVinci Resolve, for example. Its Magic Mask feature can isolate a person from their background up to 10 times faster than painstakingly rotoscoping by hand. You can dig into more of these emerging video editing trends on Delivered Social.
Learning to weave these smart tools into your workflow is becoming just as important as the classic editing skills. It's all about working smarter.
Ready to slash your editing time and create professional videos without a green screen? Try VideoBGRemover and get your first transparent background video in minutes. Start for free at videobgremover.com.
Tagged with
Ready to Remove Your Video Background?
See a free preview before you buy.
No credit card required • Free preview on every video