Learn Editing Video From Beginner to Pro
Want to learn editing video for social media? This guide shares a practical workflow for turning raw clips into professional content that engages your audience.
Getting into video editing can feel like a huge mountain to climb, but honestly, creating polished, professional-looking content is more achievable now than ever before. If you want to learn how to edit video, you really just need to nail three core principles: shaping a story, trimming clips for pacing, and adding that final layer of polish.
This guide is designed to give you a practical, real-world workflow. We'll focus on producing high-quality social media content without getting bogged down in overly complex software features you'll never use.
Your Path to Creating Professional Video Content
Diving into video editing doesn’t mean you have to become a Hollywood filmmaker overnight. For most creators, marketers, and business owners, the goal is much more direct: make engaging videos for platforms like Reels, TikTok, and YouTube Shorts that look clean, professional, and actually keep people watching. That's exactly what this guide is built for.
We're going to skip the super technical jargon and concentrate on a repeatable process that gets you real results. You'll learn the fundamentals of visual storytelling—how to piece your clips together to create a narrative that flows and keeps your audience hooked from start to finish.
This really comes down to mastering a few essential skills:
- Pacing and Rhythm: Getting a feel for how the length and sequence of your shots create a specific energy.
- Audio Mixing: Blending your voice, background music, and sound effects to create a seamless listening experience.
- Visual Polish: Using motion, simple effects, and even modern AI tools to get that high-quality look.
Think of the entire editing workflow in three simple stages: story, cut, and polish.
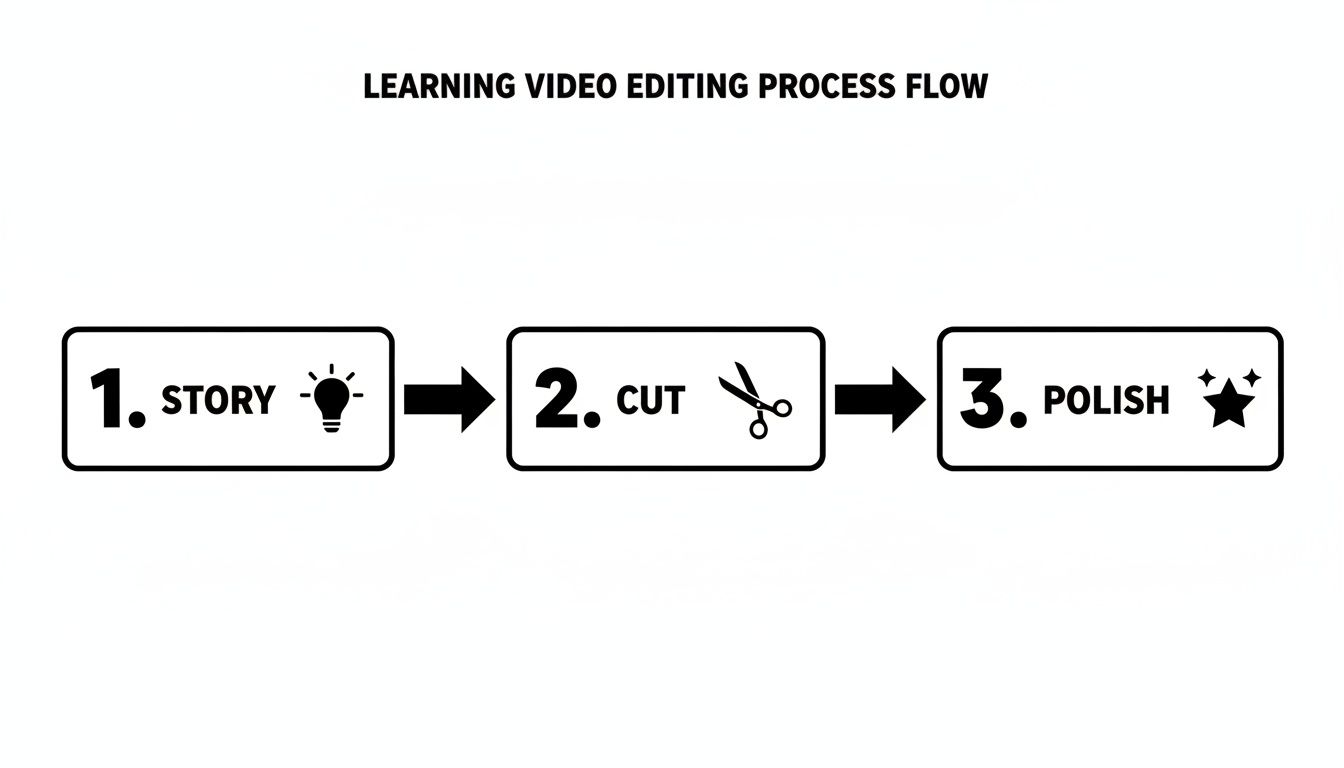
This visual breaks it down perfectly. Every great video starts with an idea, gets refined through careful cutting and trimming, and is finalized with those professional touches that make it stand out.
Before we jump into the software itself, let's quickly go over the key concepts you'll encounter. Getting these fundamentals down will make the entire process much smoother.
Core Video Editing Concepts at a Glance
| Concept | What It Means | Why It Matters for Social Media |
|---|---|---|
| Timeline | The digital workspace where you arrange and edit your video and audio clips in sequence. | This is your canvas. A well-organized timeline is crucial for fast-paced vertical video where timing is everything. |
| Trimming | The act of shortening or lengthening a clip by adjusting its start and end points. | The #1 skill for pacing. Tight, effective trims keep the viewer engaged and remove any "dead air." |
| Cuts & Transitions | How you move from one clip to the next. A "hard cut" is an instant switch; a transition is a visual effect. | For social media, quick hard cuts (or "jump cuts") are king. They create energy and hold attention. |
| B-Roll | Supplemental footage used to add context, variety, and visual interest to your main shot (A-Roll). | B-roll is what makes a video feel dynamic instead of static. It's essential for "showing" instead of just "telling." |
| Keyframing | Setting parameters for an effect (like position, scale, or opacity) at specific points in time to create motion. | This is how you create zooms, pans, and text animations that make your videos feel alive and professional. |
Understanding these five concepts will give you a massive head start. They are the building blocks of virtually every video you'll create.
Why Editing Skills Matter More Than Ever
The demand for video content isn't just growing—it's exploding. The global video editing software market jumped from $3.09 billion in 2023 and is on track to hit $5.13 billion by 2032. That's a huge indicator of how vital this skill has become for anyone creating content online.
The most rewarding part of editing is seeing your story come to life. It’s not about knowing every single tool in the software; it’s about knowing how to use a few key tools to tell a compelling story effectively.
To really get good, it pays to understand the tools at your disposal. If you're working with specific types of footage, exploring resources like The Ultimate Guide to Drone Video Editing Software can broaden your skillset.
Our own guide on how to make professional looking videos also offers more tips to get you started. By focusing on a practical workflow from the beginning, you'll build a solid foundation to create impressive content quickly and efficiently.
Getting Around Your Workspace and Making Your First Cuts
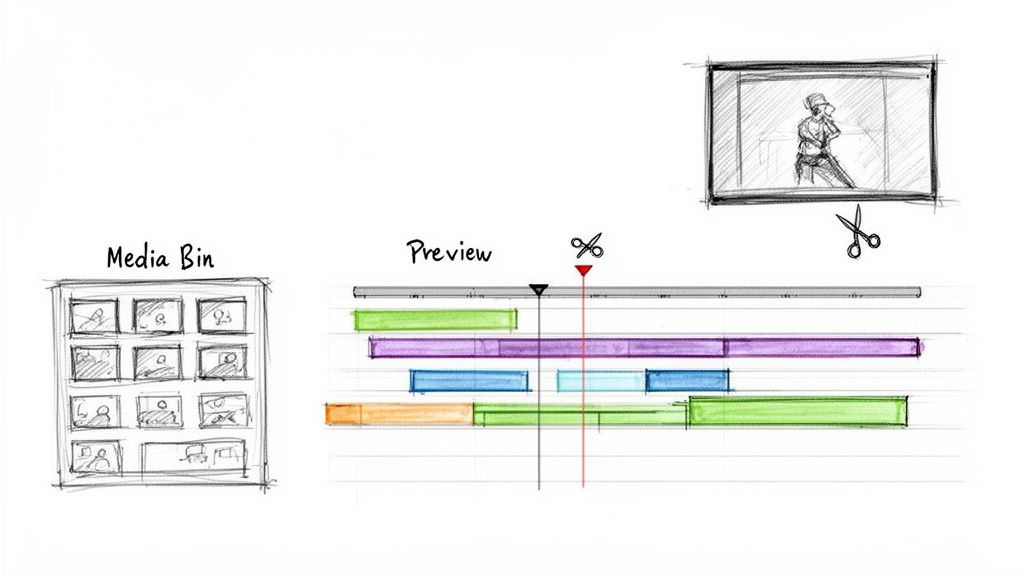
Staring at a video editing program for the first time can feel like sitting in a cockpit. Panels, buttons, timelines—it's a lot to take in. But here's the good news: you can ignore 90% of it for now. To get started, you only need to get comfortable with three key areas, and they're pretty much the same no matter what software you're using.
I like to think of it as a kitchen. You’ve got your ingredients, your cutting board, and your finished dish. In video editing, this translates to the Media Bin, the Timeline, and the Preview Monitor.
- Media Bin: This is your pantry. It’s the panel where you dump all your raw footage, music, sound effects, and images. Everything you might use lives here until you need it.
- Timeline: This is your workbench. You drag your clips from the Media Bin down to the Timeline to slice them up, arrange them in order, and layer things like music and titles on top.
- Preview Monitor: This is the window that shows you what you're actually making. It plays back whatever is on your Timeline, so you can see your edit come to life in real-time.
A quick pro-tip before you even start: get organized. Seriously. It’s a habit that separates pros from amateurs and will save you from pulling your hair out later. Inside your project, create a few basic folders: "A-Roll" (for your main talking head shots), "B-Roll" (for your supporting footage), "Audio," and "Graphics." Trust me on this one.
The Art of the Trim
With your clips loaded and organized, it’s time to focus on the single most important skill in editing: trimming. This is the simple act of cutting out all the junk—the awkward pause before you started speaking, the moment you flubbed a line, the dead air at the end of a take.
Most software gives you a "blade" or "razor" tool to literally slice a clip in two. You can then just select the bad part and hit delete. An even faster way is to grab the beginning or end of a clip on the timeline and just drag it inward. It’s intuitive and quick.
An edit is defined more by what you take out than what you leave in. Every single second has to justify its existence. You'd be amazed how much energy you can inject into a video just by trimming out a half-second of dead air between sentences.
Using Advanced Cuts for Better Flow
Once you're comfortable with basic trimming, there are two techniques that will immediately make your edits feel more polished: J-cuts and L-cuts. They get their names from the shape the clips make on the timeline.
- J-Cut: The audio from the next clip starts a moment before you see the video for it. This is a fantastic way to tease what's coming next, letting the viewer hear a new speaker or a new scene before they see it, which pulls them in smoothly.
- L-Cut: The audio from your current clip continues to play even after you've cut to the next piece of footage. Think about someone talking, and as they continue speaking, you cut to a shot of what they’re describing. It’s a classic technique for storytelling.
Using these split edits is the difference between a choppy, jarring video and one that flows like a natural conversation. They guide the viewer’s attention instead of just cutting from one thing to the next. Master these, and you're well on your way.
Adding Polish with Motion and Visual Effects
Once your core story is in place and the cuts feel sharp, it's time to add that layer of professional polish that makes a video feel truly finished. This is where we move beyond just assembling clips and start creating a dynamic viewing experience. Motion, transitions, and a few clever visual effects are what separate a decent edit from a great one.
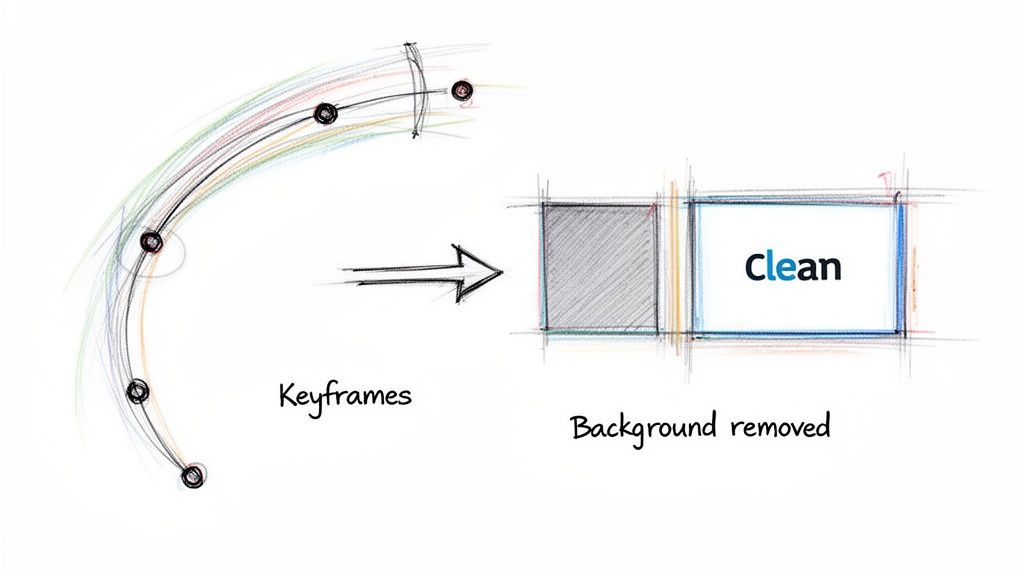
Let's start with a foundational concept: keyframing. If you can grasp this one idea, you'll unlock a huge amount of creative potential. Think of a keyframe as an instruction you give the software, like "at this exact moment, I want this clip to be this big." By setting a keyframe for a clip's scale at the beginning and then another, slightly larger one at the end, you’ve just created a slow, deliberate zoom. It's a fantastic way to add emphasis to someone speaking or subtly guide the viewer's eye.
You can keyframe almost anything—position, rotation, opacity—to make static graphics slide into frame or gently drift across the screen. If you're looking to really dig into this, our guide on motion graphics for social media is a great next step.
Choosing the Right Transitions
Transitions are the glue that holds your scenes together, but most editors (especially beginners) tend to overuse them. Your software probably offers a hundred different star wipes, page peels, and flashy effects. Ignore them.
Honestly, 99% of the time, a simple hard cut is all you need. It’s clean, invisible, and keeps the energy high, which is exactly what you want for snappy social media videos.
That said, sometimes a different transition serves a specific purpose, like signaling a shift in time or topic.
- Dissolve: This is your go-to for showing the passage of time or creating a softer, more thoughtful mood. A gentle fade from one clip to the next works beautifully, but use it sparingly or your video can start to feel a bit dated.
- Wipes and Slides: These can feel energetic and stylish if they fit your brand, but they can just as easily come off as cheesy and distracting. Only reach for these if they have a clear narrative reason to exist.
The best transition is often the one nobody notices. Its job is to guide the viewer smoothly from one idea to the next without pulling focus from your message. If the transition itself becomes the main event, it’s probably the wrong choice.
AI-Powered Background Removal: A Modern Game Changer
One of the most powerful tools to land in an editor's toolkit recently is AI background removal. This completely sidesteps the need for a physical green screen, which is a massive win for creators working in less-than-ideal spaces.
Let's say you filmed a fantastic take, but the background is your messy office or a distracting environment. In the past, that clip was unusable. Now, you can use a tool like VideoBGRemover to digitally cut yourself out and place yourself against any background you want.
The process is refreshingly simple: upload your video, let the AI work its magic, and download a new clip with a transparent background. You can then drop this right into your timeline and layer it over a clean graphic, a stock video, or anything else that fits your project.
This isn't just a gimmick; it's becoming a core part of the modern production workflow. With over 85% of companies using video in their marketing and corporate demand growing by 15% annually, the pressure is on to produce high-quality content efficiently and affordably. AI tools are making that possible for everyone.
How AI Is Changing the Video Editing Game
Let's be honest, some parts of video editing are just a grind. AI is stepping in to take over those tedious, time-sucking tasks, and it's completely changing how we approach editing. Forget spending hours manually cutting out a subject or endlessly tweaking audio levels. AI-powered tools can now knock out these jobs in minutes, often with just a single click.
This isn't just about saving time; it's about breaking down creative barriers. Suddenly, you're not held back by technical limitations. You can focus on the fun stuff—the story, the pacing, the overall vibe. Take background removal, for example. What used to demand a green screen, perfect lighting, and specialized software can now be done on pretty much any video clip, no matter where it was shot. That opens up a whole new world of creative options that used to be out of reach for most of us.
Where AI Actually Makes a Difference
So, what does this look like in a real editing session? Let's move past the hype and look at how AI is practically being used to make better videos, faster.
- Flawless Background Removal: A tool like VideoBGRemover is a perfect example. You can drop in any video and it will instantly spit out a version with a clean, transparent background. This is a game-changer for placing subjects into new scenes, adding branded graphics behind a speaker, or just getting a sleek, professional look without a physical studio.
- Smart Audio Cleanup: Ever tried to manually remove background hum or cut out all the "ums" and "ahs" from a video? It's painful. AI can do it automatically, balancing levels and cutting out filler words to give you crisp, clean audio.
- Finding the Golden Takes: Some of the newer AI tools can even sift through hours of footage and highlight the best takes. They'll analyze things like shot composition and speaker clarity to save you from scrubbing through everything yourself.
The numbers back this up. The market for AI video editing is expected to explode, growing from $0.9 billion in 2023 to $4.4 billion by 2033. That's because it works. Teams that have adopted these tools have seen productivity jump by 47% and production costs drop by 58%.
Fitting AI into Your Current Process
You don't have to abandon your favorite editing software to get these benefits. The process is usually pretty simple. You can do your primary edit, export just the clip you want to modify, run it through an AI tool like a background remover, and then drop the new transparent video file right back into your timeline as a separate layer. It’s a plug-and-play approach that lets you add some serious power to your existing workflow.
The real win here is getting your time and creative energy back. When you let AI handle the repetitive grunt work, you can pour more of your focus into what actually makes a video great: the story, the emotion, and the connection with your audience.
As you get more comfortable with these tools, it's worth exploring further innovations in Artificial Intelligence to see how automation is reshaping creative fields everywhere. If you want to dig deeper into specific software, check out our guide to the best AI video editing tools on the market today.
Getting Your Audio and Export Settings Just Right
You could spend hours creating the most visually stunning video, but if the audio is bad, you've lost your audience before they even see your best work. It's a funny thing—viewers will put up with slightly shaky footage, but they have zero patience for harsh, tinny, or muffled sound. They’ll just scroll on.
Think of audio as 50% of the video experience. It’s not an afterthought; it’s a core component.
The secret to great sound is all about balance. Most of the time, you're juggling at least three layers: the main dialogue or voiceover, the background music, and any sound effects you've added. The absolute top priority? Making sure the dialogue is crystal clear. A classic beginner mistake is letting an epic music track drown out the person speaking. If your audience has to strain to hear, you’ve already failed.
Mastering Your Audio Mix
A practical way to approach this is to get your dialogue levels right first, making sure they are consistent and clear. Then, you can bring in the music and tuck it neatly underneath the speech.
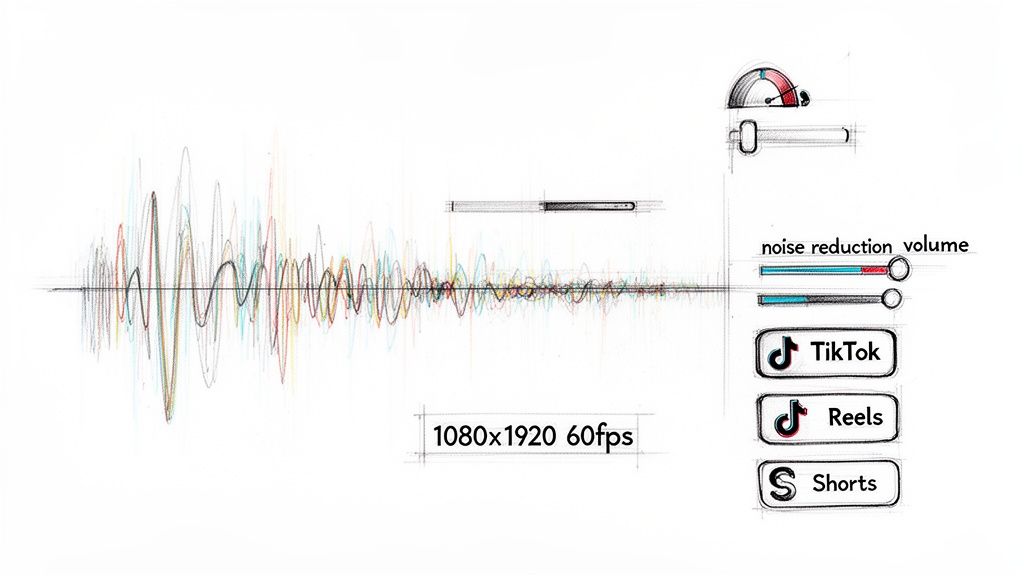
A good rule of thumb is to drop your music track’s volume down to somewhere between -18 dB and -25 dB. Your main dialogue, on the other hand, should be peaking much higher, usually hovering around 0 dB without going over.
Another tool in your arsenal is normalization. This is a simple but powerful process where your software scans the entire audio clip and adjusts its overall volume. It boosts the quiet parts and brings down the loudest peaks to a consistent level, preventing any jarring changes. The result is a much smoother listening experience for your audience, who won't have to keep adjusting their volume. Most video editors have a simple one-click "normalize" or "auto-gain" function that does the heavy lifting for you.
I've seen it a thousand times: People will forgive so-so video quality if the audio is excellent, but they won't sit through a beautiful video with terrible sound. Audio keeps them locked in.
Exporting for Maximum Impact on Social Media
You've done the hard work, and your edit is finally locked. The last hurdle is exporting it with the right settings. This is where a lot of great work gets ruined—the wrong export can leave your video looking blurry, pixelated, or just off on a phone screen.
Platforms like TikTok, Instagram, and YouTube are aggressive with their video compression. While you can't stop them from re-compressing your file, giving them a high-quality, properly formatted video from the start makes a massive difference in the final look.
When you’re first starting out, all the talk of codecs and bitrates can feel overwhelming. Don't worry about memorizing everything. The goal is just to give the platform a file that’s as close to its preferred specs as possible. This minimizes quality loss.
I've put together a quick reference table to take the guesswork out of it. These are the go-to settings for today's most popular vertical video platforms.
Recommended Export Settings for Social Media
| Platform | Resolution | Frame Rate (FPS) | Format/Codec |
|---|---|---|---|
| Instagram Reels | 1080 x 1920 pixels | 30 or 60 FPS | MP4 / H.264 |
| TikTok | 1080 x 1920 pixels | 30 or 60 FPS | MP4 / H.264 |
| YouTube Shorts | 1080 x 1920 pixels | 24, 30, or 60 FPS | MP4 / H.264 |
Stick to these settings, and you can be confident that the video you worked so hard on will look just as crisp and clean on your audience's screen as it did in your timeline.
Frequently Asked Questions
When you're just starting to learn video editing, a lot of questions pop up. Let's tackle some of the most common ones I hear from newcomers, covering everything from picking your first tool to figuring out if your computer is up to the task.
What’s the Best Software for a Beginner?
This is the big one, right? My advice is to start with a tool that’s easy to get into but has enough power to grow with you. You can't go wrong with the free version of DaVinci Resolve —it's what many pros use, and the free offering is incredibly generous. Another great option is CapCut, which is super intuitive, especially for social media content.
While industry heavyweights like Adobe Premiere Pro or Final Cut Pro are fantastic, they can feel overwhelming at first. The most important thing is to choose one and stick with it for a while. Get comfortable with the basics before you even think about trying something else.
How Do I Make My Videos More Engaging?
Engagement really boils down to two things: solid storytelling and great pacing. You want to keep the viewer’s attention, and that means using quick cuts to build energy, weaving in B-roll to show what you're talking about, and using music and sound effects to set the mood.
Engagement isn't just about flashy effects; it's about holding attention. Simple things like clean cuts, clear audio, and adding captions for silent viewers often have the biggest impact on whether someone keeps watching.
Never forget text and captions! A huge chunk of people watch videos with the sound off, so making your content accessible without audio is a massive win.
Do I Really Need a Super-Powerful Computer?
Not necessarily. If you're editing short videos for social media in 1080p, most modern laptops will handle it just fine. A beast of a machine is great, but it's not a deal-breaker when you're starting out.
If you find your older computer is struggling, there are workarounds. One pro trick is to edit using "proxies," which are basically low-resolution stand-ins for your high-quality footage. This makes the editing process much smoother. Another great move is to offload demanding tasks to cloud-based tools. For instance, using VideoBGRemover lets you pull off a clean background removal without ever maxing out your own computer's processor.
How Long Will It Take to Learn the Basics?
Honestly, you can get the core skills down—trimming clips, layering audio, and exporting a file—in just a few hours. Seriously. If you follow a guide like this one, you could easily put together your first simple video this afternoon.
Getting to the point where you feel fast and confident, where the process feels natural? That usually takes a few weeks of consistent practice. The best way to speed things up is to work on actual projects. Don't just watch tutorials; apply every new skill you learn to a real video you're trying to create. That’s how the knowledge really sticks.
Ready to create studio-quality videos without a green screen? Try VideoBGRemover today and see how easy it is to replace your video background with just one click. Get started for free at videobgremover.com.
Tagged with
Ready to Remove Your Video Background?
See a free preview before you buy.
No credit card required • Free preview on every video