How to Make Professional Looking Videos: A Practical Guide
Learn how to make professional looking videos with practical lighting, sound, editing, and AI tips to elevate your content.
When it comes to making a professional-looking video, it’s not about the price tag on your camera. It all really boils down to getting just four things right: crystal-clear audio, deliberate lighting, stable camerawork, and sharp, intentional editing. Focus on mastering these fundamentals, and you can elevate your videos from amateur to polished, no matter your budget.
What Separates Pro Videos From Amateur Footage
Have you ever watched a video and just felt it was professionally made, even if you couldn't put your finger on exactly why? That feeling is the result of a bunch of small, deliberate choices that all come together to create a smooth, engaging experience. Amateur footage often falls flat because of a few common—and easily fixable—mistakes that pull the viewer out of the moment.
The biggest giveaway? Bad audio. Viewers are surprisingly forgiving of video that isn't perfectly crisp, but they will click away in a heartbeat if they can't hear you clearly. If your audio is muffled, echoey, or full of background noise, it immediately signals low quality and can make even the most beautifully shot video unwatchable.
The Pillars of Professional Production
Once you've got your sound sorted, a few other key elements are responsible for that high-quality look. Think of these as the foundational pillars of any great video. Getting these right will completely change the game for you.
- Strategic Lighting: Pros use light to sculpt the subject, create a sense of depth, and set the right mood. Amateur videos, on the other hand, often just use whatever light is already in the room, which usually ends up looking flat, unflattering, or too dark.
- Camera Stability: Shaky, handheld footage is often disorienting and just looks unplanned. A tripod is your best friend here, but even just propping your camera on a stable surface makes a world of difference. A steady shot lets your content be the star.
- Purposeful Editing: Editing is so much more than just chopping out the "ums" and "ahs." It’s about telling a story and controlling the pace. Professionals use cuts, color grading, and simple graphics to direct the viewer’s attention and strengthen the message.
The secret to making professional-looking videos isn't some expensive piece of gear; it’s the consistent application of good technique across audio, lighting, and stability. Get these three right, and you’re 90% of the way there.
In the end, the real difference is intention. A professional video feels deliberate. Every shot is framed with a purpose, every sound is clean, and every cut serves the story. This guide is your roadmap to building that same intention into your own workflow, from planning your first shot to hitting "export." We’ll even get into how modern tools, including AI for things like background removal, are making it easier than ever to get a studio-quality look without a studio-sized budget.
Planning Your Video Before You Hit Record
A truly professional video is never an accident. It's the direct result of putting in the work before you even think about hitting the record button. One of the biggest mistakes I see people make is just jumping straight into filming without a clear vision. That’s a surefire way to end up with a disjointed mess and hours of wasted time trying to fix it in the edit.
Think of it like this: you wouldn't build a house without a blueprint. Your video needs that same solid foundation. It all starts with nailing down your core idea, figuring out exactly who you're talking to, and getting crystal clear on the one key message you want them to walk away with.
From Idea to Actionable Outline
Once you know your core message, it's time to translate that into a script or at least a detailed outline. Don't worry, this doesn't have to be some formal, Hollywood-style screenplay. For most of us, a simple document that maps out the video's beginning, middle, and end is all it takes to keep things focused and powerful.
A good plan is the backbone of any professional video, and that often starts with a solid script. You can explore how to write a script for YouTube videos to get a better handle on structuring your ideas for maximum impact. This simple step stops you from rambling and keeps your content tight—which is absolutely essential for holding anyone's attention these days.
This visual shows the three pillars that really hold up any professional production, all of which start in the planning phase.

As you can see, mastering technical elements like lighting, audio, and camera stability is what really separates amateur footage from something that looks and feels professional.
Create a Simple Shot List
With your script or outline in hand, the next step is building a shot list. This is just a running list of every single shot you need to get. Trust me, it’s a total game-changer on filming day, turning a potentially chaotic shoot into a smooth, efficient process.
For each part of your script, start thinking visually. A basic shot list doesn't have to be complicated; it just needs to cover the essentials:
- Shot Number: Just a simple way to track your progress (e.g., Shot 1, Shot 2).
- Camera Angle: Are you going for a wide shot to set the scene, a medium shot for a conversation, or a close-up to highlight a specific detail?
- Shot Description: A quick note on what's happening. Think "Close-up of hands typing on keyboard" or "Wide shot of me standing by the whiteboard."
- Audio Notes: Is there dialogue here? A voiceover? Or just ambient sound?
This document forces you to visualize the entire video before you pick up the camera. It’s your chance to spot potential problems, figure out what props you need, and make sure you don't forget that one crucial B-roll shot you'll be kicking yourself for later.
A well-crafted shot list is your on-set checklist. It eliminates guesswork, saves incredible amounts of time, and ensures you capture every single element needed to tell your story effectively in the edit.
Scout Locations and Gather Props
Finally, pre-production is all about the practical stuff. Where are you actually going to film? Your location is so much more than a background; it sets the entire mood and tone of your video. It's always a good idea to scout your spot ahead of time to check for a few key things.
First, look at the light. Are there big windows giving you nice, soft, natural light, or are you going to need to bring in your own lighting kit? Second, just listen. Is there a loud air conditioner, a humming fridge, or street traffic that’s going to completely ruin your audio? Find out now, not when the camera is rolling.
Then, make a list of every single prop, piece of gear, and wardrobe item you'll need. Get it all together in one place before shoot day. This prep work saves you from those last-minute panic attacks and lets you focus on what really matters: your performance and creativity.
Nailing Your Camera, Audio, and Lighting Setup
With a solid plan in hand, it’s time to get behind the camera. A common myth is that you need a Hollywood-sized budget to create professional-looking videos, but that’s just not the case. The real secret is learning how to get the most out of the gear you already own, whether that's a new smartphone or an older DSLR.
Let's talk about your camera first. Whatever you're shooting with, the goal is to take manual control instead of letting the camera's auto-mode make all the decisions for you. Hop into your camera’s menu and look for two critical settings: resolution and frame rate.
For a crisp, modern look, you should be shooting in at least 1080p (Full HD). If your camera or phone can handle 4K, even better—it gives you a ton of flexibility to crop in and reframe your shots in editing without losing any quality. As for frame rate, 24 frames per second (fps) delivers that classic, cinematic motion you see in movies, while 30 fps is the standard for most online content.
Mastering Your Framing and Composition
How you frame your shot is just as important as the resolution. A well-composed video feels intentional and professional, guiding your viewer’s attention exactly where you want it. The easiest way to improve your shots instantly is by using the rule of thirds.
Just imagine a 3x3 grid overlaid on your screen. Instead of plunking your subject right in the dead center, try positioning them along one of the vertical lines or where the lines intersect. This simple shift creates a more balanced and visually engaging image.
Beyond that, here are a few more tips to level up your composition:
- Leading Lines: Look for natural lines in your environment—the edge of a desk, a road, a bookshelf—and use them to draw the viewer’s eye toward your subject.
- Headroom: Always leave a little bit of breathing room above your subject's head. Too much can make them look small and lost in the frame, while too little feels uncomfortably tight.
- Depth of Field: Create a sense of depth by having elements in the foreground, middle ground, and background. A shallow depth of field (that blurry background effect) is a hallmark of professional video and does a fantastic job of making your subject pop.
Quick tip: Your camera's angle tells a story. Shooting from slightly below eye level can make a subject feel more powerful or authoritative. Shooting from above can make them seem more vulnerable or small. These subtle choices are what separate good content from great content.
Illuminating Your Subject with Simple Lighting
Lighting is what truly separates amateur footage from a polished, professional production. Bad lighting can make a top-of-the-line camera look cheap, while good lighting can make a smartphone video look like it was shot in a studio. The goal is always to create soft, flattering light that wraps around your subject and gets rid of any harsh, distracting shadows.
The industry gold standard is the three-point lighting setup. It sounds complicated, but the concept is simple.
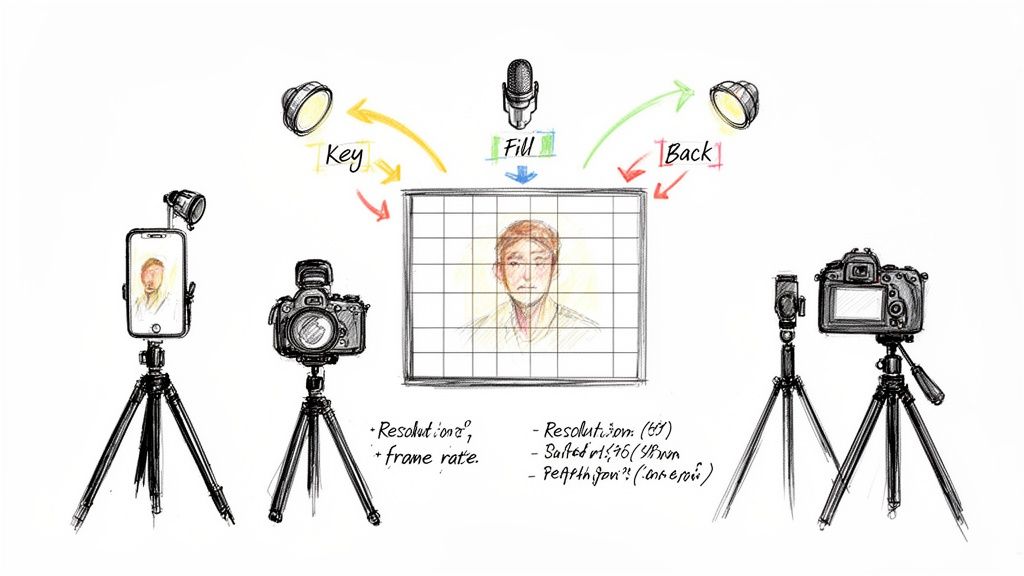
- Key Light: This is your main and brightest light source. Place it about 45 degrees off to one side of your subject to create the primary illumination.
- Fill Light: Positioned on the opposite side, this light is softer and "fills in" the shadows created by the key light. This prevents one side of the face from being too dark.
- Backlight: Sometimes called a hair light, this goes behind your subject. It creates a subtle rim of light that separates them from the background, adding a fantastic sense of depth.
You don't need to go out and buy expensive studio lights for this. A bright window can be your key light. A cheap white foam board from a craft store can bounce that light back onto your subject to act as a fill. Even a small desk lamp placed behind you can work as a backlight. It’s all about experimenting. To get the full picture, understanding essential audio visual equipment is a huge help.
Capturing Crystal-Clear Audio
If there’s one thing you absolutely cannot compromise on, it's audio. Viewers will forgive a slightly soft focus or a shaky shot, but they will click away in a heartbeat if they can't hear you clearly. Your camera's built-in mic is designed to pick up everything—the echo in the room, the hum of the air conditioner, the dog barking next door. That's a problem.
Investing in a dedicated external microphone is arguably the single best upgrade you can make to your production value. And the good news? You don't have to break the bank.
Affordable Microphone Options:
| Microphone Type | Best For | Price Range |
|---|---|---|
| Lavalier Mic | Talking head videos, interviews—anything where you need hands-free freedom. | $20 - $60 |
| USB Mic | Voiceovers, podcasts, and streaming directly from a desktop. | $50 - $150 |
| Shotgun Mic | Mounting on your camera to capture focused sound from what you're pointing at. | $60 - $200 |
Before you hit record, always do a quick soundcheck. Your audio levels should be consistently hitting that sweet spot between -6dB and -12dB on the meter—loud enough to be clear, but not so loud that it distorts or "peaks."
If you record your video and still hear a persistent hiss or hum, don't panic. There are great software tools to fix that. Our guide on how to remove background noise from video has some practical post-production tricks: https://videobgremover.com/blog/how-to-remove-background-noise
Creating a Clean and Professional Background
Nothing screams "amateur video" faster than a distracting background. That pile of laundry in the corner or a messy bookshelf can instantly sabotage your credibility, pulling your audience's focus away from your message. If you want your videos to look professional and command attention, creating a clean visual environment is non-negotiable.
Think of your background as part of the story. A simple, minimalist setting can convey focus and expertise, while a thoughtfully chosen location adds personality. The key is to be intentional, making sure your environment supports your content instead of competing with it.
Traditional Ways to Handle Your Background
For years, creators have relied on a few tried-and-true methods to get a clean shot. The simplest approach is often the best: find or create a minimalist space. This could be as straightforward as filming against a clean, solid-colored wall or a neatly organized office.
Another popular choice is using a physical backdrop. This doesn’t have to mean a full-blown studio setup—it could be a large piece of fabric, seamless paper, or a collapsible screen. These are great for maintaining a consistent, branded look, especially if you film in different places.
But let's be real—these methods have their downsides. Finding the perfect spot can be a headache, and physical backdrops require space, proper lighting, and a bit of fuss to get them looking smooth and wrinkle-free.
The Modern Fix: AI Background Removal
Today, there's a much faster and more flexible way to get that perfect studio look without the physical hassle: AI-powered background removal. These tools are completely changing how we approach video production, letting anyone digitally remove and replace their background with just a few clicks.
This tech has taken off for a reason. By 2025, it's estimated that 63% of video marketers will have used AI tools in their workflow, a big jump from 51% the year before. This shift shows just how much professionals are leaning on AI for post-production work.
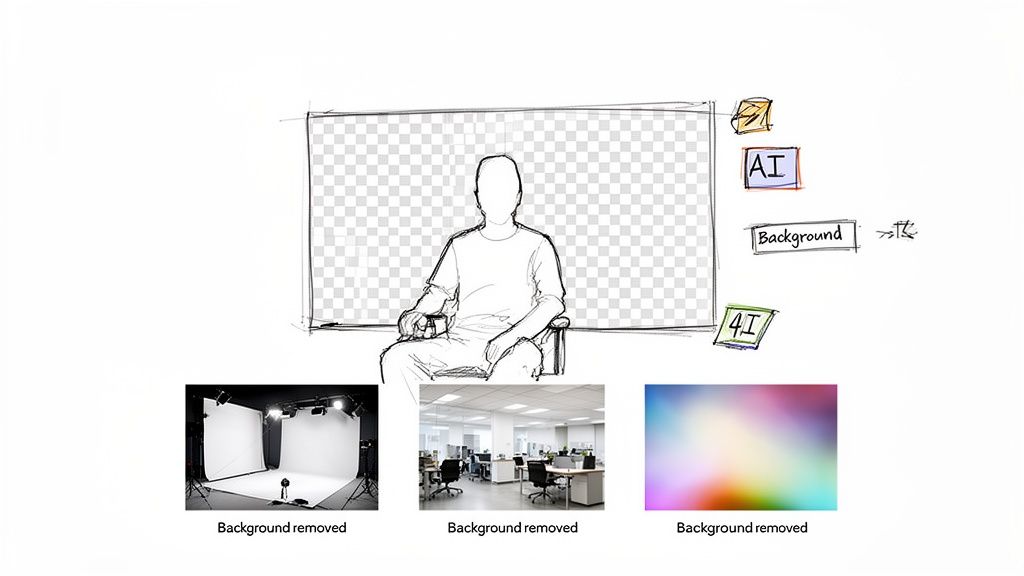
The best part about using an AI tool is the creative freedom it gives you. You're no longer stuck with your physical surroundings. You can place yourself in a sleek branded office, in front of a dynamic motion graphic, or on a simple, clean color—all from the very same footage.
Background Treatment Options Comparison
To help you decide what's right for your workflow, here’s a quick breakdown of the different background methods.
| Method | Setup Time & Cost | Flexibility | Best For |
|---|---|---|---|
| Minimalist Space | Low (if available) | Low | Quick, one-off videos; creators with a dedicated, clean space. |
| Physical Backdrop | Medium | Medium | Branded series; creators needing a consistent but physical look. |
| AI Removal | Very Low | High | UGC ads, product demos, tutorials; creators needing maximum flexibility and speed. |
Ultimately, AI offers an incredibly efficient way to achieve a high-end look without the traditional barriers of time, space, and budget.
Get a Flawless Look Without a Green Screen
You might be thinking, "Can it really look as good as a green screen?" The answer is yes. Modern AI algorithms have gotten so good they can handle tricky details like fine strands of hair and quick movements with amazing precision.
Tools like this AI video background remover are built to handle high-resolution footage, so you can maintain crisp 4K quality without the fuzzy edges or weird artifacts that plagued older software. You just upload your MP4 or MOV file, and the AI gives you back a video with a transparent background, ready for you to drop in whatever new scene you want.
Here’s why so many creators are making the switch:
- Speed and Efficiency: What used to take hours of painstaking manual editing can now be done in minutes.
- Cost-Effectiveness: It cuts out the need to buy green screens, extra lights, or rent a studio.
- Ultimate Flexibility: Change your background for different promotions or topics without ever having to re-shoot.
- Consistency: Keep a polished, professional look across all your videos, no matter where you filmed them.
By bringing these modern tools into your workflow, you can sidestep one of the biggest video production hurdles and start creating clean, professional videos that keep your audience hooked.
Editing Your Footage Like a Storyteller
Shooting the video is really just the first half of the job. The real magic—where you turn a folder of raw clips into a compelling story—happens in the edit. This is your chance to shape the narrative, control the pace, and add that final layer of polish that keeps people watching.
Great editing is more than just snipping out the "ums" and awkward pauses. It’s a series of deliberate choices that guide how your audience feels. When done right, the cuts are invisible, letting the story flow so smoothly that viewers get completely lost in the moment.
It's no surprise that more creators and businesses are taking this on themselves. An incredible 73% of companies now produce their videos with in-house teams, leaving only 25% to outsource the work. This is a huge shift, and it matters because over half of all businesses are regularly creating educational, product, and social media videos. If you're making content today, you're part of a massive movement toward in-house production.
Arranging Your Clips for Narrative Flow
The first thing I always do is get all my footage organized on the timeline. This is often called an "assembly edit." I just lay out all the usable takes in the order they were shot. It gives me a high-level view of everything I have to work with and immediately shows me if there are any glaring holes in the story.
Once you have that rough assembly, you can start molding it. Think about the pacing. Do you want the video to feel high-energy and snappy, or should it be more calm and thoughtful? Quick cuts build excitement, while letting a shot linger gives your audience a moment to really soak it in.
My favorite trick for making edits feel incredibly smooth is using J-cuts and L-cuts. A J-cut is when you hear the audio from the next shot before you see the video. An L-cut is the opposite—the audio from the first shot continues playing over the video of the next one. This technique alone will make your videos feel ten times more professional.
The Power of Color Correction and Grading
Color is an incredibly powerful tool for setting the mood. This usually happens in two stages: correction first, then grading.
- Color Correction: This is the technical step. The goal here is to make your footage look natural and true-to-life. You'll be adjusting the exposure on shots that are too dark or bright, fixing the white balance so white objects actually look white, and making sure skin tones don’t look weird.
- Color Grading: Now for the fun part. Once your clips are corrected and consistent, you can apply a specific "look" to them. Maybe you want warm, golden tones for a nostalgic vibe, or cool, blue hues for a more corporate or serious feel. A consistent color grade ties the whole video together and is a dead giveaway of a professional production.
Adding Graphics and Sound Design
Simple graphics can make a huge difference in how well your message lands. Use text overlays to introduce a speaker, pop a key statistic on screen, or give a clear call-to-action. Just keep them clean, on-brand, and easy to read. Nobody wants to squint.
Sound design is the final, and often overlooked, layer of polish. It's not just about slapping a background music track on it. It’s about carefully balancing every audio element so they all work together.
A few things to focus on:
- Leveling Audio: Make sure your dialogue or voiceover is always front and center. It should be clear and consistent, never fighting with the music or sound effects.
- Adding Music: Pick a track that actually matches the energy of your video. And please, make sure you're using royalty-free music to avoid any copyright headaches down the road.
- Using Sound Effects (SFX): Even subtle effects can make your video feel more alive. A simple "whoosh" for a text transition or a satisfying "click" can add a surprising amount of engagement.
Getting a handle on these post-production steps is what separates good footage from a great video. If you're ready to go deeper, check out our complete guide covering key video editing best practices to really sharpen your skills.
You’ve poured hours into planning, shooting, and meticulously editing your video. It looks perfect in your timeline. But all that hard work can be undone in a single click if you get the export settings wrong. This final step is where so many creators trip up, and it's what separates a professional-looking video from one that looks fuzzy and compressed.
Hitting "export" with default settings is a recipe for disaster. Each social media platform has its own aggressive compression algorithm, designed to shrink your file size. If you don't feed it a file that's already optimized, it will crush the quality, leaving you with ugly digital artifacts that scream "amateur."
The key is understanding that you can't use a one-size-fits-all approach. You have to tailor your export for the specific platform you're targeting.
Platform-Specific Export Settings
Think of it like this: you're giving each platform a file that's as close as possible to its own preferred specs. This minimizes how much extra, destructive compression the platform has to apply on its end. The less work Instagram or YouTube has to do to your file, the better it will look.
Here’s a quick cheat sheet I use that works wonders:
- For YouTube: Always export in the native resolution you shot in (1080p, 4K, etc.). Use the H.264 codec wrapped in an MP4 file. For bitrate, aim for 8-12 Mbps for a solid 1080p video, or crank it up to 35-45 Mbps for crisp 4K.
- For Instagram & TikTok: These are mobile-first, vertical platforms (1080x1920). Again, stick with an MP4 file and the H.264 codec. You can drop the bitrate a bit here—somewhere around 5-10 Mbps is the sweet spot for great quality on a phone screen without long upload times.
Don't Forget the Packaging
A professional video is more than just a high-quality file; it's the entire experience you present. I've seen incredible videos fall flat because of a lazy thumbnail or a boring title. Your thumbnail is your video's billboard—it has to be bright, clear, and intriguing enough to stop someone from scrolling.
And please, don't skip the captions. So many people watch videos on their phones with the sound off. Captions not only make your content more accessible but also dramatically boost engagement and watch time. This is especially true for short-form content under 60 seconds, which is completely dominating social feeds.
The landscape is competitive. In 2025, a staggering 89% of businesses will be using video marketing, with a huge focus on social clips. This is driven by the massive audience of mobile users—3.5 billion strong back in 2023—who demand content that looks great on their screens. You can dig into more of these fascinating video marketing statistics on thedesirecompany.com.
Takeaway: The edit isn't the finish line. Mastering your export settings and carefully packaging your video with a great thumbnail, title, and captions is what gets your hard work seen and appreciated.
Paying attention to these final details is what truly elevates your work. It ensures that the quality you worked so hard to achieve in production and post-production actually makes it to your audience's eyeballs, helping you stand out in an incredibly crowded space.
Ready to create that flawless, professional background without the hassle of a green screen? With VideoBGRemover, you can remove your video background in minutes using powerful AI. Perfect for product promos, UGC ads, and tutorials. Start creating studio-quality videos today at https://videobgremover.com.
Tagged with
Ready to Remove Your Video Background?
See a free preview before you buy.
No credit card required • Free preview on every video