How to Overlay Videos: how to overlay videos in 3 steps for seamless results
Discover how to overlay videos with ease. This practical guide covers layering, transparency, and simple tips for polished, pro-level results.
At its most basic, overlaying a video is as simple as stacking one clip on top of another in your editing timeline. You then just tweak its size, position, and maybe its opacity. The real trick, though, is using a foreground clip that has a transparent background. This is what lets the video underneath peek through, creating that classic layered look you see everywhere. It's the go-to technique for adding a facecam to gameplay footage or slapping a logo on a marketing video.
Why Video Overlays Are a Creator's Secret Weapon
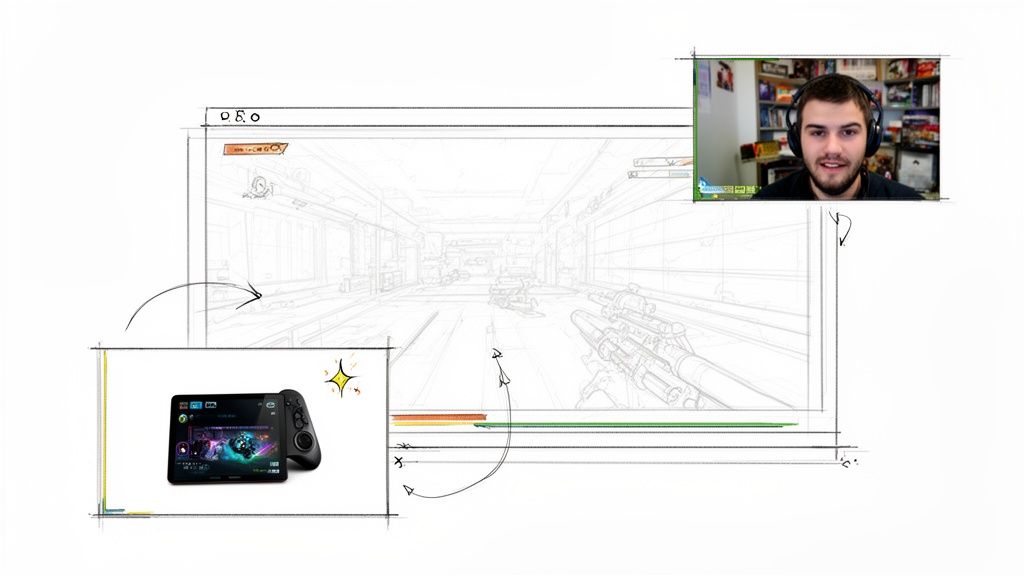
Ever wonder how your favorite streamers perfectly sync their facecam with their gameplay, or how a product shot appears seamlessly over a customer review? That's the power of video overlays. It’s a fundamental editing skill that turns flat, single-shot videos into dynamic, multi-layered stories. Before we jump into the "how-to," let's talk about why this is a skill you absolutely need.
Mastering video overlays gives you a massive advantage in storytelling. It lets you present different pieces of information at the same time without overwhelming your audience. Honestly, it's the backbone of so much modern content, from viral TikToks to those social media ads that just seem to work.
The Power of Layered Storytelling
At its heart, an overlay is just about combining two or more visual elements into one cohesive message. Think of it as a moving collage. The technique is incredibly versatile, and once you start looking for it, you'll see it everywhere:
- Gaming Streams: This is the classic example. A streamer’s live reaction (the overlay) is layered on top of the game they’re playing (the background).
- Product Demos: A slick close-up of a product feature appears over a video of someone actually using it in a real-world scenario.
- Educational Content: You've seen this a million times—a presenter is tucked into the corner of the screen while charts, graphs, or a software demo takes center stage.
- News Broadcasts: The reporter in the field is shown in a box next to the anchor back in the main studio.
This layering doesn't just look cool; it adds crucial context and depth. It makes the final video far more engaging and informative than a single shot ever could. By blending visuals, you're essentially telling the viewer exactly where to look and reinforcing your key points.
Understanding Transparency and Alpha Channels
The secret sauce that makes professional overlays work is transparency, which in the video world is handled by an "alpha channel." An alpha channel is basically an extra piece of information in your video file that tells the editing software which pixels should be solid and which should be completely see-through.
A clean cutout is the foundation of a believable overlay. Without a properly isolated subject, the effect can look amateurish and distracting, undermining your video’s credibility. This is where background removal becomes a critical first step.
When you remove the background from your main clip—whether it's you talking to the camera, a product shot, or an animated graphic—you're creating that transparency. This is what allows the video track underneath it to show through the "empty" areas, giving you that seamless, composited final image. Before you even think about opening your editor, getting a clean, transparent source file is the single most important thing you can do for a polished, professional result.
Getting Your Footage Ready for a Perfect Composite
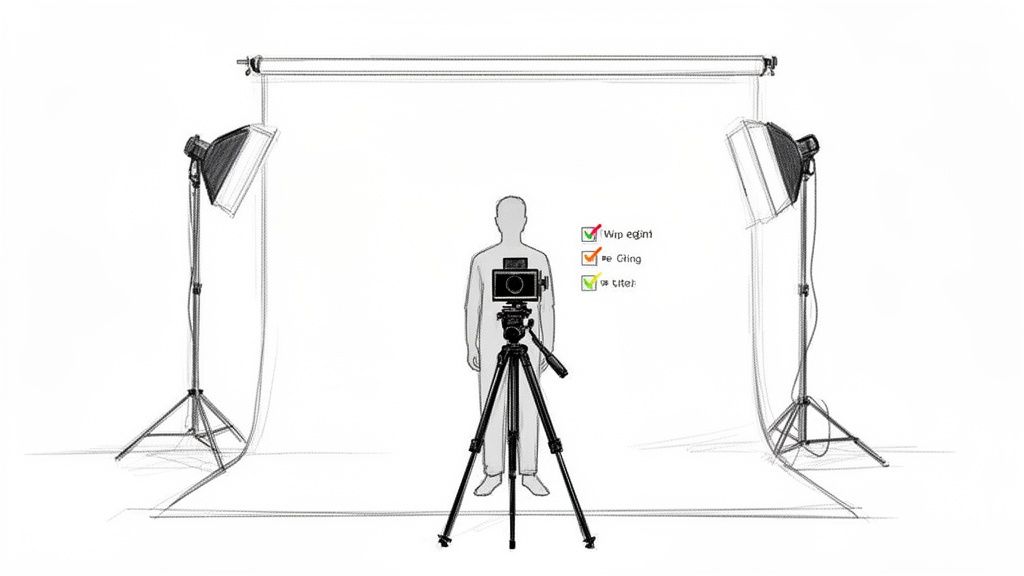
A truly great video overlay doesn't start in the editing suite. It starts with the camera. The choices you make during the shoot will have a massive impact on your final composite, and setting yourself up for success here is the secret to a professional-looking result.
Think of it as giving the background removal AI the cleanest possible canvas to work with. Even though modern tools mean you can ditch the green screen, the fundamental principles haven't changed: good lighting and clear separation between your subject and the background are still king. A clean source video is the foundation of a believable final product.
Filming for a Flawless AI Cutout
You don't need a high-end studio to capture footage that's perfect for background removal. The main goal is simply to create as much visual contrast as possible between your subject and whatever is behind them. This is what helps the AI make a sharp, accurate separation.
Here are a few practical tips I always follow, no matter the shooting environment:
- Light Your Subject Well: Good lighting is non-negotiable. Use a key light to illuminate your subject from the front. You want soft, even light, as it gets rid of the hard shadows that can trick the AI. A simple ring light or a single softbox can work wonders.
- Create Obvious Contrast: Whenever you can, place your subject against a simple, solid-colored background. A plain wall is infinitely better than a cluttered bookshelf. Avoid busy patterns, textures, or colors that are too close to what your subject is wearing.
- Keep Your Subject in Sharp Focus: A shallow depth of field (using a lower f-stop on your camera) can naturally blur the background. This physical separation is a huge cue for the AI algorithms, helping them easily find the edges of your subject.
- Lock Down Your Shot: Use a tripod. Shaky, handheld footage introduces motion blur, making it incredibly difficult for any software to accurately track edges from one frame to the next.
These small adjustments don't require expensive gear, but they pay off big time. You'll get a much cleaner cutout and save yourself a ton of headaches in post-production.
Using an AI Tool to Remove the Background
With your footage in hand, it's time to isolate your subject. This is where a dedicated tool like VideoBGRemover shines, using AI to handle the tedious work that used to take hours of manual rotoscoping. The entire process is built for creators who need high-quality results without the steep learning curve.
The heart of a great overlay is a perfect extraction. The cleaner the alpha channel, the more seamlessly your element will blend into any new background. It’s what makes the final composite look natural and intentional.
The workflow is refreshingly simple: you upload your video, and the AI takes over. It analyzes every frame, identifies the subject, and intelligently creates a mask around it. This is a lifesaver for tricky details like wisps of hair, fabric, or fast movements that are a nightmare to handle manually.
In the fast-paced world of digital video advertising, these techniques are a game-changer. The market is projected to hit USD 90.88 billion in 2026, driven by an ability to layer product demos and calls-to-action directly over footage. This is especially true on mobile, which accounts for 67.58% of spending. You can dive deeper into these figures in the full video advertising market report.
This technology is more accessible than ever. If you're making Reels or Shorts, you can upload an MP4, let the AI do its magic, and export a transparent file ready for any editor. To see how different tools stack up, you can check out our guide on the best AI video background removers. Getting this step right is absolutely critical for a polished final video.
Choosing the Right Transparent Video Format
So, you’ve zapped the background from your video. Now what? You can't just hit "Save as MP4" and call it a day. That's because standard formats like MP4 don't support transparency. To make this work, you need to export your clip in a format that understands and preserves the alpha channel—the secret sauce that tells your editing software which parts of the video are see-through.
Picking the right format is really a balancing act. You're juggling video quality, file size, and whether your editing software will even play nice with it. The perfect format for a high-end commercial would be total overkill for a quick social media post. Get this choice right, and your overlay will look crisp, perform smoothly, and won't clog up your hard drive with massive files.
The Big Three Transparent Formats
When you're learning how to overlay videos, you'll run into three main options time and time again. Each one has its own job, from web-based animations to professional film work. Knowing their strengths and weaknesses is key to picking the right tool for your project.
WebM (VP9 Alpha): This is the modern champion for anything that lives online. Developed by Google, WebM is a fantastic open-source format that gives you excellent quality with surprisingly small file sizes. It's the go-to for anyone who needs transparent videos to load quickly on a website or social media. Pretty much all modern browsers and editors, like Premiere Pro and DaVinci Resolve, support it now.
MOV (ProRes 4444): Meet the heavyweight industry standard. An Apple creation, ProRes 4444 offers virtually lossless quality, meaning it keeps every single pixel of detail from your original footage. That incredible fidelity comes at a price: the file sizes are enormous. This is what the pros use for broadcast, film, and high-end advertising where image quality is everything.
PNG Sequence: This one’s a bit different. It’s not a single video file, but a folder packed with individual still images—one for each frame of your video. Each PNG contains its own alpha channel information. This approach offers amazing flexibility and is almost universally compatible, since every editor can handle an image sequence. It's a lifesaver for complex motion graphics or when you need to do frame-by-frame touch-ups, but be warned—managing thousands of individual files can get messy.
If you want to get really nerdy about the technical side of things, our guide on creating a transparent video background goes much deeper into how alpha channels work.
Transparent Video Format Comparison
Choosing the right transparent format really comes down to your project's specific needs. To make the decision a bit easier, this table breaks down how the most common options stack up in terms of quality, file size, and software compatibility.
| Format | Best For | Quality | File Size | Common Editors |
|---|---|---|---|---|
| WebM (VP9) | Online content, social media, ads, and general use | High | Small | Premiere, DaVinci, CapCut, Browser |
| ProRes 4444 | Professional film, broadcast, high-end commercials | Lossless | Very Large | Premiere, Final Cut, DaVinci |
| PNG Sequence | Motion graphics, VFX, frame-by-frame editing | Lossless | Large | All professional editors |
Ultimately, there's no single "best" format—only the best one for your particular workflow and final destination.
My Personal Takeaway: Honestly, for about 90% of my projects—from YouTube content to client ads—I stick with WebM. The quality is fantastic for online viewing, the small file sizes speed up my workflow, and it’s supported by all the tools I use. I only bust out ProRes 4444 when a project absolutely demands the highest fidelity for broadcast.
So, Which Format Should You Choose?
Think about where your final video is going to live. That’s the most important question.
If you're making an overlay for a TikTok video or an Instagram Reel, WebM is a no-brainer. It gives you all the quality you need without slowing down your mobile editor or taking forever to upload.
On the other hand, if you're a pro editor working on a client project that's going to be displayed on a massive screen, you'll need the uncompromised quality of ProRes 4444. The huge files are just part of the job when you need to preserve every last drop of visual data. A PNG sequence is more of a specialist's tool, best saved for those times you need absolute control over every single frame, like in detailed animation or VFX work.
Compositing Your Overlay in Popular Editors
You've got your transparent video file ready to go—now for the fun part. This is where we get into compositing, the process of actually layering your overlay onto your main footage inside a video editor. The core idea is simple and works pretty much the same everywhere: your main background video goes on a lower track, and your transparent overlay sits on a track right above it.
But the real artistry is in the details. Getting that seamless, professional look requires a solid video editor. If you're still deciding on one, you can find a good rundown of the best software for editing videos out there. No matter what you use, from a pro-level suite to a quick mobile app, the techniques for blending clips are universal.
The chart below gives you a good visual of the technical workflow for getting those crucial transparent formats like WebM, ProRes, or a PNG Sequence.

As you can see, something like a WebM file is perfect for web use, while ProRes and PNG Sequences give you that uncompressed quality you need for serious editing before the final export.
Getting the Basics Down in Different Editors
Even though the buttons and menus look different from one program to the next, the logic behind adding an overlay is always the same. Think of it like stacking layers in Photoshop.
- Pro-Level Editors (Premiere Pro, DaVinci Resolve, Final Cut Pro): In these timeline-based giants, you'll drag your main footage onto the first video track (usually V1). Next, drop your transparent overlay file—your WebM or ProRes clip—onto the track directly above it (V2). The software is smart enough to see the alpha channel and will automatically make the background transparent.
- More Accessible Editors (CapCut, iMovie): These apps are designed for speed but use the same layering concept. In CapCut, for instance, you add your main clip, then hit the "Overlay" button to bring in your second clip, which pops it onto its own layer. iMovie has a similar drag-and-drop feel; placing one clip on top of another brings up options like picture-in-picture.
This simple layering technique is your starting point. From here, we can begin to dial in the look and feel.
Fine-Tuning Scale and Position
It’s rare that your overlay will drop into the timeline at the perfect size or in the exact spot you want it. Your next move is to jump into the transform properties. Look for Scale and Position controls in your editor's effects panel or inspector window.
For a classic gaming facecam, you might scale it down to 25% and nudge the X and Y position values to tuck it into a corner. If you're showing off a product, you might do the opposite—scale the background footage down so the overlay takes center stage.
Pro Tip: Don't just eyeball it. Use your editor’s built-in safe margins or guides to make sure your overlay is properly aligned. This prevents it from getting cropped on different screens and keeps your videos looking consistent.
Getting Creative with Blend Modes
Here's where you can really start to experiment. Blend modes change how the pixels on your top layer interact with the pixels on the bottom layer. "Normal" is the default, but playing with the others can create some incredible effects.
- Screen: This brightens everything up, making it perfect for light leaks, lens flares, or ethereal, ghostly effects.
- Multiply: The opposite of Screen, this darkens the image. It’s fantastic for adding subtle textures like film grain or creating realistic shadows.
- Overlay: A combination of Screen and Multiply, this one punches up the contrast by making the brights brighter and the darks darker.
Blend modes are a game-changer for stylistic overlays. And if you're working in Adobe's ecosystem, you might find our guide on how to use chroma key in Premiere Pro useful for related green screen techniques.
Adding Polish with Masks and Motion Tracking
Want even more control? Masks let you selectively hide or reveal parts of your overlay. You could use a simple oval mask to create a modern, circular facecam, or get really fancy and draw a custom shape to make an overlay appear from behind a building in your background shot.
Motion tracking is the next level. This powerful feature lets the software analyze movement in your background footage and automatically apply that same motion path to your overlay. Imagine tracking a moving car and having a text graphic follow it perfectly across the frame. It’s techniques like this that make your composite feel truly integrated and dynamic.
Pro Tips for a Seamless and Polished Look
Getting your overlay onto the timeline is a huge step, but the real magic happens in the subtle refinements. This is where you elevate your work from a simple composite to a polished, professional piece of content. It’s all about tricking the viewer’s eye into seeing one cohesive image, not two separate clips awkwardly slapped together.
A few extra minutes spent on color and performance can make a world of difference. These are the finishing touches that separate great content from the rest.
Match Your Colors and Lighting
The most common mistake that screams "amateur overlay" is a glaring mismatch in color and lighting. If your overlay was shot in warm, indoor light and you place it over a cool, outdoor scene, the disconnect will be jarring. Your goal is to make both layers feel like they were captured by the same camera, at the same time.
Jump into your editor’s color correction tools—think curves, color wheels, or HSL secondaries—and start tweaking your overlay. Pay close attention to:
- Color Temperature: Is your overlay too warm (yellow/orange) or too cool (blue) compared to the background? Slide the temperature until the whites in both layers look the same.
- Brightness and Contrast: Match the brightest parts (highlights) and darkest parts (shadows) of your overlay to the background. If the background is softly lit, a high-contrast overlay will look completely out of place.
- Saturation: Make sure the color intensity feels consistent. A super-saturated overlay on a muted background looks fake, and vice-versa.
Soften the Edges with Feathering
Even the best AI background removal can sometimes leave a sharp, digital-looking edge around your subject. While precision is great, an overly sharp edge can create a "cutout" effect that gives the game away.
A tiny bit of feathering can solve this instantly. Look for a "feather" or "softness" setting on your mask or matte. Applying a subtle value, often just 1 to 3 pixels, will slightly blur the edge of your overlay. This small change helps it blend much more naturally into the background, smoothing out any minor imperfections.
Optimize Your Editing Performance
Working with multiple video layers, especially 4K files and transparent formats like ProRes, can bring even a powerful computer to its knees. A choppy, lagging timeline makes precise editing nearly impossible. If you want to keep things running smoothly, you need to optimize your workflow.
The single best way to do this is by using proxies. Proxies are low-resolution copies of your original footage that your editor uses for smooth playback. When you're ready to export, the software automatically swaps back to the full-quality files. It gives you the best of both worlds: a responsive editing experience and a pristine final video.
Key Takeaway: Performance optimization isn't just for pros. Using proxies saves time and frustration, letting you focus on the creative side of your edit instead of fighting with your software. It’s a foundational skill for anyone serious about video.
This is especially critical in a market where visual effects are booming. The graphic overlay industry is projected to hit $2.8-$3.2 billion globally by 2026, driven heavily by mobile video ads. Tools that simplify these workflows, like the browser-based background removal from VideoBGRemover, are vital for the 30,000+ creators who need to produce high-quality overlays for platforms like DaVinci Resolve or After Effects without technical headaches.
To take your projects even further, exploring some essential video editing tips for beginners will help you achieve that truly polished look across the board.
Nail Your Export Settings
After all that hard work, don't let poor export settings ruin your video. Each platform—YouTube, Instagram, TikTok—has its own preferred specs for resolution, bitrate, and codec. Using the right settings ensures your video looks as crisp on their platform as it did in your editor.
- For YouTube: Stick with the H.264 codec. Use a high bitrate—around 15-20 Mbps for 1080p or 35-45 Mbps for 4K—to keep things looking sharp.
- For Instagram/TikTok: Vertical video is king (1080x1920). Use H.264 with a variable bitrate, and remember that shorter clips tend to hold their quality better on these platforms.
A pro habit to get into is exporting a master file in a high-quality format like ProRes first. From that master, you can then create compressed versions for each specific platform. This way, you always have a top-quality source to work from.
Common Questions About Video Overlays
Even when you know the steps, getting video overlays to look just right can be tricky. Things pop up. It's totally normal, especially when you're chasing that polished, professional look. Let's dig into some of the most common questions and sticking points I see people run into when working with overlays.
Think of this as your go-to troubleshooting guide. We'll get straight to the point with clear answers to help you fix common problems, fine-tune your technique, and feel confident tackling any compositing challenge.
Do I Really Need a Green Screen for a Clean Overlay?
Not anymore, thankfully. For years, a green screen was the only reliable way to get a clean cutout. But today's AI tools have pretty much made them optional for most projects. An AI-powered background remover can intelligently analyze your footage and isolate a subject from almost any background you throw at it.
This is a game-changer. It means you can shoot in a real environment—your office, a park, your living room—and still pull off a professional-looking overlay. The key is to shoot with good, even lighting and have some decent visual contrast between your subject and whatever is behind them. This tech makes high-quality overlays so much more accessible.
Which Transparent Video Format Is Best for Me?
The right format really boils down to where your video will end up and what you're doing with it. There’s no single "best" choice, but there are definitely clear winners for specific situations.
- WebM (VP9): For most online content, this is your best bet. It hits that sweet spot between great quality and small file sizes, which is perfect for YouTube, social media, and web ads. Just about every modern editor supports it.
- MOV (ProRes 4444): If you're working on a high-end commercial or a project where visual quality is the absolute top priority, this is the industry standard. Just be ready for massive file sizes, as it preserves nearly every bit of image data.
- PNG Sequence: This one gives you ultimate control for complex motion graphics or when you need to tweak things frame-by-frame. It’s literally a folder full of images, which is fantastic for detailed VFX work but can be overkill for simpler edits.
As a rule of thumb, start with WebM for its efficiency. Only jump to a heavier format like ProRes if the project absolutely demands it for broadcast or cinema-grade output.
Why Does My Overlay Look Blurry or Pixelated?
This is a frustrating one, but it usually comes down to one of three culprits. First, always look at your source footage. Your overlay can never be sharper than the original video you started with. Garbage in, garbage out.
Second, double-check your export settings—both from your background removal tool and from your main video editor. Make sure you’re choosing a high-quality transparent format and exporting your final video with a high bitrate to avoid nasty compression artifacts.
Finally, make sure your project settings inside your editor (like in Premiere Pro or DaVinci Resolve) match your clip's resolution. Dropping a 1080p overlay into a 4K timeline without scaling it up correctly will always make it look soft and pixelated.
How Do I Make My Overlay Blend More Naturally?
Making a composite believable is all about the little details that trick the viewer's eye. The single most important thing you can do is focus on color matching. You want the overlay and the background to look like they were shot in the same place, at the same time.
Jump into your editor’s color correction tools and start tweaking the brightness, contrast, and hue of your overlay until its lighting feels right for the background. Pay close attention to things like the color of the light (warm or cool?) and where it’s coming from.
Another great trick is to add a super subtle edge feather, usually just 1 or 2 pixels. This softens the hard cutout line and helps it sit more organically in the scene. And for a final touch, try adding a faint, uniform grain layer over the entire composition. This can act like a "glue," tying the foreground and background together so they feel like they were captured by the same camera.
Ready to create flawless video overlays without messing with a green screen? With VideoBGRemover, you can use powerful AI to remove the background from any video. Just upload your clip, let the tool do its thing, and download a high-quality transparent file that’s ready for any editor.
Tagged with
Ready to Remove Your Video Background?
See a free preview before you buy.
No credit card required • Free preview on every video