How to Make a Video with Green Screen a Creator's Guide
Learn how to make a video with green screen, from physical setup and lighting to modern AI-powered background removal. Your complete guide to pro-level video.
So, you want to make a video with a green screen. The basic idea is pretty simple: you film someone in front of a bright green wall, and then in editing, you tell the software to remove all that green and replace it with whatever you want. That's it. This trick is called chroma keying, and it's the secret sauce behind everything from Hollywood special effects to the viral TikToks filling your feed.
Why Green Screens Are Suddenly Everywhere
Ever see a YouTuber who looks like they're broadcasting from a tropical beach, or a creator reacting to a giant meme that’s seemingly floating behind them? That’s the magic of chroma keying. It’s no longer a tool reserved for big-budget film studios; it’s become a go-to for creators of all kinds.
The concept is powerful. By isolating a very specific color—usually a super vibrant green or blue—you can make it completely transparent in your editing software. This lets you drop any image or video clip you can dream of into the background, all without ever leaving your room. It’s a game-changer for creativity, saving you the time, money, and hassle of building physical sets or traveling to exotic locations.
The Two Ways to Get It Done
These days, you've got two main ways to pull off this effect, and each has its own strengths.
- The Classic Green Screen Setup: This is the tried-and-true, industry-standard method. You hang a physical green fabric or paint a wall, light it up so there are no shadows, and film your subject in front of it. It takes a little effort to get right, but the payoff is clean, professional-looking results you can count on.
- AI-Powered Background Removal: The new kid on the block. Instead of a physical screen, you let artificial intelligence do the heavy lifting. Smart tools like VideoBGRemover can analyze your footage and digitally cut you out from your background, no green required. It's a fantastic option if you're short on space or just want to move fast.
The rise of short-form video on platforms like TikTok, Instagram Reels, and YouTube Shorts has pushed these techniques into the mainstream. In fact, TikTok's own Green Screen effect was one of its hottest trends in 2023, fueling a massive wave of creative content. Users could instantly swap their backgrounds without any gear, which sent engagement through the roof. If you're curious, you can explore more data on the green screen production market to see just how big this has become.
My Take: Whether you get your hands dirty with a physical screen or let an AI do the work, learning how to replace your background is a core skill. It's essential for making sharp tutorials, engaging social clips, and ads that actually look professional.
This guide will walk you through both methods, step by step. I'll show you how to create incredible content no matter what your budget, space, or experience level looks like. Let's get started.
Building Your Physical Green Screen Studio
Let’s get one thing straight: you don't need a Hollywood budget to pull off a great green screen effect. Forget the intimidating, high-tech image you might have in your head. Getting the traditional, physical setup right really just boils down to two things: your screen and your lighting. Master those, and you're golden.
Choosing Your Green Screen Material
First up, you need to pick your background. What you choose will hinge on your space, how much you want to spend, and whether you need a permanent spot or something you can tear down.
You’ve got three solid options here, each with its own pros and cons.
- Fabric Screens: This is the go-to for most home studios and creators who need portability. You can hang them on a stand or even just tape them to a wall. The downside? Wrinkles. They're a total pain and create shadows that make editing a nightmare. You’ll need to spend quality time with a steamer before every single shoot.
- Paper Rolls: A favorite in the photography world, seamless paper rolls give you a perfectly smooth, non-reflective surface from the get-go. They look fantastic and provide an even color, but they're delicate. One wrong step or a tear, and you’re cutting off a section and rolling out a fresh piece.
- Chroma Key Paint: If you have a dedicated studio space, this is the ultimate solution. A couple of coats of chroma key paint on a wall gives you a flawless, permanent background. It’s a one-and-done setup that completely gets rid of wrinkles and sagging. The only catch is, it’s not going anywhere.
Once you’ve got your screen sorted, it's time to focus on what really makes or breaks your shot. It's not the screen—it's the light.
The Art of Green Screen Lighting
Lighting is everything. I can't stress this enough. Bad lighting leads to shadows, uneven color, and that dreaded green "spill" reflecting onto your subject. These are all things that will give you a massive headache in post-production.
The secret is to light your subject and your screen separately.
First, light your subject using a classic 3-point lighting setup. Think of it as a triangle of light.
- Key Light: This is your main, brightest light. Position it at about a 45-degree angle to one side of the camera to illuminate your subject.
- Fill Light: This one is softer and less bright. Place it on the opposite side of the camera to fill in the shadows created by the key light.
- Backlight: Sometimes called a hair light, this goes behind and above your subject. It creates a subtle rim of light that separates them from the green screen, preventing that ugly "pasted on" look.
With your subject looking great, turn your attention to the green screen. You'll need at least two more soft lights (LED panels with diffusers work well) on either side of the screen. The goal here is simple: create a flat, evenly lit canvas of pure green. No shadows, no bright hotspots. Just smooth, consistent color.
This flowchart breaks down the two main paths you can take to get a green screen effect—the traditional physical setup we're talking about now, and the newer AI-driven approach.
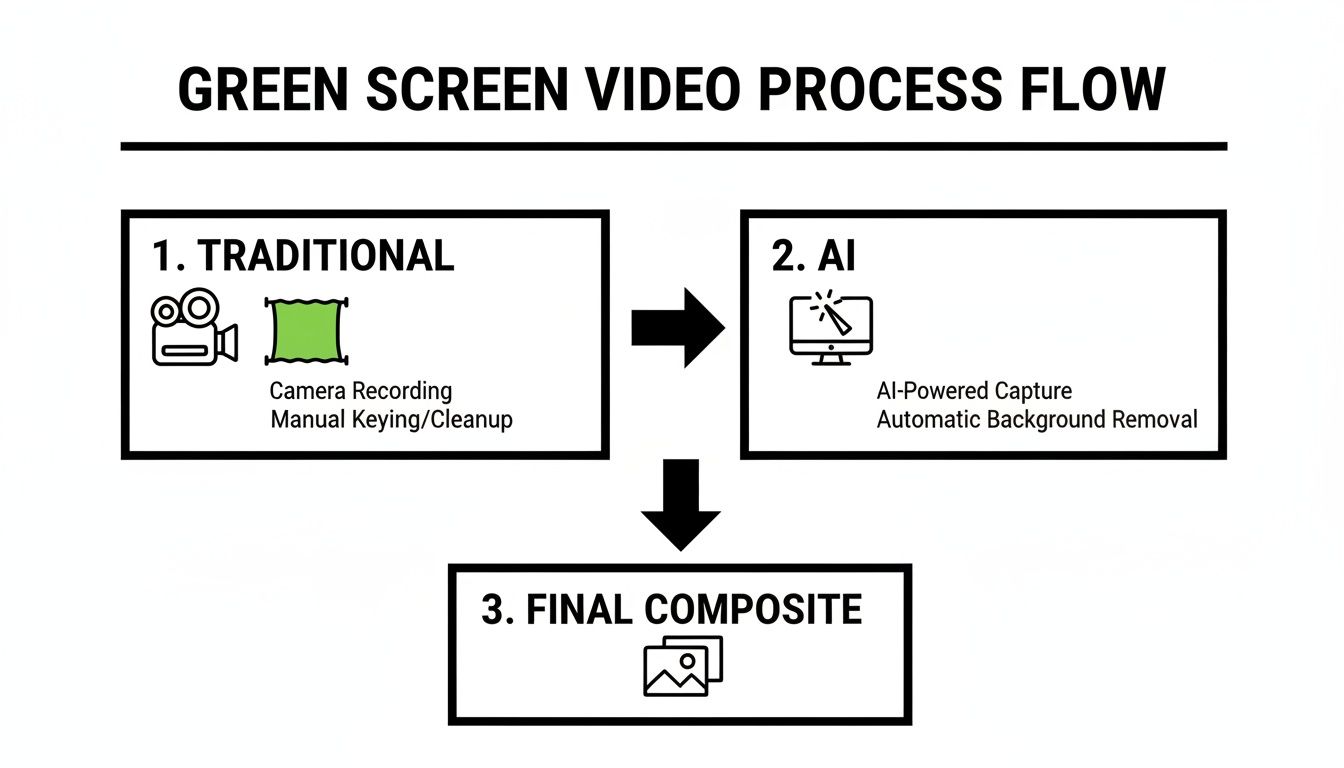
As you can see, the physical process gives you a ton of control right from the start, while the AI method handles the heavy lifting in post.
Pro Tip from the Trenches: Always keep your subject at least six feet away from the green screen. This simple step does two crucial things: it dramatically reduces the amount of green light bouncing off the screen and onto your subject, and it makes it way harder for their shadow to land on the screen behind them. For a deeper dive, check out our guide on video backgrounds and green screens.
Essential Gear for Your Green Screen Setup
Getting the right equipment doesn't have to break the bank. You can start small and upgrade as you grow. Here's a look at what you might need, broken down by budget.
| Gear Category | Budget Friendly (Beginner) | Mid-Range (Prosumer) | Professional (Studio) |
|---|---|---|---|
| Green Screen | Collapsible fabric screen or muslin cloth | Large pop-up screen or seamless paper roll | Permanently painted cyclorama wall |
| Screen Lighting | 2x Clamp lights with daylight bulbs | 2x LED panels with softboxes | 4x Dimmable studio lights (Kino Flo, Aputure) |
| Subject Lighting | 1-2 LED ring lights or softboxes | 3-point LED lighting kit (e.g., Godox SL60W) | Professional 3-point kit with large modifiers |
| Camera | Smartphone with manual controls or a DSLR | Mirrorless camera (e.g., Sony A7 series) | Cinema camera (e.g., Blackmagic, RED) |
| Stands & Grip | Basic light stands, clamps, and sandbags | C-stands, boom arms, and extra grip gear | Heavy-duty stands and a full grip truck |
No matter your budget, the core principles of separate, even lighting remain the same. The better gear just makes achieving it easier and more consistent.
Dialing in Your Camera Settings
Your camera settings are the final piece of the pre-production puzzle. Getting them wrong can introduce motion blur or digital noise, which absolutely wrecks your footage and confuses the chroma keying software.
- Shutter Speed: To keep your edges clean and avoid motion blur, a good rule of thumb is to set your shutter speed to at least double your frame rate. Shooting at 30 fps? Set your shutter to 1/60th of a second or faster.
- ISO: Keep your ISO as low as you possibly can. High ISO creates that grainy, noisy look in your video, making it tough for the software to isolate a clean green color. This is another reason why good lighting is a must—more light means you can use a lower ISO.
- Aperture (f-stop): A slightly deeper depth of field (a higher f-stop number) helps keep the green screen in focus, which is good. Just don't push it too high, or you'll need a massive amount of light. Find that sweet spot where your subject is sharp and the background isn't blurry.
- Recording Format: Always record in the highest quality format your camera can handle. A higher bitrate and better color subsampling (like 4:2:2 instead of 4:2:0) capture way more color data, which gives your editing software more information to work with for a cleaner key.
The market for green screen gear tells its own story. Valued at around $1.2 billion in 2023, it's expected to hit $2.8 billion by 2032. That massive growth proves that millions of creators are still investing in these classic techniques. They know that poorly lit footage is the enemy of a clean key. With your gear ready and your settings locked in, you're all set to press record.
Getting the Shot and Nailing the Edit
Alright, your lights are set, and the camera is dialed in. Now comes the fun part: filming and editing. Think of it this way: the work you put in on set directly impacts how much time you'll spend pulling your hair out in the editing suite. A great recording makes for an easy edit, but a skilled editor can definitely salvage a less-than-perfect shot.
The little things you manage during the shoot—from wardrobe to how your subject moves—can make or break your final video. Let's walk through the on-set best practices that will make your post-production workflow a whole lot smoother.
What to Do Before You Hit Record
A few minutes of prep work before the camera rolls can save you hours of frustration later. What your talent wears and how they move are two of the biggest factors that determine how cleanly you can key out that green background.
The golden rule of green screen is obvious but worth repeating: do not wear green. Anything that matches the background color will simply vanish in the edit. But other wardrobe choices can be just as tricky.
- Ditch the Bling: Shiny jewelry, glasses, and even glossy fabrics are notorious for catching green reflections from the screen. This "spill" is a real pain to remove later.
- Watch Out for Fine Patterns: Intricate designs like tight pinstripes or houndstooth can create a weird, shimmering moiré effect on camera that confuses the keying software.
- Avoid Sheer or Translucent Fabrics: These materials are a chroma keying nightmare. The software can't figure out where the subject ends and the background begins.
Movement is the other big thing to watch. You want natural motion, of course, but fast, jerky actions create motion blur. That blur produces semi-transparent edges that are nearly impossible for the software to key cleanly, leaving you with choppy, glitchy outlines. It's best to coach your talent to use smoother, more deliberate movements to keep their edges looking sharp.
The Magic of Chroma Keying in Your Editor
Once your footage is on the computer, it's time to remove the green background. This process is called chroma keying, and pretty much any modern video editor—from Adobe Premiere Pro to DaVinci Resolve—has fantastic tools for the job.
The basic idea is the same across all software. You'll apply an effect, usually called "Ultra Key," "Chroma Keyer," or something similar, to your video clip. This effect lets you isolate and remove the specific shade of green in your background, which creates a mask (or matte) separating your subject from everything else.
A clean matte is the secret to a believable composite. When you look at the matte view, your goal is a solid white subject against a pure black background. Any gray spots mean partial transparency, which will make your subject look ghostly or see-through.
After applying the effect, you’ll use a color picker to tell the software exactly which shade of green to remove. And just like that, the background is gone. But this is just the starting point; the real work is in the fine-tuning.
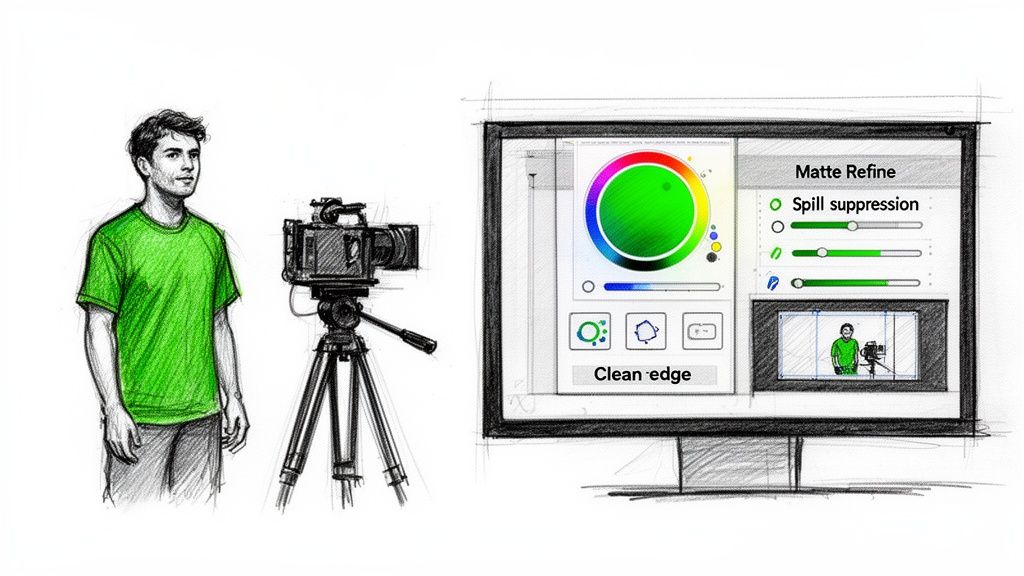
Refining Your Key for a Perfect Composite
Just clicking on the green is never the final step. You'll need to tweak several settings to clean up the edges, get rid of that nasty green halo, and make your subject look like they actually belong in their new environment.
Matte Refinement Controls
These are the sliders and dials that let you perfect the edges of your matte. You’ll be using these constantly:
- Tolerance/Threshold: This tells the software how much "green" to consider green. Nudge it up to remove stubborn green spots, but don't go so far that you start eating into your subject.
- Choke/Shrink: This is a lifesaver. It pulls the edges of your matte inward, which is perfect for killing thin green halos around your subject.
- Soften/Feather: This adds a tiny bit of blur to the matte's edge. It helps your subject blend more naturally into the new background instead of looking like a sharp, hard-edged cutout.
Spill Suppression
Even with great lighting, you'll almost always see a faint green reflection bouncing off the screen onto your subject's hair and shoulders. That's called spill. Every professional keying tool has a spill suppressor to fix this. It intelligently finds those green tints and neutralizes them, usually by pushing them toward magenta (green's opposite on the color wheel).
If you want to dive deeper into this, our guide on https://videobgremover.com/blog/how-to-use-chroma-key-in-premiere-pro breaks down the spill suppression tools and other advanced settings for a truly polished look.
Putting It All Together
The final step is to drag your new background—whether it's a video or a static image—onto the timeline track underneath your green screen footage. Instantly, your composite comes to life.
Now, watch it back. Pay close attention. Are the edges flickering? Do you see any leftover green glow? Is the background showing through your subject anywhere?
A common rookie mistake is to be too aggressive with the settings. Pushing them too far can create unnaturally sharp edges or erase fine details like hair. The best approach is to make small, incremental adjustments. It's a bit of a balancing act, but with a little practice, you'll get a feel for it. This meticulous work is what separates an amateur video from a professional-looking final product.
No Green Screen? No Problem. Let's Talk About AI Background Removal
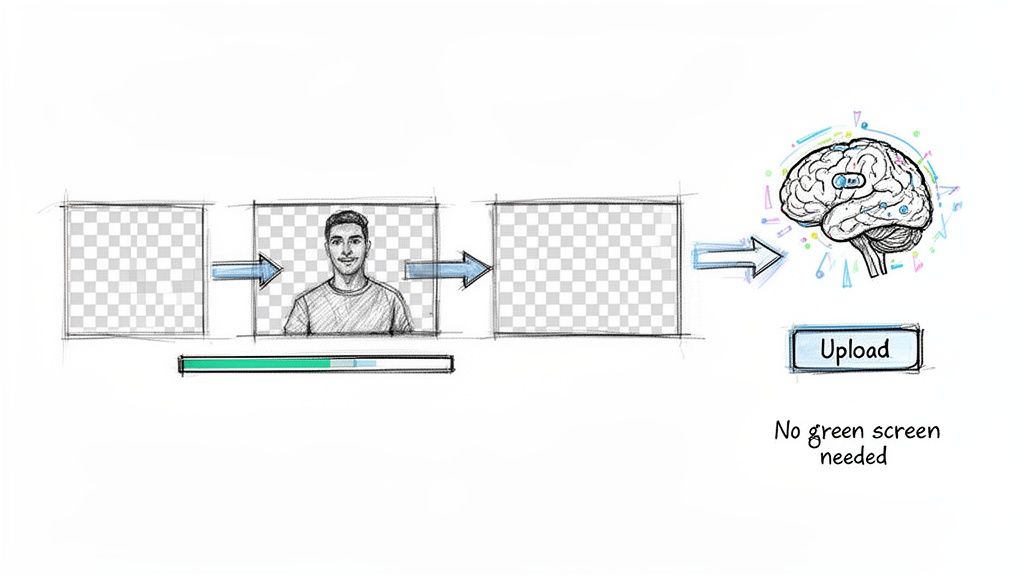
What if you could get that clean, professional look of a green screen video without ever setting up a single piece of fabric? That’s exactly what AI-powered background removal offers. It's a fantastic alternative for creators who don’t have the space, budget, or frankly, the time to fuss with a traditional physical setup.
Instead of hunting for a specific color to key out, AI models are smart. They analyze your footage frame by frame, intelligently identifying you (the subject) and separating you from whatever is going on in the background. It doesn't matter if it's a messy bedroom or a busy street.
This completely sidesteps the biggest headaches of using a physical green screen. You can forget about wrestling with perfectly even lighting, chasing down stubborn shadows, or dealing with that dreaded green halo—what we call "color spill." The AI does all the tricky separation work for you.
How AI Actually Simplifies Your Workflow
The whole process is way more straightforward than you might think. When you use a tool built for this, like an AI video background remover, your workflow gets a serious efficiency boost. You just upload your video clip and let the algorithm take over.
The AI essentially creates a perfect digital cutout of your subject, giving you back a new video file that has a transparent background. From there, you just drop that clip into your favorite editor and layer it over any new background you want—exactly like you would with regular chroma key footage.
This opens up a ton of creative freedom. You can shoot content on the fly—in your car, at a park, or from a hotel room—and still end up with a polished, studio-quality result when you get to the edit.
The goal is the same whether you use a green screen or AI: get a clean separation between your subject and the background. The difference is that AI does it with software, getting rid of the need for a big physical setup and finicky lighting.
When AI Is the Smarter Choice
Look, a perfectly lit physical green screen can give you incredible precision. But AI background removal really shines in a few key situations where speed and convenience are everything.
- You're Tight on Space: This is a lifesaver for creators in small home offices or apartments where setting up lights and a giant screen just isn't happening.
- You Shoot "Run-and-Gun" Content: It’s perfect for vloggers, journalists, or social media creators who need to film on location without lugging around a bunch of extra gear.
- You're on a Tight Deadline: When you need to crank out content for TikTok or Reels fast, AI can slash your setup and editing time.
- You're on a Budget: It completely removes the upfront cost of buying screens, stands, and dedicated lighting kits.
Traditional Green Screen vs. AI Background Removal
Deciding between the old-school physical setup and a modern AI tool can be tough. Both have their place, but they excel in different areas. This table breaks down the key differences to help you figure out which workflow is the right fit for your next project.
| Feature | Traditional Green Screen | AI Background Removal (e.g., VideoBGRemover) |
|---|---|---|
| Setup Time | High (Requires careful lighting and screen setup) | Minimal (Just need a camera and a subject) |
| Space Required | Significant space for the screen, lights, and distance | Only enough space for the person you're filming |
| Precision | Very high with proper, even lighting | Good, but can sometimes struggle with fast motion or fine details |
| Flexibility | Limited to your studio or wherever the screen is set up | Film absolutely anywhere, anytime |
| Cost | Higher upfront investment in gear | Typically a pay-per-use or subscription model |
Ultimately, choosing the right tool comes down to your specific needs. If you're building a permanent studio and need pixel-perfect keys for high-end productions, a traditional green screen is a solid investment. But for most creators, especially those focused on social media and fast-turnaround content, AI offers an incredibly powerful and flexible alternative.
This flexibility is a huge deal for businesses, too. It’s becoming common for brands to shoot product demos and tutorials with the full intention of swapping out the background later. This is why more and more editors are focused on getting a clean foreground asset they can export with a transparent background. It allows them to reuse the same clip across dozens of ad campaigns and A/B tests without ever needing a reshoot.
And this is just the beginning. The capabilities of Generative AI integration services are pushing the boundaries even further, giving us new ways to not just replace but create entirely new backgrounds from scratch. In the end, AI gives more creators a faster, more accessible way to achieve the "green screen" effect, empowering them to make great-looking videos no matter where they are.
Creative Ideas for Your Next Video
Alright, so you’ve got the technical side of green screening down. That’s the hard part, right? Well, now the real fun begins. Getting a clean key is one thing, but figuring out what to do with it is where your creativity can really shine.
Think of your transparent background video as a master key—a versatile asset you can use to unlock all sorts of content ideas. Whether you used a physical green screen or an AI tool to knock out the background, you're ready to roll.
Let's dive into how you can actually use this technique to make content that genuinely connects and gets noticed.
For Social Media Creators
If you’re making TikToks, Reels, or Shorts, you live and die by speed and relevance. A green screen is one of the most powerful tools in your arsenal for jumping on trends the moment they happen.
- Jump Inside the Meme: Don't just talk about the latest viral meme—put yourself right in the middle of it. Reacting to a clip is good, but physically placing yourself into the scene is way more engaging and shareable.
- Level-Up Your Reactions: Move beyond the basic picture-in-picture box. With a transparent background, you can stand in front of the video you're reacting to, pointing at things and interacting with the content as if you're right there. It’s a game-changer for engagement.
- Fake Your Location: Want to look like you're on a beach in Bali or the streets of Tokyo without the plane ticket? Done. This is perfect for skits, storytelling, or just creating a scroll-stopping visual that makes people pay attention.
Once you get the hang of creating these videos, timing is everything. Understanding the best times to post videos on platforms like TikTok can make a huge difference in how many people see your work.
For Educators and Course Creators
When you're teaching something, your goal is to be clear, engaging, and memorable. A green screen can take a potentially dry tutorial and make it feel like a one-on-one session.
Instead of just being a voiceover, overlay yourself directly onto your software demo or presentation slides. This keeps you, the instructor, visually connected to your students. You’re no longer a disembodied voice; you’re their personal guide walking them through the material.
The mantra here is to "shoot once, repurpose endlessly." Think about it: that single tutorial you filmed becomes a timeless asset. You can drop it over an updated software interface next year or place it on a newly branded slide deck without ever having to re-record yourself.
For Marketers and Businesses
In the world of marketing, flexibility is gold. Using a green screen for your promotional videos is a ridiculously smart strategy that saves a ton of time and money down the line.
Imagine you film a fantastic customer testimonial. With a transparent background, you can use that same video for your holiday sale (just add a festive backdrop) and then reuse it for a summer campaign with a different background. You can even A/B test which backgrounds get more clicks.
This is also the secret to creating clean, professional product showcases where you can add branding and graphics later, ensuring the product itself is the hero.
The bar for this stuff is getting higher. With video making up around 82% of all internet traffic, your audience is seeing more and more sophisticated content. Learning how to make a green screen video properly means you can deliver clean, believable effects that help you stand out in a very crowded feed.
Your Top Green Screen Questions, Answered
Once you get the basics down, you’ll inevitably run into a few head-scratchers. It happens to everyone. Let's walk through some of the most common questions I hear from creators, covering everything from screen color to those frustrating post-production gremlins.
Can I Just Use a Blue Screen Instead?
You absolutely can. The technique, known as chroma keying, isn't exclusive to green. In fact, for decades, blue was the go-to color in Hollywood and it's still a fantastic choice.
So, when would you pick blue? A blue screen is often the smarter move if your subject has blonde hair or is wearing anything with green in it. Green screens have a nasty habit of casting a subtle green reflection onto light-colored hair, which can make getting a clean key a real headache. Blue neatly sidesteps that issue.
The reason green became so popular is that modern digital camera sensors are most sensitive to the green channel. This technical detail often means you can pull a cleaner key with less digital noise. Ultimately, the right choice boils down to what (and who) is in your shot.
How Do I Get Rid of That Annoying Green Halo?
That faint green glow wrapping around your subject's hair and shoulders has a name: spill. Your best line of defense is creating physical distance. The farther your subject is from the screen, the better. A strong backlight during your shoot also works wonders to combat it.
But if it still creeps into your footage, don't sweat it. This is a super common issue, and pretty much every video editor has a built-in spill suppression tool to handle it.
- In Adobe Premiere Pro, the Ultra Key effect has a spill suppression feature that automatically finds and neutralizes that unwanted green tint.
- If you need more precise control, you can add a secondary color correction. From there, you can carefully nudge the hues in just the affected areas away from green and toward its opposite on the color wheel, magenta.
My Two Cents: Great lighting on set is always the best cure. A dedicated backlight that creates a crisp rim of light around your subject is the single most effective way to separate them from the background and kill reflections before they start.
What's the Best Video Format to Shoot In?
For the cleanest key imaginable, your camera needs to grab as much color information as possible. That means shooting in a format with minimal compression and maximum color detail is the name of the game.
If your camera has professional codecs like ProRes or DNxHD, use them. These formats are data-rich, which makes the keying process much smoother for your software.
Shooting on a consumer camera? No problem. Just dig into the settings and crank everything up. Pick the highest quality option with the highest bitrate available—look for 100 Mbps or more. Also, keep an eye out for a setting that offers 4:2:2 color subsampling. It captures significantly more color data than the standard 4:2:0, giving your editor more information to work with when it's trying to figure out where your subject's edges end and the background begins.
Do I Really Need to Spend a Fortune on Lights?
Nope. You don't need a Hollywood-sized budget to get professional results. The goal isn't expensive gear; it's soft, even illumination. You can achieve that easily with some affordable LED panels and softboxes.
The core principle to burn into your brain is this: light your subject and your green screen separately. I can't stress this enough. Use at least two lights dedicated only to the screen, aimed to create a perfectly flat, shadow-free canvas. Then, use a completely separate 3-point lighting setup for your subject. Consistent, shadowless light is infinitely more important than the brand name on your equipment.
Ready to skip the whole setup and just get creating? VideoBGRemover uses AI to instantly remove your video's background, no green screen required. Just upload your clip, let the AI work its magic, and you'll get a professional video with a transparent background in minutes. You can try it for free on the VideoBGRemover website.
Tagged with
Ready to Remove Your Video Background?
See a free preview before you buy.
No credit card required • Free preview on every video