How to Correct Color in Video for Professional Results
Learn how to correct color in your videos for a professional look. This guide covers white balance, skin tones, and creative grading to elevate your content.
Color correction is the technical side of making your footage look right. It’s all about fixing problems with lighting and color to get everything to a clean, natural starting point. The whole process really boils down to analyzing your video with scopes, fixing the exposure and white balance, getting skin tones just right, and then moving on to the creative stuff—the color grade that sets the mood.
Getting this workflow down is what separates amateur-looking shots from truly professional video.
Why Color Correction Is Your Secret Weapon
We’ve all been there. You get back from a shoot, load your footage, and… it just looks off. The colors are dull, the lighting is inconsistent from one shot to the next, and there's a weird tint you didn't see on set. That's the frustrating gap between the scene you pictured in your head and what the camera actually saw.
This guide is here to help you close that gap. We'll walk through a reliable workflow to fix those common issues and give you the confidence to make your video look exactly how you want it to.
First, let's clear up two terms that often get mixed up: color correction and color grading.
- Color Correction: This is the technical, foundational part. Think of it as problem-solving. You’re fixing things like an orange cast from indoor lights or a shot that’s too dark. The goal is a neutral, true-to-life image.
- Color Grading: This is the fun, creative part that comes after. Once your footage is corrected and balanced, you can apply a specific style—maybe a cinematic teal-and-orange look or a warm, vintage vibe.
Here's an analogy I love: Color correction is like prepping and priming a wall before you paint. You fill the holes, sand it smooth, and make sure you have a perfect, clean canvas. Color grading is choosing the paint color and finish to give the room its personality. You can't get a beautiful result by painting over a damaged wall.
The Impact of Professional Color
Nailing your color isn't just about making things look pretty; it has a real impact on how your audience connects with your video. For anyone creating content, especially marketers, poor color can be a deal-breaker. In fact, some studies show that improper color treatment can slash viewer engagement by as much as 40%.
On the flip side, well-balanced, professional color boosts the perceived quality of your work and keeps people watching longer. If you want to dive deeper, there's plenty of research about visual media that explores this connection.
This simple diagram breaks down the core stages of the process, moving from the technical analysis to the final creative touches.
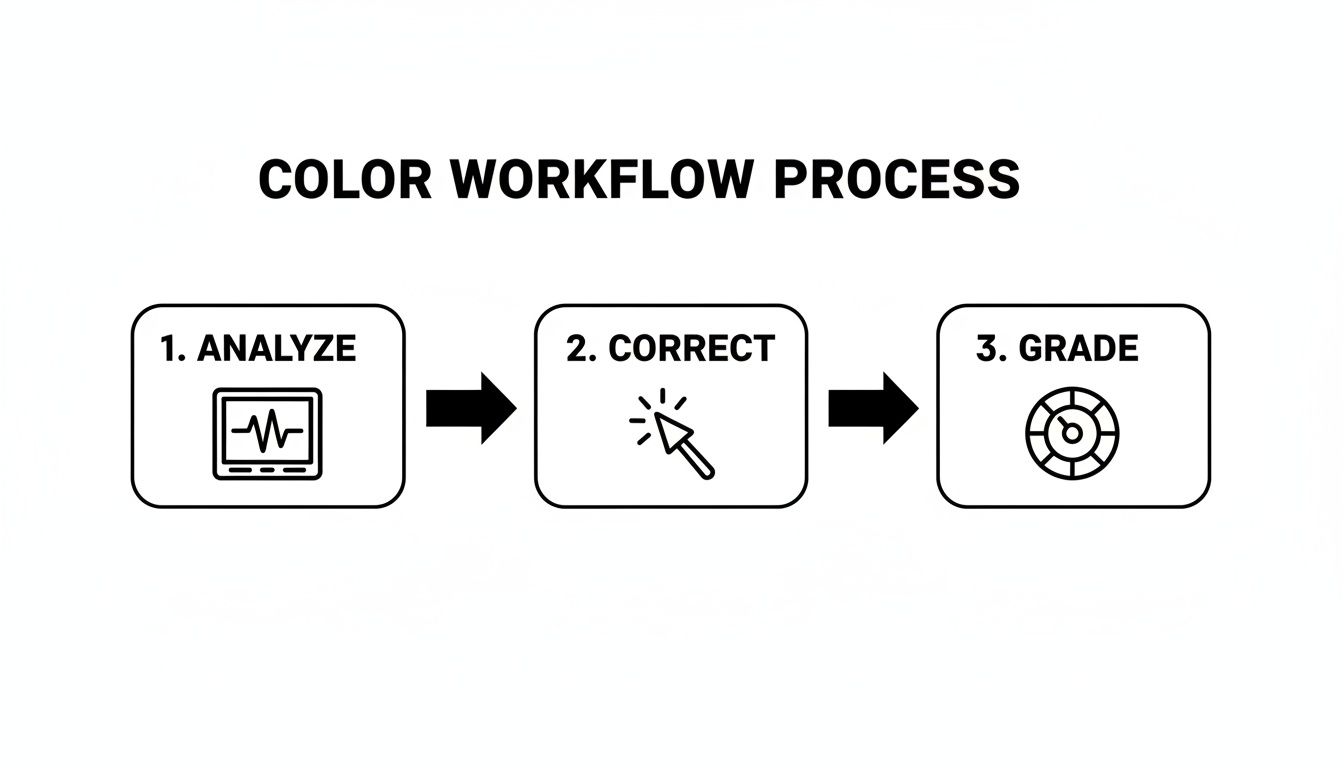
The flow is always the same: you have to get the technical fixes right before you can start making creative decisions. It’s the key to getting great results every time.
The Core Color Correction Workflow at a Glance
To make this even clearer, here’s a quick summary of the entire process from start to finish. Think of this as your roadmap for every project.
| Stage | Objective | Key Tool/Technique |
|---|---|---|
| 1. Analysis & Scopes | Assess the footage objectively to identify issues with brightness, contrast, and color balance. | Waveform, Vectorscope, RGB Parade |
| 2. Primary Correction | Fix fundamental problems across the entire image: exposure, contrast, and white balance. | Exposure/Luminance controls, Temperature/Tint sliders |
| 3. Secondary Correction | Isolate and adjust specific colors or regions, like skin tones or a color cast in the shadows. | HSL Secondaries, Color Masks, Qualifiers |
| 4. Shot Matching | Ensure visual consistency between different clips in a sequence. | Comparison viewers, shot-matching tools |
| 5. Creative Grading | Apply a stylistic look or mood to the corrected footage. | LUTs (Look-Up Tables), Color Wheels, Curves |
| 6. Final Review & Export | Check the final grade on different displays and export with the correct color space settings. | Calibrated monitors, proper export codecs (e.g., Rec. 709) |
Following these stages in order will help you build a solid, repeatable workflow that saves time and delivers consistently professional results.
Building a Solid Foundation with Scopes and Balance
Before you even think about creative looks or cinematic styles, the first part of any color correction workflow is purely technical. We're building a clean, neutral canvas to work from. The thing is, your eyes can lie to you. Room lighting, monitor settings, even what you had for lunch can affect how you perceive color. That's why we have to rely on objective tools—our video scopes—to get professional, consistent results.
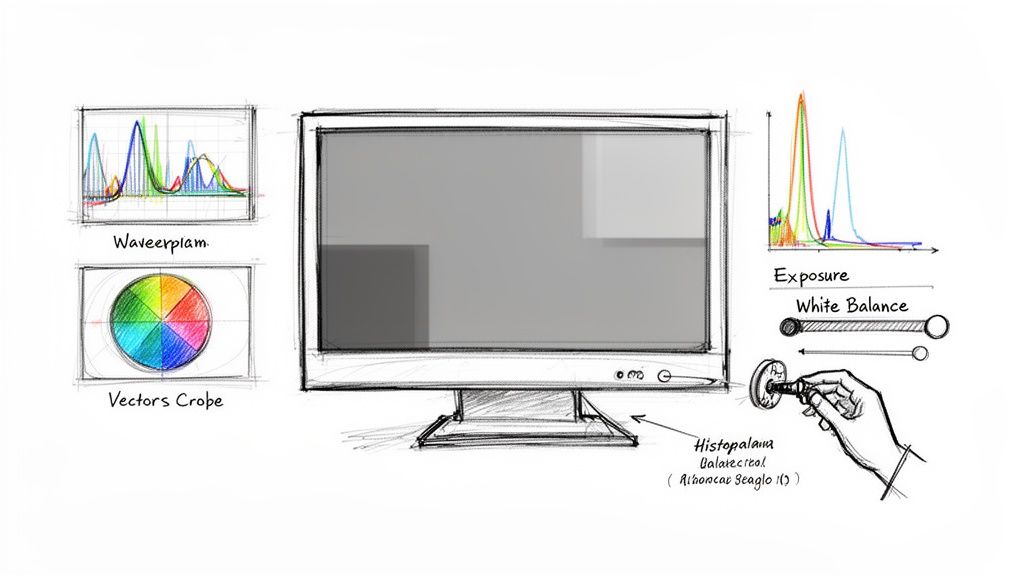
Think of scopes as the vital signs for your video. They don't have opinions; they just show you the raw data. The two you absolutely need to get comfortable with are the Waveform and the Vectorscope.
- Waveform Monitor: This scope maps out the brightness (luminance) of your image. The bottom represents pure black (0 IRE), and the top is pure white (100 IRE). It’s your absolute best friend for nailing exposure.
- Vectorscope: This circular scope shows all the color information (chrominance). The further a signal extends from the center, the more saturated that color is. It's crucial for spotting color casts and, as we’ll discuss later, getting skin tones just right.
Dialing in Exposure and Contrast
The very first thing you should do is fix the light levels. The goal here is to establish a good dynamic range—meaning, you want detail in your bright highlights and your dark shadows without "clipping" them. Clipping is when parts of your image are so bright or so dark that all the visual information is completely lost.
Glance over at your Waveform. A pretty well-exposed shot will have its brightest parts hovering around 90-95 IRE and its darkest points sitting just above 0-5 IRE. If you see your whole signal bunched up in the middle, that tells you the shot is flat and lacks contrast.
Using your editor’s exposure or luminance controls, start stretching that signal out. Gently lift your highlights so they get close to the top without slamming into 100 IRE. Then, bring your shadows down, but be careful not to crush them at the 0 IRE line. Just this one move can add a massive amount of depth and dimension to your footage.
For more on foundational image fixes, our guide on how to improve video quality is a great next read.
Conquering White Balance
Once your light levels are set, it’s time to tackle any weird color casts. This is where white balance comes in. You’re essentially telling your software, "This specific thing in my shot is supposed to be pure white." Once it understands that reference point, it can adjust every other color in the frame to be accurate.
A classic example is shooting indoors under tungsten lights, which can bathe everything in an orange glow. Or maybe you were filming in the shade on a bright day, making your footage look unnaturally cool and blue. White balance is the tool that neutralizes these problems.
The fastest way to fix this is with the white balance dropper, sometimes called an eyedropper tool. Scan your frame for something that you know is supposed to be a neutral white or gray—a white shirt, a piece of paper, a gray wall. Click on it with the dropper.
Instantly, your editing software will adjust the temperature (the blue-orange axis) and the tint (the green-magenta axis) to neutralize that spot, correcting the color cast across the entire image. It's a simple click, but it's one of the most powerful steps in the entire process.
Perfecting Skin Tones and Neutralizing Color Casts
Once you’ve wrestled your exposure and white balance into place, your next focus should be on the people in your shot. This is where a lot of videos fall flat. Our eyes are incredibly sensitive to skin tones, and if they’re even slightly off, the entire image feels unnatural.
Think about it—we immediately notice if someone looks too orange, a bit green, or washed out. Getting skin to look healthy and realistic is non-negotiable for a professional look.
Your best friend for this task is the vectorscope. Don’t let the technical-sounding name intimidate you. This tool simply maps out all the color in your footage. Look in the upper-left quadrant, and you’ll see a faint diagonal line. That’s the skin tone line, a universal reference point that represents the average hue of human skin, no matter the ethnicity.
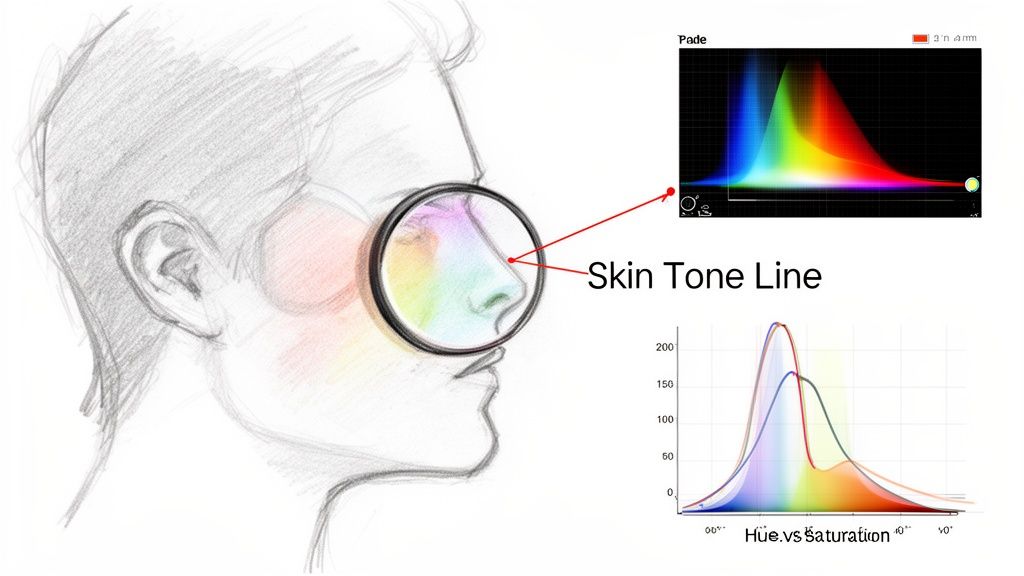
To put it to work, you’ll want to isolate just the skin on your subject’s face using a mask or qualifier. As you do, you'll see a cluster of color information appear on the vectorscope. Your goal is to nudge that cluster right onto the skin tone line.
If it’s drifting toward yellow, your subject will look jaundiced. If it’s leaning toward magenta, they'll look like they have a bad sunburn. A few subtle tweaks to your hue and saturation controls are usually all it takes to get that signal sitting comfortably where it belongs.
Eliminating Unwanted Color Casts
Now let's zoom out from skin tones to the image as a whole. You might be dealing with a color cast—a subtle, unwanted tint that’s contaminating a specific part of your image, like the shadows or highlights.
Ever shot footage in the shade and noticed the shadows have a weirdly cool, blue feel? Or filmed indoors under fluorescent lights and everything has a sickly greenish-yellow tinge? That’s a color cast.
These issues are incredibly common, especially with user-generated content. In fact, uncorrected lighting problems show up in around 45% of user-generated ads, which can actually hurt click-through rates by 15-20%. Small details like this really do matter.
The most effective way to surgically remove these casts is with your color curves—specifically the Hue vs. Saturation or Hue vs. Hue tools. These let you target one specific color without messing up everything else.
Here’s a quick-and-dirty workflow:
- Pinpoint the problem: First, just look at your image. Are the shadows too blue? Midtones too green?
- Select the offender: Grab the eyedropper tool in your Hue vs. Saturation curve and click directly on the problem color in your footage (like that overly blue shadow).
- Pull the color out: Your editor will place points on the curve representing that specific hue. All you have to do is drag the center point down to desaturate only that color. The blue tint vanishes, while your skin tones and other key colors stay right where you want them.
This kind of targeted correction gives you incredible power to clean up an image without creating new problems. If you're looking to build on these skills, we have a bunch of other color grading tips that can help you take your footage to the next level.
Color Matching With a New Video Background
Getting a clean background removal is a huge win, but the real art comes next: making your subject actually look like they belong in their new world. This part of the process, called compositing, is where jarring differences in color and light can completely shatter the illusion for your audience.
The core of the problem is simple. Your subject was shot under one set of lights, while your new background was created or filmed under entirely different ones. If you just slap one on top of the other, it’s going to feel fake and disconnected. To really sell the shot, you have to blend these two separate elements into one seamless scene.
Analyze Your New Environment
Before you even think about touching a color wheel, you need to put on your detective hat. Take a hard look at your new background plate and ask yourself some fundamental questions about its lighting.
- Where is the key light coming from? Is it a harsh, direct sun hitting from the top right? Or maybe a soft, diffused glow from a window on the left? The direction, intensity, and quality (hard vs. soft) of the main light source are your biggest clues.
- What’s the color temperature? A sunny beach is going to have warm, golden highlights and cooler, bluer shadows. A neon-lit city street at night will be a chaotic mix of vibrant, saturated colors.
- How does light bounce around in this space? Pay attention to the ambient light. Someone standing in a dense forest should have faint green light bouncing up onto them from all the foliage.
Getting a handle on these details is everything. Your job is to recreate these exact lighting characteristics on your foreground subject. For a closer look at the whole process, our guide on how to add a background to a video covers some great techniques that go hand-in-hand with this color work.
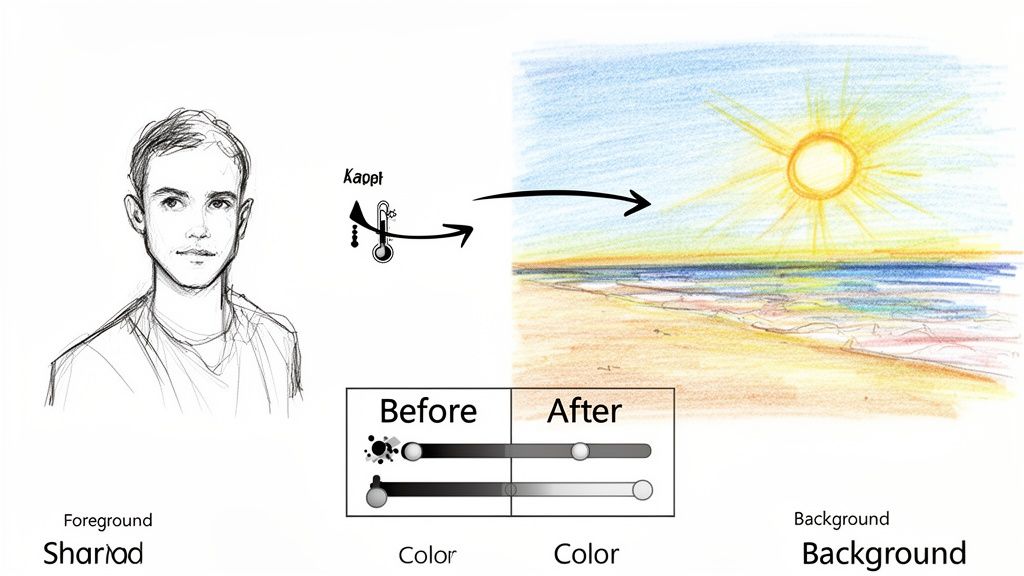
Replicate the Lighting and Color
Once you’ve finished your analysis, it’s time to start making adjustments to your subject. The goal is to make it look like they were standing in that new location all along.
Start with the big stuff—match the most obvious lighting features first. If the background has super bright, blown-out highlights from the sun, you’ll need to carefully lift the highlights on your subject to a similar level. On the flip side, if the new scene has deep, crushed blacks in the shadows, your subject’s shadows need to be just as dark and rich.
The key is to think about how light naturally wraps around an object. A common mistake is to adjust the overall brightness of a subject, when what you really need is to shape the light with targeted highlights, midtones, and shadows to match the new scene’s direction and quality.
Finally, you need to bleed some of the background's color into your subject. This is the final touch that truly sells the composite. For that beach scene we mentioned, you’d probably want to add a hint of yellow or orange to your subject’s highlights to simulate that warm sunlight. Then, you could push a little blue or cyan into their shadows to mimic the ambient light bouncing off the sky and water.
It's these small, intentional color shifts that fuse the two layers together, turning a basic cutout into something your audience will actually believe.
Applying a Creative Grade and Using LUTs
Okay, your footage is now corrected and balanced. You have a clean, neutral canvas to work from. This is where the fun really begins. Now, you get to switch hats from color technician to color artist.
Color grading is all about injecting personality, mood, and emotion into your shots. It’s the step that elevates a technically "correct" video into something that truly connects with an audience and tells a story. This is how you shape the feel of the entire piece.
Using tools like color wheels, saturation curves, and HSL secondaries, you can craft a distinct visual style. For that classic, big-budget cinematic look, try pushing a bit of teal into your shadows and a complementary orange into the highlights and skin tones. Or maybe you're editing a travel video and want a warmer, more nostalgic vibe? You can achieve that by gently lifting the reds and yellows in your midtones.
What’s the Deal with LUTs?
A huge part of creative grading today involves LUTs, which stands for Lookup Table. The simplest way to think of a LUT is as a complex color preset. It's essentially a set of instructions that maps every single color value in your footage to a new one, instantly applying a specific, often intricate, look.
You'll generally come across two main types of LUTs:
- Technical LUTs: These are for conversions. For instance, if you shoot in a flat "Log" profile to capture more dynamic range, you’ll use a technical LUT to convert that footage into a standard color space (like Rec. 709). This makes it look "normal" again before you start grading.
- Creative LUTs: These are all about style. They're designed to emulate the look of a specific film stock, create a moody sci-fi aesthetic, or give your entire video a sun-drenched, golden-hour feel.
The need for precise color control isn't just an artistic preference; it's a rapidly growing industry standard. The market for RIP color management software, for example, is projected to jump from USD 281.1 million in 2025 to USD 396.6 million by 2035. This just goes to show how critical consistent, professional color has become for creators and businesses.
A Quick Guide to Creating Common Looks
You don't always need a fancy LUT to create a popular look. Many iconic styles can be achieved with the basic color wheels and curves you already have. Here’s a quick breakdown of a few common grades to get you started.
| Look | Primary Colors | Common Use Case | Key Adjustment |
|---|---|---|---|
| Teal & Orange | Teal shadows, Orange/Warm midtones | Action films, Blockbusters, Travel videos | Push teal into the shadows with your color wheels. Nudge the midtones and highlights towards orange/yellow. |
| Bleach Bypass | Desaturated, High contrast, Crushed blacks | War films, Gritty dramas, Music videos | Crush the blacks using a curves tool, slightly raise the mid-point, and significantly lower the overall saturation. |
| Golden Hour | Warm yellows, Soft reds, Low contrast | Romantic scenes, Travel vlogs, Nostalgic content | Gently boost the yellow and red channels in your midtones and highlights. Slightly lower the overall contrast. |
| Moody & Muted | Desaturated greens, Cool blues, Soft highlights | Thrillers, Sci-fi, Cinematic B-roll | Use HSL secondaries to isolate and desaturate greens. Nudge the overall white balance slightly towards blue/cool. |
Experimenting with these basic adjustments is the best way to understand how different colors interact and influence the mood of your scene.
Best Practices for Applying a Grade
Here’s the golden rule of using LUTs and creative grades: always apply them last.
Think about it. A LUT is designed to be applied to a clean, balanced image. If you slap a creative LUT onto footage that has a wonky white balance or is underexposed, you’re just going to amplify those problems. The result is often a muddy, unprofessional mess.
Remember: A LUT is an enhancer, not a fixer. Get your primary corrections right first. Once the image is clean, then you can start experimenting with creative looks.
Another pro tip is to almost never use a LUT at 100% intensity. A full-strength grade can easily crush all the detail out of your shadows, blow out your highlights, and make skin tones look bizarre and unnatural.
Every professional editing software lets you dial back the intensity or opacity of a LUT. I usually start somewhere around 50-70% and adjust from there. The goal is for the look to feel intentional and integrated, not just pasted on top. For a streamlined workflow when applying these grades, tools like the lunabloomai app can offer a powerful and intuitive set of controls.
Common Questions About Color Correction
As you start getting serious about color, you'll inevitably run into the same questions that trip up almost every editor at some point. It can feel like a maze of technical jargon and creative choices, but don't worry. Let's clear up a few of the most common hurdles people face when they're learning the ropes.
Color Correction vs. Color Grading
This is the big one. People use these terms interchangeably all the time, but they are two totally different stages of the process. Getting this right is fundamental.
Color correction is the repair work. It’s the first, purely technical step where you fix all the problems with your footage to make it look normal and accurate. You’re adjusting exposure so your shadows aren't crushed and your highlights aren't blown out, fixing the white balance to get rid of weird color casts, and making sure skin tones actually look like human skin. Your goal here is to create a clean, neutral, and consistent starting point for all your clips.
Color grading, on the other hand, is all about style. This is the creative layer you add after you’ve corrected everything. It’s where you push colors around to create a mood, a feeling, an entire aesthetic. That classic teal-and-orange blockbuster look? That’s grading. A warm, dreamy, nostalgic vibe? Also grading.
Think of it this way: correction is the science, and grading is the art. You have to nail the science first.
Can I Color Correct Video on My Phone?
You absolutely can, and the tools available now are shockingly powerful. A lot of creators just starting out want to know about the best Instagram video editing apps that can handle this, and the good news is, you have options.
Apps like CapCut and VN Video Editor give you solid basic controls for things like brightness, contrast, and color temperature. If you want to go a step further, mobile versions of pro software like Adobe Premiere Rush or LumaFusion offer more advanced tools like color wheels and HSL controls. You won't get the precision of desktop video scopes, but you can get fantastic-looking results for social media without ever touching a computer.
Here's a quick tip for mobile editing: before you start, crank your phone's brightness all the way up and turn off any features like "True Tone" or "Night Shift." This helps you see the most accurate version of the colors your screen can produce.
Why Does My Video Look Different After Uploading?
This is one of the most frustrating things that can happen. You spend hours getting the color just right, and then you upload it to YouTube or Instagram and it looks... off. Washed out, maybe a little darker. It's not your fault—it's usually caused by color space shifts and compression.
Your editing software works in a standard professional color space (usually Rec. 709). But when you upload that video, the social media platform’s servers re-compress it to save space and stream it efficiently. That process can slightly alter the color and gamma information.
To fight back, here’s what you can do:
- Export for the web: Always use the H.264 codec in an MP4 file. It's the universal standard.
- Run a test: Before you commit to a long upload, export a tiny 10-second clip and upload it first. See how it looks on the platform.
- Compensate if needed: If you see a consistent shift—like your videos always look less saturated on Instagram—you can go back into your editor and add a tiny bit of extra saturation to your final export to counteract it.
What Is a LUT and How Do I Use It?
A LUT, which stands for Lookup Table, is basically a complex color preset. It’s a small file that contains a set of mathematical instructions to map every single color in your footage to a new, specific value. In one click, it can apply a sophisticated, cinematic look that would take ages to create manually.
Here's the critical rule: always do your primary color correction before you apply a creative LUT. A LUT will just magnify any problems in your original shot. If your exposure is off or your white balance is wrong, the LUT will only make it look worse.
Once your shot is balanced and clean, then you can apply the LUT. But almost never leave it at 100% intensity. Every professional editor dials the strength of the LUT back until it blends naturally with the footage. It should be a stylistic choice, not a sledgehammer.
Ready to create stunning videos with seamless backgrounds? The AI at VideoBGRemover handles the complex task of background removal in minutes, giving you a perfect cutout to place in any new scene. Start for free and see the magic for yourself.
Tagged with
Ready to Remove Your Video Background?
See a free preview before you buy.
No credit card required • Free preview on every video