A Creator's Guide to Convert AVI to MOV Without Quality Loss
Learn how to convert AVI to MOV using free tools like VLC, HandBrake, or the professional command-line tool FFmpeg for high-quality video workflows.
So, you have an AVI file and need to get it into the MOV format. The good news is you have plenty of options, from free desktop workhorses like VLC Media Player or HandBrake to powerful command-line tools like FFmpeg. For a quick one-off, an online converter can do the trick, but for anything serious, you'll want more control.
Ultimately, the right method boils down to your file size, how much quality you need to preserve, and your comfort level with the tools.
Why Creators Should Convert AVI to MOV

If you’ve ever dragged an AVI file into your editing timeline only to be met with errors or choppy playback, you know the frustration. It's not a random glitch; it’s a sign of a format that’s showing its age. AVI, or Audio Video Interleave, was developed by Microsoft way back in 1992. While it was reliable for its time, it just can't keep up with the demands of modern video production.
This is where the MOV format, created by Apple for QuickTime, comes in. Think of converting your AVI to MOV not as a simple file swap, but as a strategic upgrade for your entire post-production process. It’s about making your content work for you, not against you.
Superior Compatibility and Performance
The most immediate win you'll get with MOV is its rock-solid compatibility, especially within the Apple ecosystem and with professional editing software. If you're working in Final Cut Pro, Adobe Premiere Pro, or DaVinci Resolve, MOV is the native tongue. These files are built to run smoothly, which translates to:
- Smoother Playback: No more stuttering timelines or dropped frames when you’re trying to make precise edits.
- Faster Rendering: Your editing software is optimized for the MOV container, which can seriously cut down on your export times.
- Fewer Errors: You can finally say goodbye to those cryptic "unsupported format" or "codec missing" pop-ups that bring your creativity to a halt.
It all adds up to less time fighting with your software and more time actually creating.
Access to Professional Codecs
Beyond just playing nice with your editor, the MOV container unlocks access to a whole world of modern, high-performance codecs. This is arguably its biggest advantage for any serious creator.
For example, the industry-standard Apple ProRes family of codecs lives inside MOV files. ProRes gives you incredible image quality without the gigantic file sizes of uncompressed video, making it perfect for editing. More importantly, certain codecs like ProRes 4444 support alpha channels, which is just a technical way of saying they can handle transparency. This is absolutely essential if you’re using a tool like VideoBGRemover and need to layer your subject over a different background.
For professional video production, the MOV format has become the preferred choice. Its robust support for multiple video and audio tracks, advanced codecs, and detailed metadata allows creators to maintain quality and flexibility throughout their projects. Learn more about professional video format choices on capcut.com.
AVI vs MOV: A Quick Comparison for Creators
When you break it down, the choice between AVI and MOV for any modern video workflow becomes pretty clear. Here’s a quick look at the key differences that really matter for creators in the trenches.
| Feature | AVI (Audio Video Interleave) | MOV (QuickTime File Format) |
|---|---|---|
| Primary Ecosystem | Windows (Legacy) | Apple/macOS (Modern Standard) |
| Editing Performance | Can be slow and resource-intensive in professional software. | Optimized for smooth playback and faster rendering in Final Cut Pro and Adobe Premiere Pro. |
| Codec Support | Limited to older codecs; poor support for modern standards. | Excellent support for professional codecs like Apple ProRes and H.265 (HEVC). |
| Transparency | No standard support for alpha channels (transparency). | Full support for alpha channels with codecs like ProRes 4444. |
| Compression | Generally less efficient, leading to larger file sizes for similar quality. | More efficient compression, offering better quality at smaller file sizes. |
In short, making the switch to MOV ensures your files are ready for professional editing, compositing, and delivery.
Need More Control? Try These Free Desktop Apps
When an online converter just won't cut it—maybe you're worried about privacy or need more advanced options—desktop software is the way to go. You don’t have to shell out cash for a professional video suite to handle a simple AVI to MOV conversion. In fact, two of the most reliable tools for the job, VLC Media Player and HandBrake, are completely free.
The big win with desktop apps? Your files stay on your computer. There's no uploading to a third-party server, which is a huge plus for security. Plus, you get far more control over the final output, letting you dial in the exact settings you need.
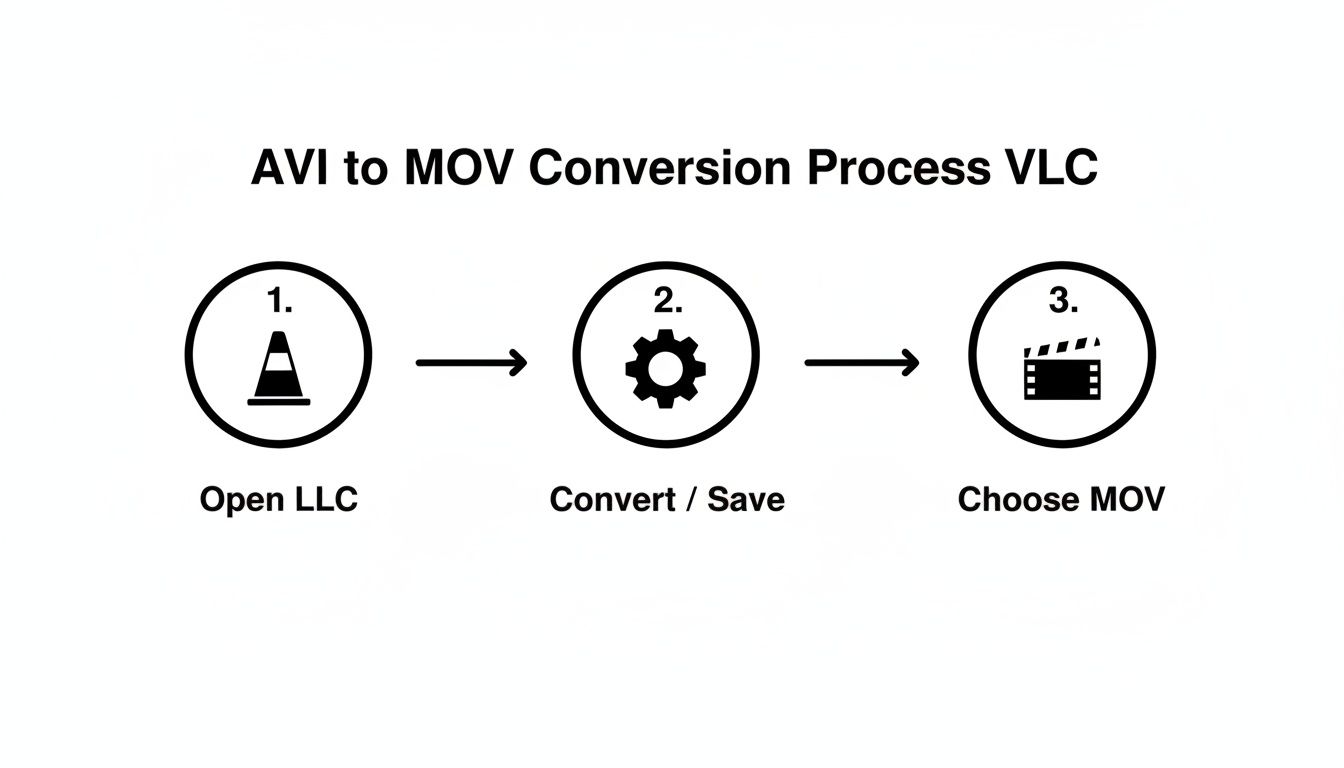
For a Quick and Dirty Conversion: VLC Media Player
Most of us know VLC as the media player that plays anything. But tucked away inside is a surprisingly capable conversion tool. It's the perfect choice when you just need to get the job done fast without installing yet another program.
Once you know where to find the conversion feature, it's a breeze. The trick is simply telling VLC you want an MOV container instead of its default MP4.
Here's how you do it:
- In VLC, head up to Media > Convert / Save.
- Add your AVI file.
- Click the Convert / Save button.
- From the Profile dropdown, pick a common one like Video - H.264 + MP3 (MP4). This is a solid starting point.
- Now for the important part: click the little wrench icon next to the profile.
- Go to the Encapsulation tab and select MOV/MP4.
- Choose where to save your file, give it a name ending in .mov, and hit Start.
That's it. For most basic tasks, this is all you'll ever need to get a file ready for editing or sharing.
For Finer Control Over Quality: HandBrake
When you need to get more hands-on with your video's settings, HandBrake is the undisputed champ of free video transcoders. It was built from the ground up for this exact purpose, offering a dizzying array of presets and manual controls. It might look a little intimidating at first, but that complexity is its greatest strength.
HandBrake really comes into its own when you're trying to strike the perfect balance between file size and video quality. Its built-in presets for Apple devices, for instance, are expertly configured to create MOV files that play perfectly on iPhones, iPads, or in Final Cut Pro. Just pick a preset like "Apple 1080p30 Surround," and you're good to go.
HandBrake lets you tweak everything—the video encoder, frame rate, audio bitrate, subtitles, you name it. This is exactly what you need when a project has strict delivery specs or you need to optimize a file for a specific platform.
If you'd rather set things up manually to convert an AVI to MOV, here's the typical workflow:
- First, open your AVI file in HandBrake.
- On the Summary tab, make sure the Format is set to MP4. Don't worry about the name—the MP4 container is functionally almost identical to MOV, and most software treats them the same. If you absolutely must have the
.movextension, you can just rename the file when it's done. - Hop over to the Video tab and choose a high-quality encoder like H.264 (x264).
- Adjust the Constant Quality slider. A lower number here (around RF 18-22) means higher quality and a larger file.
- Pick your destination and click Start Encode.
While VLC and HandBrake are fantastic, they're just two examples from a wide world of various desktop applications designed to help creators. For most people, though, these two free powerhouses will handle just about any conversion task you can throw at them.
Getting Professional Results With FFmpeg
When you need absolute control and quality, it's time to roll up your sleeves and use the tool the pros rely on: FFmpeg. If you've ever felt limited by the preset options in desktop apps or worried about the privacy of online converters, FFmpeg is the answer.
Don't be put off by the command-line interface. Think of FFmpeg as the powerful engine that runs under the hood of many video converters you already use. By learning to speak its language directly, you gain total control over every single parameter of your conversion. This is the key to creating professional-grade files where every detail matters.
Why Use the Command Line?
Unlike graphical interfaces that often hide complex settings behind simplified menus, FFmpeg puts everything at your fingertips. This allows you to perform tasks that are simply impossible with most other tools.
The classic example? Changing a video's container from AVI to MOV without re-encoding the video stream. This is a truly lossless operation, and it’s something FFmpeg makes incredibly simple. Let's walk through a few practical commands you can copy and adapt for your own projects.
Command 1: The Go-To High-Quality Conversion
Let's start with a workhorse command. This one takes your input.avi and converts it to a high-quality output.mov using the universally compatible H.264 video codec and AAC audio. It's a fantastic balance of quality, file size, and compatibility.
ffmpeg -i input.avi -c:v libx264 -preset slow -crf 18 -c:a aac -b:a 192k output.mov
Here’s a quick rundown of what’s happening:
-i input.avi: This just tells FFmpeg which file you want to work with.-c:v libx264: We're setting the video codec to H.264, the industry standard.-preset slow: This tells FFmpeg to take its time during encoding, which results in a smaller file size and better quality for the same bitrate.-crf 18: The Constant Rate Factor controls quality. Lower numbers are better, and 18 is often considered visually lossless. It’s my starting point for most professional work.-c:a aac -b:a 192k: We're using the AAC audio codec at 192kbps, a solid choice for high-quality stereo sound.
Even with a powerful command-line tool, the core process remains the same, as this diagram illustrates. You pick a file, choose your output settings, and let the software work its magic.
This process is fundamentally what FFmpeg is doing, just without the graphical interface.
Command 2: Lossless Remuxing (The Fastest Method)
What if your AVI file already uses codecs compatible with the MOV container, like H.264 video and AAC audio? In that lucky scenario, you don't need to re-encode at all. You can just "remux" it—which means swapping the container from AVI to MOV.
This process is lightning-fast and preserves 100% of the original quality.
ffmpeg -i input.avi -c copy output.mov
The key here is the beautiful simplicity of -c copy. It tells FFmpeg to copy the video and audio streams as-is, without any processing. If your codecs are compatible, this is the absolute best way to convert avi to mov.
Command 3: Preserving Transparency With ProRes
Working with visual effects, motion graphics, or transparent video from tools like VideoBGRemover? Then you know preserving the alpha channel is non-negotiable. For this, you need a professional codec, and the gold standard is Apple ProRes 4444.
Using a professional codec like ProRes 4444 is absolutely essential for any compositing workflow. It guarantees the transparency in your video is perfectly preserved, allowing you to layer it over other footage without nasty black boxes or artifacts.
Here’s how to convert your AVI into a MOV file using ProRes 4444, keeping that precious alpha channel intact.
ffmpeg -i input.avi -c:v prores_ks -profile:v 4444 -c:a pcm_s16le output.mov
The important parts of this command are:
-c:v prores_ks: Selects the ProRes encoder.-profile:v 4444: Specifies the ProRes profile that supports an alpha channel (transparency).-c:a pcm_s16le: Uses uncompressed audio (PCM), which is standard practice in professional editing to avoid any audio quality loss.
This is the command I use constantly when prepping transparent assets for editing in Final Cut Pro or Adobe Premiere Pro. For a closer look at what else this amazing tool can do, check out our guide on essential FFmpeg commands for video professionals.
Command 4: Batch Convert an Entire Folder
Nobody has time to convert files one by one. Thankfully, you can use a simple script to tell FFmpeg to process an entire folder of AVI files automatically. This is a massive time-saver.
For macOS or Linux users, open your terminal and run this for loop:
for f in .avi; do ffmpeg -i "$f" -c:v libx264 -crf 18 "${f%.}.mov"; done
For Windows users, you can create a batch file (.bat) and paste this inside:
for %%f in (*.avi) do ffmpeg -i "%%f" -c:v libx264 -crf 18 "%%~nf.mov"
Both scripts do the same thing: they find every .avi file in the current folder and run our high-quality conversion command on it, saving a new MOV file with the same name. Learning a little bit of automation like this is why mastering FFmpeg is a game-changer for any serious video workflow.
Online Converters: The Quick Fix with Big Catches
Web-based tools that promise to convert your AVI to MOV in a few clicks can be incredibly tempting. The idea of just dragging and dropping a file without installing any software is definitely appealing, especially when you're in a hurry. For a tiny, non-sensitive clip, they can sometimes get the job done.
But that convenience often comes with some serious strings attached. While the main draw is speed and accessibility, these online tools can quickly become a dead end for anyone doing serious video work.
The Hidden Costs of "Free"
Right off the bat, you'll likely run into strict file size limits. Most free online converters cap your uploads somewhere around 100-200MB. If you're working with high-definition video, that’s next to nothing. Just a couple of minutes of 1080p footage will blow right past that limit, sending you back to square one.
Then there's the quality issue. To keep their servers from getting overwhelmed and to deliver a "fast" conversion, these platforms almost always use aggressive compression. This can leave your video looking a mess, full of ugly artifacts and softness, basically ruining all the effort you put into shooting it in the first place.
When you upload a file to a random website, you’re handing over control. For any client project, private footage, or sensitive material, that’s just not a risk worth taking. Desktop software keeps everything safely on your own computer.
Security and Privacy: Don't Gamble with Your Footage
This is probably the biggest dealbreaker. Every time you upload a video, it’s going to a server owned by someone else. You have no idea what their security is like, how long they keep your files, or who has access to them. For a silly personal clip, maybe you don't care. But for confidential business footage or a client’s project? It’s an unacceptable risk.
The need for trustworthy video tools is only growing. The global video streaming market was valued at USD 129.26 billion in 2024 and is expected to balloon to USD 416.8 billion by 2030. As more people create and share high-quality video, having reliable and secure methods to manage it is more important than ever. You can dig into more of these industry trends over at Grand View Research.
So, When Should You Actually Use an Online Converter?
Honestly, almost never. But there are a few very specific situations where it might make sense.
- For small, disposable files. Think short, low-res clips under 100MB that don't contain anything important.
- For a quick-and-dirty preview. If you just need to see what’s in a file and don’t care about quality, it can work in a pinch.
- When you have no other choice. You’re on a locked-down computer where you can't install software and you need a one-off conversion right now.
For pretty much every other situation, you are far better off using desktop software. The control, quality, and security you get from applications like HandBrake or the command-line powerhouse FFmpeg are simply in another league. Taking a few minutes to learn them will save you a world of headaches down the road.
Solving Common Video Conversion Problems

Let's be real—the path to convert AVI to MOV isn't always smooth. Sometimes you hit frustrating roadblocks that can completely derail your workflow. You might see audio drifting out of sync, or maybe you're getting cryptic error messages that pop up out of nowhere.
The good news is that these issues are incredibly common, and more importantly, they're entirely fixable once you know what you’re looking at. This section is your practical guide to diagnosing and solving these conversion headaches, without the technical jargon.
Fixing Audio Sync Issues
There’s nothing worse than watching a video where the audio and video don't line up. You see someone’s lips move, and a full second later, you finally hear the words. This classic problem, often called audio drift, usually comes down to a mismatch in frame rates.
Your original AVI file might have a variable frame rate (VFR), meaning the number of frames per second changes on the fly to save space. That’s fine for some things, but most professional editing software—and the MOV container itself—really prefer a constant frame rate (CFR). When you convert the file without locking this in, the audio can slowly creep away from the video.
Here’s how to fix it:
- In HandBrake, force a constant frame rate. Head over to the "Video" tab and look for the "Framerate (FPS)" dropdown. Don't leave it on "Same as source." Instead, choose a specific value like 29.97 or 30 and make sure the "Constant Framerate" option is selected. This simple change is often all you need.
- With FFmpeg, use the
-rflag. You can explicitly command FFmpeg to set a frame rate. Just add-r 30to your command, and it will encode the output file at a steady 30 frames per second, which almost always clears up sync problems.
Demystifying Codec Incompatibility
Ever gone to the trouble of converting a file, only to open the MOV and get a black screen, just audio, or a frustrating "Codec Not Found" error? That’s a classic case of codec incompatibility.
Think of AVI and MOV as just containers. The actual video and audio data inside are encoded with specific codecs. The problem happens when the software or device you're using for playback doesn't have the key to unlock the codec you used. This is especially common when dealing with older or more obscure AVI files.
The easiest way to sidestep codec errors is to use one that’s universally loved. For video, H.264 is the undisputed champion of compatibility (use libx264 in FFmpeg). For audio, AAC is your safest bet. If you stick to these two, your MOV file will play nice on virtually any device or editing program.
By choosing a widely adopted codec, you’re basically future-proofing your file and saving yourself a lot of headaches down the road.
Preventing Noticeable Quality Loss
So, you've successfully converted your file, but the final MOV looks soft, blocky, or just plain disappointing. This almost always comes down to the bitrate, which is the amount of data used to encode each second of your video. If the bitrate is too low, the converter starts throwing away visual information to shrink the file size, and the quality takes a nosedive.
Many online tools and default software presets are aggressive with compression to keep files small, but this often comes at the cost of visual clarity. The solution is to take manual control.
Tips for Keeping Your Quality High:
- Use the Constant Quality (CQ) slider in HandBrake. Instead of guessing a bitrate, this lets you choose a visual quality level. A lower RF (Rate Factor) number means higher quality. For crisp 1080p video, a value between 18 and 22 is a fantastic starting point.
- Control quality in FFmpeg with the
-crfflag. This works just like HandBrake's slider. A command with-crf 18is often considered visually lossless for H.264 and will give you a pristine MOV file. - Go with a professional codec when it matters. If preserving every last pixel is critical for your project, convert to a format like Apple ProRes using FFmpeg. The files will be much larger, but it’s the industry standard for maintaining quality through post-production.
To really get a handle on this, check out our guide on how to achieve great video compression without losing quality. It dives even deeper into finding that perfect balance between file size and clarity.
Optimizing MOV Files for Post-Production
Getting your AVI file into an MOV container is a great first step, but the real magic happens next. You have to pick the right specs for your creative goals. The codec you choose inside that MOV file makes all the difference in post-production, especially when you're working with transparency and visual effects.
This is where the alpha channel comes into play. Think of it as a hidden layer in your video file that stores transparency data. It’s the secret sauce that lets you cleanly layer a subject over a new background, which is the core of video compositing.
Choosing a Codec for Transparency
For professional compositing work, not just any MOV will cut it. You need to use a codec that actually supports transparency.
The industry gold standard here is, without a doubt, Apple ProRes 4444. When you use a tool like VideoBGRemover to get rid of a background, exporting to ProRes 4444 locks in that transparency perfectly. Drop that file into your editing software, and you'll see just your subject, ready to be placed anywhere you want. If you want to go deeper, we've got a full guide on the different types of MOV file formats.
An alpha channel is what turns a basic file conversion into a professional visual effects tool. It’s how you get a subject with a removed background to look seamless when layered onto another video.
The need for high-quality, flexible video formats is bigger than ever. In fact, the global market for video converter apps is expected to hit USD 1.5 billion by 2033, a testament to how many creators rely on these tools. You can read more about this market growth on strategicrevenueinsights.com. Picking the right format from the start just makes sure your files are ready for whatever you throw at them.
Frequently Asked Questions
When you're dealing with video formats, a few questions always seem to pop up. Whether you're worried about losing quality or just trying to find the quickest way to get the job done, let's clear up some of the common confusion around converting AVI to MOV.
Will I Lose Quality When I Convert AVI to MOV?
It really depends on how you do it. If you're smart about the conversion, you can avoid any noticeable quality loss.
The best-case scenario is what's called "re-muxing." Using a tool like FFmpeg, you can essentially just copy the video and audio streams from the AVI container and paste them into a new MOV container. When this works, there is absolutely zero quality loss. It’s the perfect solution, but it requires the codecs inside the AVI file to already be compatible with the MOV format.
If you do have to re-encode the video, you're still in control. Just be sure to choose a high-quality codec like Apple ProRes or set a high bitrate for H.264. This will keep your video looking crisp and clear.
Is MOV Better Than AVI for Editing?
In almost every modern editing situation, yes. MOV is the clear winner here. The format was built to support the high-end codecs that professional editing software loves, especially the entire Apple ProRes family.
Think of it this way: using an MOV with a ProRes codec in Final Cut Pro or Adobe Premiere Pro is like speaking the software's native language. Everything runs smoother, playback is less choppy, and your whole editing process feels more responsive.
Can VLC Really Convert Files for Free?
You bet. A lot of people just think of VLC as the media player that can handle any file you throw at it, but it has a surprisingly capable conversion tool tucked away in its menus. It’s a fantastic, no-cost option for straightforward conversions without needing to hunt down and install more software.
What Is the Fastest Way to Convert a Large AVI File?
For big files, skip the online tools. They’re slow and almost always have tiny file size limits. Your best bet is a dedicated desktop app.
HandBrake is a solid, user-friendly choice. But if you're comfortable with the command line, FFmpeg is the undisputed speed champion. If you're able to just re-mux the streams without re-encoding, FFmpeg can wrap up the job in mere seconds, even for a massive file.
Ready to create professional videos with transparent backgrounds? With VideoBGRemover, you can remove any background from your footage and export it as a high-quality MOV file with a perfect alpha channel. Try it for free and see the magic for yourself at https://videobgremover.com.
Ready to Remove Your Video Background?
See a free preview before you buy.
No credit card required • Free preview on every video