Rotate MP4 Videos a Pro on Any Device
Tired of sideways videos? Learn how to rotate MP4 videos on Windows, Mac, iOS, and Android with free, easy-to-use tools. Fix your video orientation in minutes.
It’s a frustratingly common problem: you film a fantastic video, but when you go to watch it on your computer, it’s playing sideways. What went wrong?
Don't worry, the video isn't broken. This usually happens because of a disconnect between how the video was recorded and the "orientation metadata" tag attached to the file. Your phone knew you were holding it vertically, but the video player on your computer or social media platform might ignore that little piece of data, causing it to display incorrectly.
Thankfully, fixing a sideways video is simple. You don't need to be a video editing pro or buy expensive software. The right tool for the job is likely already on your device, whether you're on a computer or your phone.
So, What's the Best Way to Rotate Your Video?
The right method really boils down to where you are and what you need to do. Are you at your desk and need to fix a dozen clips? Or are you just trying to quickly correct a video on your phone before sharing it?
Here’s a quick breakdown of your options:
- Desktop Apps: This is your best bet for control and reliability. Free tools like VLC Media Player or built-in apps like Photos (Windows) and QuickTime (macOS) let you rotate and permanently save the corrected video. They're perfect for your main video editing workflow.
- Mobile Apps: For sheer convenience, nothing beats fixing a video right on the phone or tablet you used to shoot it. It’s the fastest way to go from "oops" to "posted."
- Online Tools: Need a one-and-done fix without downloading any software? An online rotator is great for a quick adjustment, especially if you're on a computer that isn't yours. Just be cautious with private videos and be aware of potential file size limits.
This flowchart lays out the different paths you can take to get your video looking right.
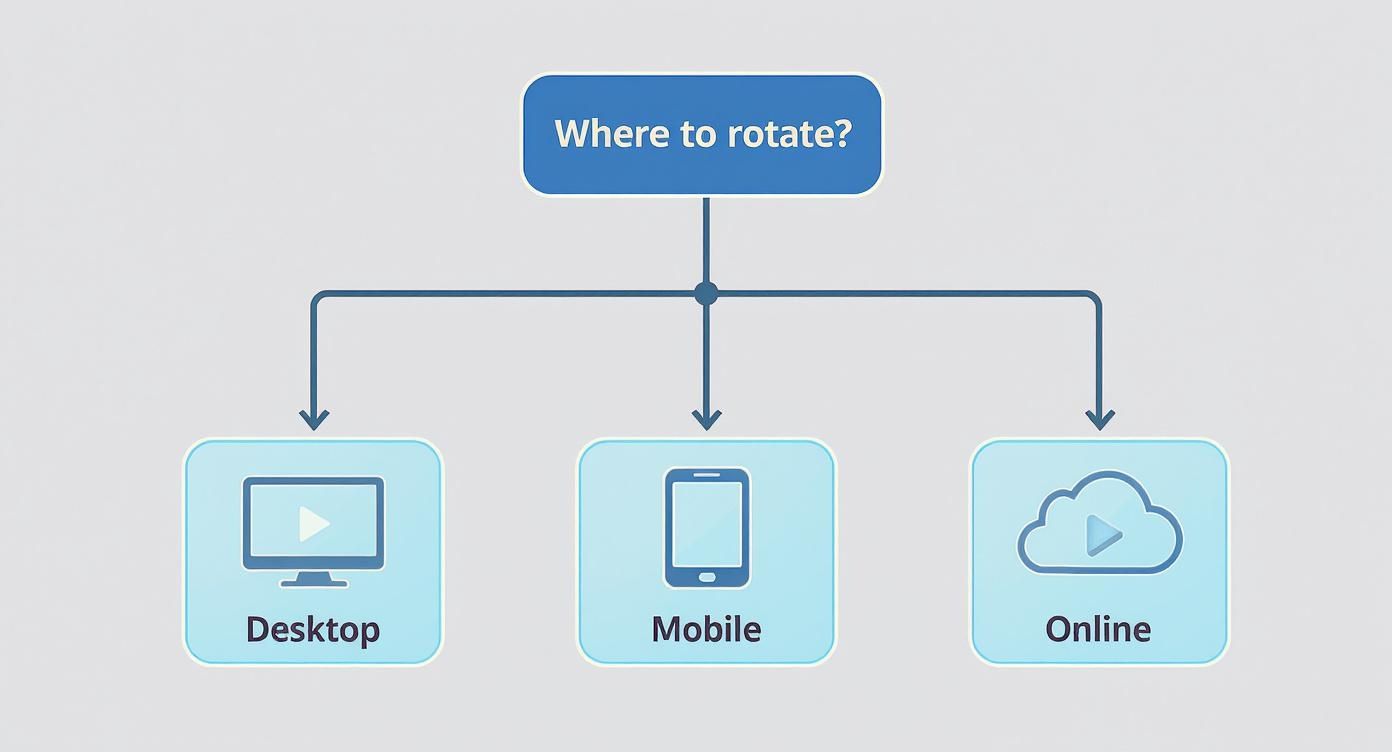
As you can see, no matter the device, there’s a straightforward solution waiting for you.
Key Takeaway: The problem isn't a corrupt file; it's a metadata mix-up. The solution is to either update that metadata tag or re-encode the video to permanently bake in the correct orientation.
To make things even easier, here's a quick reference guide to help you pick the best free tool for your platform.
Quick Guide to Video Rotation Tools by Platform
| Platform | Recommended Free Tool | Best For | Ease of Use |
|---|---|---|---|
| Windows | Photos App | Quick, simple rotations for casual users. | Very Easy |
| macOS | QuickTime Player | Fast, lossless rotation for Mac users. | Very Easy |
| iOS | Photos App | On-the-go fixes directly on your iPhone/iPad. | Very Easy |
| Android | Google Photos | Convenient editing integrated with your gallery. | Very Easy |
| All Platforms | VLC Media Player | Advanced control and permanent saves. | Moderate |
This table should give you a solid starting point. Each of these tools gets the job done without costing you a dime. Now, let’s get into the step-by-step details for each one.
Rotating MP4 Files on Your Desktop Computer
When you need more firepower than a quick mobile fix offers, your desktop is the place to be. Desktop apps give you far more control, especially for permanently saving orientation changes so your video looks right everywhere, every time.
The good news is that both Windows and macOS have free, built-in tools that handle this perfectly well. You probably won't even need to download anything new. Let's dig into the best ways to get it done on each platform.
Fixing Video Orientation on Windows
If you're on Windows, the easiest starting point is the built-in Photos app. It’s surprisingly capable for quick edits. Just open your MP4, hit the "Edit & Create" button, and you’ll find the "Crop & rotate" option waiting for you.
This is great for a one-off adjustment. But for more control, my go-to recommendation is the free and open-source VLC Media Player. Most people think of it as just a player, but it’s packed with powerful editing features.
Imagine you shot a vertical video for Instagram, but it's showing up sideways on your computer. This is a classic case where VLC excels. You can rotate it and, crucially, re-save it so the change sticks.
Here’s how you do it:
- Fire up VLC and open your video.
- Head to Tools > Effects and Filters.
- Click the Video Effects tab, then find the Geometry sub-tab.
- Tick the Transform checkbox and pick your rotation, like "Rotate by 90 degrees."
Pro Tip: Just rotating the video in the viewer isn't enough—that only affects playback within VLC. To make the change permanent, you have to use the "Convert / Save" feature. This creates a brand new, properly rotated file, which is essential for uploading to social media.
This process "bakes" the new orientation into the video file itself. It’s the best way to prevent platforms from ignoring the rotation data and showing your video sideways anyway. Mastering these small edits is becoming essential, especially with the global video production market hitting an incredible USD 98,987.9 million in 2023. For more advanced techniques, our guide on how to edit an MP4 video covers even more ground.
Rotating MP4s with QuickTime on macOS
Mac users are in luck because QuickTime Player is a fantastic built-in tool for this job. It’s dead simple to use and, more importantly, it can often perform a lossless rotation. This means it just tweaks the video's metadata to tell players how to display it, all without re-compressing and degrading the quality.
The process couldn't be easier. Open your MP4 in QuickTime, head to the "Edit" menu at the top of the screen, and choose "Rotate Left" or "Rotate Right."
After you pick the right orientation, just save the file. QuickTime will either update the metadata instantly or perform a quick export to create the corrected file. I’ve done this a thousand times with iPhone videos that refuse to display correctly on my Mac, and it works like a charm.
Whether you're team Windows or macOS, your desktop gives you some solid options for rotating MP4 files. The trick is knowing which tool fits the situation—a quick metadata edit in QuickTime for quality, or a permanent re-encode with VLC to guarantee compatibility.
How to Rotate a Video on Your Phone or Tablet
Let's face it: most of those awkwardly-oriented videos come straight from our phones. So, it only makes sense to fix them right at the source. Mobile editing is incredibly convenient, letting you rotate MP4 videos in just a few taps without ever touching a computer.
The great news is that the process is almost identical on both iOS and Android. Modern smartphones pack surprisingly powerful editing tools directly into their native photo apps. Chances are, you already have everything you need.
This built-in convenience is a big reason why we watch so much video on our phones. The global video streaming software market hit USD 16.14 billion and is expected to more than double by 2030, thanks in large part to faster 5G networks making mobile streaming effortless. You can dive deeper into these trends with Mordor Intelligence's detailed industry report.
Rotating a Video on an iPhone or iPad
If you're using an iPhone or iPad, the built-in Photos app is your go-to tool. Say you just filmed a fantastic clip for your dog's Instagram, but you held your phone vertically for a horizontal shot. No problem.
- Find Your Clip: First, open the Photos app and locate the video you want to fix.
- Get Into Edit Mode: Tap "Edit" in the top-right corner.
- Find the Crop Tool: At the bottom, tap the "Crop" icon—it looks like a square with arrows around it.
- Rotate It: Now, look for the rotate icon in the top-left corner. Tap it until the video is oriented correctly. Each tap rotates it 90 degrees.
When it looks good, just tap "Done." Photos saves the corrected version right over the old one, ready for you to share.
iPhone Pro Tip: The Photos app performs non-destructive edits. This means you can always undo your changes. Just go back into the edit menu and tap "Revert" to restore the video to its original, sideways glory.
Correcting Video Orientation on Android
For Android users, the experience is just as seamless, thanks to the Google Photos app. It comes standard on most devices and offers a fantastic set of editing tools for quick fixes like this.
Just launch Google Photos, find your sideways video, and tap the "Edit" button at the bottom. Head over to the "Crop" section, and you'll spot the familiar rotate icon. Tap it to turn the video in 90-degree increments until it’s perfect.
Getting the orientation right is the first, crucial step when prepping videos for social media. If you're looking to take your posts to the next level, our guide on the best video editing apps for TikTok is packed with other great mobile tools.
Using Online Tools for an Instant Video Fix
Sometimes you just need to fix a sideways video right now. You might be on a computer where you can't install software, or maybe you just don't want to clutter your machine for a one-off task. This is where online video rotators really shine.
The whole process is incredibly straightforward. You find a site, upload your MP4, click a button to rotate it 90 degrees left or right, and download the corrected version. It’s a perfect solution for those quick, in-the-moment fixes when you just need to get it done and move on.
But, as with most free online services, that convenience comes with a few strings attached.
What to Watch Out For
The two biggest red flags with online tools are privacy and limitations. Think about it: you're uploading your video to a stranger's server. If it’s a personal family video or confidential client work, that might not be a risk you’re willing to take. Always give their privacy policy a quick scan before you upload.
You'll also run into some common restrictions with the free versions:
- File Size Limits: Many free tools tap out at 500MB or 1GB. If you're working with a long 4K clip, you'll hit that ceiling fast.
- Watermarks: A lot of services will slap their logo on your final video. That's a deal-breaker if you're creating clean content for professional use or social media.
- Processing Queues: If the service is busy, you could find yourself stuck in a waiting line, which defeats the whole purpose of a "quick" fix.
When you’re prepping content, especially for platforms like TikTok or Instagram, you need reliable tools. It’s why having a good set of social media content creation tools is so important—they can handle everything from rotation to final polish without these kinds of limitations.
A Quick and Reliable Online Option
For a simple, no-fuss fix, Clipchamp is a solid choice that works right in your browser. It’s incredibly intuitive—just drag your video into the editor, select it, and use the rotation handles to get the orientation just right.
The real beauty of a browser-based tool is its sheer accessibility. You can fix a video from literally any computer with an internet connection, turning what could be a major headache into a two-minute task.
Once you’ve got it rotated, you can export the corrected file. It’s a great way to quickly prep a clip before you upload it to YouTube or send it off to a colleague. Just keep an eye on the export options, as free plans often have their own limitations. While dedicated desktop software will always give you more power and control, you just can't beat an online tool for pure, unadulterated speed.
Taking Rotation to the Next Level: Lossless and Batch Processing
When you're dealing with a large volume of videos or demand absolute precision, clicking through a graphical interface just doesn’t cut it. For pros and power users, the real work happens on the command line. This is where FFmpeg, the swiss-army knife of multimedia tools, really shines, giving you total control to rotate MP4 videos without losing a single bit of quality.
The secret is performing a lossless rotation. Most video editors actually re-encode your file when you rotate it, which introduces a tiny bit of compression and can degrade the quality. FFmpeg, on the other hand, can simply tweak the video's metadata. It tells the video player which way is up without ever touching the original video stream. This method is not only instant, but it also preserves 100% of the original quality.
How to Do Lossless Rotation with FFmpeg
First, you’ll need to have FFmpeg installed on your system. Once you're set up, you can fix a video's orientation with a simple one-liner in your terminal. For a truly lossless, metadata-only fix, the command looks something like this:
ffmpeg -i input.mp4 -c copy -metadata:s:v:0 rotate=90 output.mp4
This command tells FFmpeg to copy all the video and audio streams exactly as they are (-c copy) and just add a rotation flag to the video’s metadata. No re-encoding, no quality loss. It’s that simple.
- To rotate 90° clockwise, use
rotate=90 - For a 90° counter-clockwise turn, use
rotate=270 - And to flip it 180°, you’d use
rotate=180
The official documentation shows just how deep the rabbit hole goes with FFmpeg—it’s packed with filters and tools for just about any video task you can imagine.
This screenshot gives you a glimpse into the raw power of FFmpeg. It’s built for people who need to get things done without compromise.
Automating the Grind with Batch Processing
Now, imagine you have a whole folder of videos filmed vertically but displaying sideways. Fixing them one by one would be a nightmare. This is where a simple script can save you a ton of time.
On macOS or Linux, for example, you can create a quick loop to find every MP4 in a folder and apply the rotation command automatically.
for f in *.mp4; do ffmpeg -i "$f" -c copy -metadata:s:v:0 rotate=90 "rotated-$f"; done
This one line of code zips through your folder, creating a new, correctly rotated version of every MP4 file and adding "rotated-" to the beginning of the filename. That's the kind of efficiency that can turn hours of tedious work into a few seconds of processing. As the global video streaming market is projected to hit an incredible USD 2.47 trillion by 2035, the ability to manage large video libraries is more important than ever.
FFmpeg puts you in the driver's seat. It's not just about rotating a video; it's about building an efficient, automated workflow that respects the integrity of your original footage.
If you're curious about other advanced editing techniques, especially those using artificial intelligence, this AI Video Editing Guide is a great resource. And to dive deeper into what you can do with command-line tools, check out our other articles in the FFmpeg guide.
Got Questions About Rotating Videos? We Have Answers
Even with the best tools, rotating video files can sometimes throw you a curveball. It's one of those tasks that seems simple but can have some quirky issues. If you've followed the steps but are still scratching your head, you're in the right place.
Let's tackle some of the most common questions and clear up the confusion around video quality, social media uploads, and other frequent rotation roadblocks.
Will Rotating My Video Reduce Its Quality?
This is the big one, and rightly so. The short answer is: it depends entirely on how you rotate it.
Some methods offer a lossless rotation, which means the video quality stays 100% identical. This clever trick doesn't actually re-render the video pixels. Instead, it just changes a small piece of metadata—think of it as a digital flag in the file that tells the player "this side up."
- Pros: No quality loss whatsoever. It's fast and efficient.
- Good tools for this: QuickTime Player on Mac and specific commands in FFmpeg are brilliant at this.
On the other hand, many tools, especially online editors and some mobile apps, have to re-encode the video to apply the rotation. This process essentially creates a brand-new video file. While modern encoders are fantastic, re-compressing a video can introduce a tiny, often imperceptible, loss in quality. The free tools we've recommended are great at keeping this to a bare minimum.
Why Is My Video Still Sideways on Social Media?
This is a frustratingly common scenario. You rotate the video, save it, and it looks perfect on your computer. But the second you upload it to Instagram, TikTok, or YouTube, it's back on its side. What gives?
This is almost always a metadata problem. Your local video player reads that little rotation flag we talked about and displays the video correctly. Unfortunately, some social media platforms and web browsers completely ignore that flag during their own video processing.
The surefire fix is to perform a "hard" rotation by re-encoding the video. This physically bakes the new orientation into the video frames themselves, so there’s no metadata for the platform to misinterpret. Using VLC’s "Convert / Save" feature after rotating is a reliable way to get this done.
Can I Fix an Upside-Down Video?
Of course! An upside-down video might look like a bigger problem, but it’s just a 180-degree rotation away from being fixed. The principle is exactly the same as turning a video 90 degrees.
Every single tool we've covered has this option built-in. Whether you're using the Photos app on your phone, VLC on your desktop, or a command-line tool, just look for the 180-degree or "flip vertical and horizontal" option. A quick save, and your world will be right-side up again.
Now that your video is perfectly oriented, you might want to polish its background. VideoBGRemover is an AI-powered tool that lets you remove or replace your video’s background in a few clicks—no green screen required. It’s perfect for creating clean, professional-looking content for ads, tutorials, or social media posts. You can learn more and give it a try for free at https://videobgremover.com.
Ready to Remove Your Video Background?
See a free preview before you buy.
No credit card required • Free preview on every video