How to Edit an MP4 Video Like a Pro
Discover how to edit an MP4 video with practical tips. Learn to trim, merge, enhance audio, correct color, and export for social media in this guide.
Editing an MP4 video is all about taking your raw footage, dropping it into an editor, and shaping it into a finished story. You'll trim out the parts you don't need, splice different clips together on a timeline, and then export it for the world to see. It starts with the basics—making simple cuts, maybe layering in some audio or effects—and ends with fine-tuning the settings to get the perfect balance of quality and file size.
Why MP4 Is the Gold Standard for Video
If you've ever downloaded a video or shared a clip from your phone, you've almost certainly used an MP4 file. It has become the universal language for digital video for one main reason: it nails the perfect balance between high quality and small file size.
Other formats can be clunky, massive, or just plain incompatible with your devices. MP4, on the other hand, uses smart compression to keep files small enough to email or upload quickly, all without making your video look like it was filmed on a potato. This efficiency is why it’s the go-to for everything from YouTube streaming to Instagram stories.
What's Really Inside an MP4?
At its heart, an MP4 file is just a "container." Think of it as a digital box designed to hold all the necessary parts of a video in one tidy package. When you look inside, you'll find a few key components:
- Video Stream: This is the visual part of your video, the actual moving images. It's usually compressed using a codec like H.264, which is great at shrinking file sizes while keeping things crisp.
- Audio Stream: This is the sound, which is also compressed, typically with a codec like AAC.
- Metadata: This is all the extra info, like subtitles, chapter markers, or even the little thumbnail image you see before you press play.
It's this all-in-one structure that makes MP4 so incredibly versatile and ensures it plays nice with just about every device and platform out there.
The Growing Demand for Video Skills
Knowing how to edit video isn't just for Hollywood directors anymore. It's become a vital skill for anyone creating content online, from marketers and small business owners to educators and social media influencers. The global video editing software market was valued at a whopping $2.29 billion and is expected to climb to $3.73 billion by 2033. That growth is fueled by the unstoppable demand for polished, engaging digital content.
Key Takeaway: Learning how to edit an MP4 opens up a whole new world of creative expression. It gives you the power to turn shaky, raw footage into a compelling story that can actually connect with and entertain your audience.
Before you jump into the deep end with advanced techniques, it’s crucial to get the basics down. If you're brand new to this, our complete guide to video editing for beginners is the perfect place to build a solid foundation.
Choosing Your Go-To MP4 Video Editor
Picking the right video editor is probably the biggest decision you'll make when you're just getting started. Think of it as your creative command center—it’s where all the magic happens. The best choice for you really boils down to your budget, what you want to create, and how steep of a learning curve you're willing to tackle.
The video editing world moves fast, so it's always a good idea to see what's new. Keeping an eye on reviews of the latest video editing tools can help you spot the perfect fit before you commit.
Free Editors That Pack a Punch
Here's the good news: you don't have to break the bank to get great results. Some of the most capable video editors on the market are completely free, which is perfect when you're just starting out or working with a tight budget.
- DaVinci Resolve: This one is a beast. Originally famous for its Hollywood-grade color correction tools, Resolve has grown into a full-fledged video editing powerhouse. It’s incredibly powerful for a free tool, but be warned—it takes some time to learn your way around.
- CapCut: If your goal is to create content for TikTok, Instagram Reels, or YouTube Shorts, look no further. CapCut is built for speed and simplicity. With its dead-simple interface, automatic captions, and built-in trending effects, it’s a go-to for quick, punchy social media videos.
For a more detailed breakdown, we've put together a guide on the best video editing software for content creators that compares even more options.
Industry-Standard Professional Software
When you feel like you've outgrown the free options and are ready to invest in your editing skills, paid software is the next logical step. These professional tools offer more advanced features, reliable support, and seamless integration with other creative apps. They're what the pros use day in and day out.
A few heavyweights dominate the professional editing space. Adobe Premiere Pro holds the top spot with a 35% market share, with Apple's Final Cut Pro X close behind at 25%, and DaVinci Resolve’s paid version capturing 15%. The demand for these powerful editors is exploding, with the number of paid users projected to grow from 43 million to nearly 64 million by 2030. It's clear that high-quality video is no longer just a trend; it's the standard.
MP4 Video Editor Feature Comparison
To help you see how these tools stack up, here’s a quick comparison of some of the most popular options for editing MP4 files. I've focused on what matters most for beginners and those looking to level up.
| Software | Best For | Key MP4 Features | Pricing Model |
|---|---|---|---|
| Adobe Premiere Pro | All-around professional editing & creative workflows | Native MP4 support, robust timeline, extensive effects library, integration with Adobe Creative Cloud. | Subscription (Monthly/Annually) |
| Final Cut Pro | Mac users seeking speed and performance | Optimized for Apple hardware, magnetic timeline, strong multicam and 360-degree video support. | One-Time Purchase |
| DaVinci Resolve | Color grading, visual effects, and all-in-one production | Industry-leading color tools, advanced audio (Fairlight), and VFX (Fusion) built-in. Powerful free version. | Freemium (Free & Paid Studio Version) |
| CapCut | Quick social media video creation (mobile & desktop) | Auto-captions, trending templates & effects, easy trimming and merging, user-friendly interface. | Free (with optional paid features) |
Choosing an editor often comes down to personal preference and the type of projects you'll be tackling. There's no single "best" choice for everyone.
This is a look at the classic timeline layout you'll find in Adobe Premiere Pro. This kind of interface—with its distinct video and audio tracks, preview window, and effects panel—is the industry standard for a reason. It gives you the granular control needed to piece together complex projects.
My Advice: Honestly, don't get stuck trying to find the "perfect" editor from the get-go. Just jump in with a free tool like CapCut for social media or the free version of DaVinci Resolve for more traditional projects. Focus on mastering the basics: trimming, cutting, and arranging clips. You'll know it's time to upgrade when the software itself becomes the only thing holding back your creative ideas.
Building Your Video from Clips to Story
Alright, you've picked your editing software. Now the fun really begins. This is where you take that jumble of raw MP4 files and start weaving them into a story. The first step is to pull all your footage into the program and get it onto the timeline, which is basically your digital workbench.
Think of the timeline as the skeleton of your video. Every clip you drop in is another bone in the structure. Your first job is simply to get these pieces in a logical order. Don't stress about making it perfect just yet; you're just creating a rough sketch of your story.
Mastering the Art of Trimming and Cutting
Once your clips are laid out in a basic sequence, it’s time to start tightening things up. This is the real bread and butter of editing an MP4 video. Trimming is when you snip off the beginning or end of a clip, while cutting is taking a chunk out of the middle. These two actions are your go-to tools for controlling the pace and rhythm of your video.
Let's say you're editing an interview. You’ll want to cut out all the awkward pauses, the "ums" and "ahs," and any time the speaker fumbles their words. A few quick cuts can make the dialogue sound sharp and confident. Or, if you have a beautiful scenic shot, you can trim the start to jump right into the most captivating moment, hooking your viewer from the get-go.
Pro Tip: Most modern editing software is non-destructive. This means when you trim or cut a clip on your timeline, the original file is untouched. You're just telling the software which parts to hide. Mess up? No problem. You can always drag the edge of the clip to restore the footage you removed.
This flowchart breaks down the key things to think about—your budget, skill level, and what you're trying to achieve—to help you land on the right editing software for your specific needs.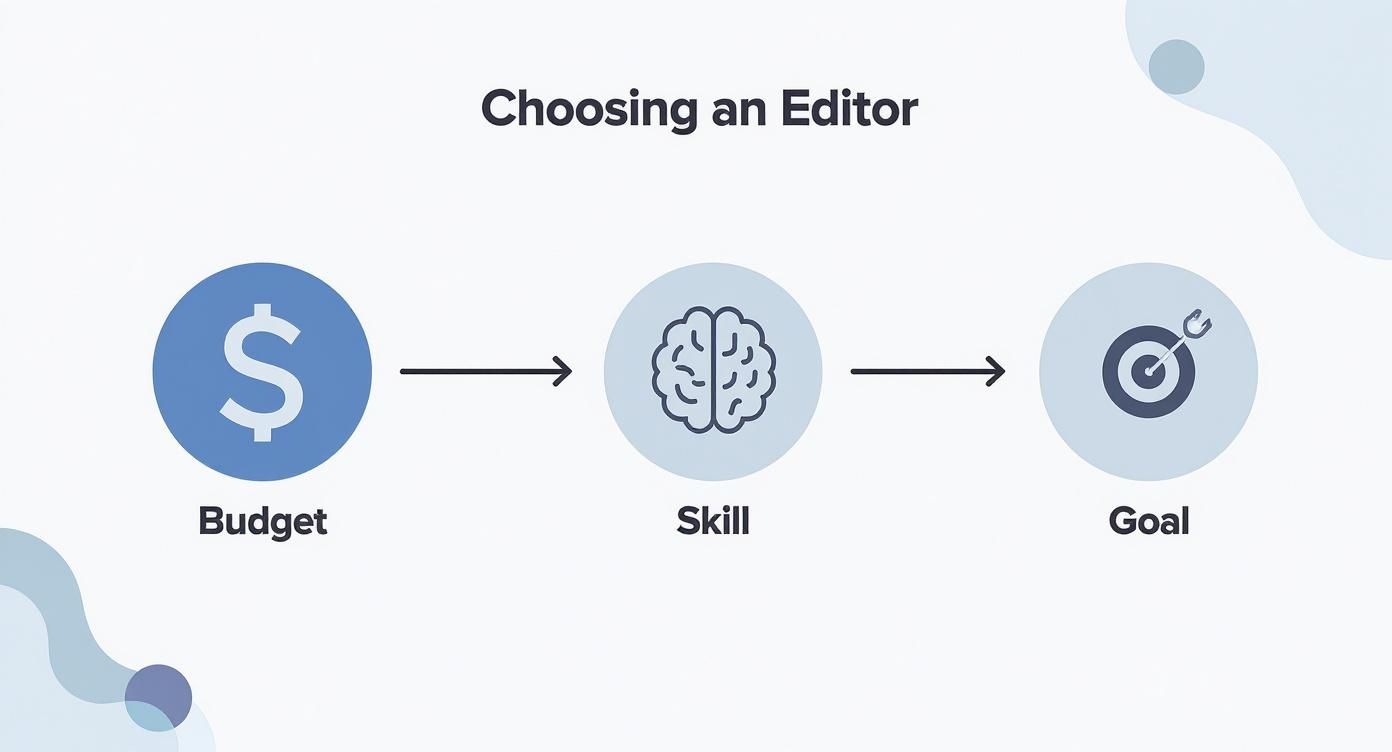
As you can see, choosing an editor is a strategic move that balances your resources with your creative vision.
Assembling Your First Rough Cut
After you've done your initial round of trimming and cutting, you'll have what we call a "rough cut." It's a bare-bones version of your video. The story is there, but it's clunky. The timing might feel a little off, and you haven't added any music, slick transitions, or special effects. That's exactly where you should be at this stage.
The whole point of a rough cut is to check the foundation of your story. Watch it all the way through and be critical. Ask yourself:
- Does the story actually make sense from start to finish?
- Are there spots that feel slow or boring?
- Is the main point coming across clearly?
- Do any of the cuts feel jarring or abrupt?
The answers will tell you what to do next. You might realize a scene has more impact if you move it earlier, or that a particular shot isn't adding anything valuable and can be scrapped. Editing is an iterative dance—a constant process of refining and polishing the timeline.
The Power of Merging and Sequencing
Putting clips together is about more than just lining them up; it's about creating a smooth, uninterrupted flow. Imagine you shot a product demo from two different angles—a wide shot and a tight close-up. By cutting back and forth between them, you can merge these two perspectives to show off important features without boring your audience.
A classic technique for this is called "cutting on action." If you cut from a wide shot of someone opening a box to a close-up right as their hands lift the lid, the viewer's eye naturally follows the movement. The edit becomes almost invisible, making the transition feel completely natural.
To really get efficient, learning your software’s keyboard shortcuts is non-negotiable. Simple commands for cutting (often C), selecting (V), and deleting gaps can save you a staggering amount of time. Most professional editors perform over 80% of their work using shortcuts, which frees them up to think creatively instead of hunting through menus. The goal is to build a sequence that doesn't just look good, but also drives your message home.
Enhancing Your Video with Audio and Color
Once your clips are laid out and the story is taking shape, it’s time to start working on the polish. This is where you breathe life into your project with sound and color, two elements that can completely transform a simple video into something that truly connects with an audience.
Nothing screams "amateur" faster than bad audio. You could have the most beautifully shot footage in the world, but if the sound is crackly, unbalanced, or hard to hear, people will click away. Clean audio and a thoughtful color palette are what separate the rough cuts from the professional-grade content.
Mastering Your Audio Mix
A good audio mix isn't just about slapping a music track under your video. It's about creating a balanced soundscape where every element has a purpose. Your goal is to guide the viewer's ear, making sure the important stuff is crystal clear while everything else adds texture without becoming a distraction.
Always start with your primary audio—usually, that’s someone’s voice. This is your anchor. Before you do anything else, make that dialogue clean, present, and easy to understand. Most editing software gives you the tools you need right out of the box.
- Dialogue Cleanup: Jump into your equalizer (EQ) settings. Got a low, annoying hum from an air conditioner? Or a slight hiss from a cheap microphone? You can often use an EQ to dial back those specific frequencies. Many editors even have simple presets like "Vocal Enhancer" that give you a great starting point.
- Volume Leveling: Listen through the dialogue. Are there parts where the speaker gets quiet, then suddenly loud? Use volume keyframes or a normalization tool to smooth it all out for a consistent, professional-sounding track.
- Background Music: Once your dialogue is solid, you can bring in the music. The classic rookie mistake is making the music way too loud. You want it to be felt more than heard, supporting the scene without competing with the speaker.
A Practical Tip: Look for a feature called "audio ducking." It's a lifesaver. This automatically lowers the music volume whenever dialogue starts and raises it back up in the pauses. Tools like Adobe Premiere Pro and DaVinci Resolve have fantastic automated ducking tools that save a ton of tedious work.
The Two Sides of Color Editing
Much like sound, color has a massive impact on the emotional tone of your video. The work is usually split into two distinct stages: color correction and color grading. People often use the terms interchangeably, but for an editor, they mean very different things.
Think of color correction as the technical, problem-solving phase. You’re fixing issues and making the footage look natural and consistent, as if you were just seeing it with your own eyes. This is always your first step.
Color grading, on the other hand, is the fun, creative part. Once your image is corrected and balanced, you get to apply a stylistic look to evoke a specific mood. This is where you inject your unique visual signature.
Getting Started with Color Correction
The goal here is simple: create a clean, neutral, and balanced image. You're setting a baseline before you start getting artistic.
Focus on these three pillars first:
- Exposure: Is the shot too dark or blown out? Tweak the exposure or brightness controls to find that sweet spot where you aren’t losing details in the bright whites (highlights) or the dark blacks (shadows).
- White Balance: This is what makes colors look true-to-life. If the white walls in your shot look a bit blue (too cool) or yellow (too warm), adjusting the temperature and tint sliders will fix it. When your whites look white, all the other colors tend to fall into place.
- Contrast: This refers to the difference between the lightest and darkest parts of the image. Bumping up the contrast can make your shot "pop" and feel more dynamic, but push it too far and you'll crush your shadows and blow out your highlights, losing detail. A little goes a long way.
Shaping the Mood with Color Grading
With a nicely corrected image as your canvas, you can start painting. This is where you get to influence how your audience feels.
For instance, pushing blues and cyans into the shadows can create a cold, sleek, or even futuristic vibe. Conversely, warming up your image with yellows and oranges can make a scene feel nostalgic, comfortable, and happy.
A classic you'll see everywhere is the "teal and orange" look, made famous by Hollywood blockbusters. It works so well because it creates a beautiful visual contrast, pushing cool teal tones into the shadows while keeping skin tones in that pleasing warm, orange range. This makes the actors pop right off the screen. Playing with these different styles is a huge part of learning how to edit an MP4 video like a pro.
Exporting Your MP4 for Any Platform
https://www.youtube.com/embed/iXXROg1YW34
You've done the hard work—the trimming, color correction, and audio mixing are all finished. Now comes the final, critical step: getting that video ready for the world. Exporting is where many new creators get tripped up, but it doesn't have to be complicated.
The right settings ensure your video looks just as sharp on someone's phone as it did on your timeline. The wrong ones? They can turn your masterpiece into a pixelated mess or a file so huge it takes an eternity to upload.
Every platform, from YouTube to TikTok, has its own preferred "recipe" for video. What shines on one might get squashed by the compression algorithm on another. The goal is always to find that sweet spot between visual quality and manageable file size.
Decoding Your Export Settings
I like to think of video exporting like shipping a package. The codec is how you fold the contents to fit, the bitrate is the quality of the shipping box, and the resolution is the size of the package itself. Nail these three, and you're golden.
Codec (H.264): When it comes to the web, H.264 (sometimes called AVC) is the undisputed champion. It’s the industry standard for a reason—it delivers incredible quality without creating massive files. Since it's supported by literally everything, it's always a safe bet.
Resolution: This one's simple: match your export resolution to your project's resolution. If you edited your video in 1080p (1920x1080), export it in 1080p. Bumping a 1080p video up to 4K during export won't magically add detail; it just makes the file unnecessarily large.
Bitrate: This setting has the biggest impact on quality and file size. A higher bitrate packs more data into each second of video, which means higher quality but also a bigger file. For most online video, a variable bitrate (VBR) is the smartest choice, as it adjusts the data flow based on the complexity of each scene.
As a rule of thumb, a bitrate between 8-12 Mbps is a great starting point for a 1080p YouTube video. For platforms like Instagram or TikTok, which use more aggressive compression, you can often drop that to 5-8 Mbps without a noticeable loss in quality.
Mastering your export settings is what separates hobbyists from pros. There’s a reason the video editing software market is valued at $3.09 billion and is expected to climb to $5.13 billion by 2032. Businesses and creators know that polished video drives results, often seeing 48% more interaction than static images. Your export is the final polish that makes that happen.
If you're really looking to dial in your settings, it's worth learning more about optimizing video for YouTube to perfectly match its specific requirements. And if you're struggling to keep file sizes down, we have a whole guide on video compression without losing quality that dives even deeper.
Got Questions? Let's Troubleshoot Common MP4 Editing Hurdles
Even with a solid guide in hand, you're bound to run into a few snags when you first start editing MP4 files. It happens to everyone. Here are some quick answers to the most common questions I hear, designed to get you unstuck and back to creating.
Can I Edit an MP4 Without Losing Quality?
Yes, absolutely—but you have to be smart about it. Think of it like making a photocopy of a photocopy; each time you re-export a video, it gets compressed again, and a little bit of quality can flake away. The trick is to minimize that degradation.
Always start with the best possible source footage. From there, try to get all your edits done in a single session before you export. When it's time to save your final cut, stick with a solid codec like H.264, keep the resolution the same as your source, and choose a bitrate that’s high enough to preserve detail. This is where tools like DaVinci Resolve or Adobe Premiere Pro really shine, as they're built to keep your video looking crisp.
What's the Best Free Software to Get Started With?
For anyone serious about learning the craft, DaVinci Resolve is my top recommendation. It's a powerhouse that gives you professional-level editing, color grading, and audio tools completely free. The learning curve is a bit steeper, but what you get is unbelievable for the price (which is zero).
If you’re looking for something quick, intuitive, and perfect for social media, you can’t go wrong with CapCut. It’s brilliant on both desktop and mobile, letting you slice up clips, throw in some text, and add effects in minutes.
I like to think of it this way: DaVinci Resolve is like a fully-stocked professional kitchen, while CapCut is a top-of-the-line, does-everything air fryer. One is for creating a gourmet meal from scratch, the other is for getting something fantastic done fast.
My Exported MP4 File Is Huge! How Do I Make It Smaller?
Nine times out of ten, a giant file size is because of the bitrate. When you go to export, the single most effective thing you can do to shrink your file is to lower the bitrate.
A great technique is to use a Variable Bitrate (VBR) setting. This tells the software to use more data for complex, fast-moving scenes and less for simple, static shots, which is a fantastic way to balance quality and file size. Also, give your resolution a quick sanity check. If you're uploading to Instagram, do you really need a 4K export? Dropping down to 1080p will slash the file size and still look perfect on a phone screen.
Ready to take your videos to the next level by easily removing or replacing backgrounds? VideoBGRemover uses AI to create professional cutouts in minutes, no green screen needed. Try it for free and see the magic for yourself.
Tagged with
Ready to Remove Your Video Background?
See a free preview before you buy.
No credit card required • Free preview on every video