Video Editing for Beginners: Easy Tips to Start Today
Learn video editing for beginners with simple tools and techniques. Start creating amazing videos with our practical guide. Click to get started!
Getting into video editing isn't about becoming a software wizard overnight. It’s really about learning to see your footage not just for what it is, but for what it could be. At its core, you're just organizing your clips, making a few simple cuts to build a narrative, and then packaging it all up for people to watch.
Think of it like putting together a puzzle—all the pieces are there, you just need to find the right way to fit them together.
Your First Steps Into Video Editing
Opening up video editing software for the first time can feel like you've stepped into a spaceship cockpit filled with a million blinking lights and confusing buttons. But here's a secret from someone who's been there: you only need to know what a handful of those buttons do to get your ship off the ground.
The fancy features can wait. For now, remember that video editing is fundamentally about storytelling. Your job is simply to guide your viewer's attention from one interesting moment to the next.
And these skills are more in-demand than ever. The video editing software market ballooned from $2.24 billion in 2018 to $3.09 billion by 2023. A big reason why is that video posts on social media snag 48% more views than static images. This explosion is being driven by regular people—just like you—learning the basics. You can dig into these video editing market trends to see what’s behind the growth.
Understanding the Editing Workspace
No matter which program you use—from a free app on your phone to professional-grade software—they all revolve around one key area: the timeline. This is your creative canvas. It’s where you’ll lay out your video clips, audio tracks, and graphics in the exact sequence you want them to appear.
To start, you really only need to get comfortable with two main tools for working on that timeline:
- The Blade Tool: This is your virtual pair of scissors. You use it to make cuts and split a long clip into two (or more) shorter ones.
- The Selection Tool: This is your hand. It lets you grab clips, drag them around on the timeline, and trim their length by dragging their start or end points.
If you can master moving clips, making precise cuts, and layering some music or a voiceover underneath, you've already learned the most important skills in video editing. Everything else is just built on top of that foundation.
Key Takeaway: Don't let the interface intimidate you. Your home base is the timeline. If you can add a clip, cut it, and move it, you’ve already figured out the hardest part of the entire process.
The Power of Organization
I can't stress this enough: the most important step happens before you even touch the timeline. Get your files organized. This one simple habit will save you from countless headaches later on. Create a main folder for your project, and then make a few subfolders inside it.
A good starting structure looks something like this:
- Video: A home for all your raw video footage.
- Audio: Where you'll keep background music, voiceovers, and any sound effects.
- Graphics: The spot for logos, photos, or any on-screen text elements you create.
Sorting your files first means you’ll never break your creative flow to hunt down a missing clip. It’s a pro-level habit that makes the whole editing journey feel smoother and more intuitive, right from the very beginning.
Before we move on to the actual editing, let's get a handle on some of the lingo you'll hear. It can sound technical, but the concepts are actually pretty straightforward.
Essential Video Editing Terms for Beginners
| Term | What It Means | Why It's Important |
|---|---|---|
| Timeline | The main workspace where you arrange your video clips, audio, and graphics in sequence from left to right. | This is the heart of your project. Everything you do happens here, so getting comfortable with it is your first priority. |
| Clip | A single piece of video or audio media on your timeline. | Your story is built by arranging and trimming these individual building blocks. |
| Cut | The point where one clip ends and another begins. Also refers to the action of splitting a clip. | Cuts control the pacing and flow of your video. A quick succession of cuts creates energy; longer clips feel more relaxed. |
| Render/Export | The final step where the software processes all your cuts, effects, and audio into a single, playable video file (like an MP4). | This is how you turn your project into a finished video that you can upload to YouTube, share on social media, or send to a friend. |
| B-Roll | Supplemental footage that you cut away to from your main shot. For example, if you're interviewing someone, B-roll might be shots of them working. | B-roll makes your video more visually interesting and helps hide cuts or mistakes in the main footage. It's a key part of telling a compelling story. |
Having these terms in your back pocket will make following along with tutorials and understanding the software so much easier. Now, let’s get our hands dirty.
Choosing the Right Editing Software
Your video editing software is your creative cockpit. It's the one tool that will shape your entire workflow, dictate what's possible, and honestly, determine how much fun you have along the way. Instead of getting bogged down by a million different feature lists, let's cut through the noise and figure out what you actually need to get started.
The real question isn't "what's the best software?" but "what's the right software for me?" Think about the videos you want to make. Are we talking quick, punchy clips for social media that you shoot on your phone? Or are you settling in at your desk to craft longer, more polished YouTube videos? Your answer points you directly to the right tool.
Mobile Editing for Speed and Simplicity
If you’re creating content on the fly, mobile apps are absolute powerhouses these days. My top recommendation here is CapCut. Its drag-and-drop interface is incredibly intuitive, making it a breeze to add trending audio, toss on some filters, or even generate automatic captions in just a few minutes. It's practically built for TikTok and Reels.
The biggest win with mobile editing is the immediacy. You can shoot, edit, and upload all from one device. That's a huge advantage when you're just starting out and trying to get into a consistent rhythm.
This handy little decision tree can help you visualize the best path forward.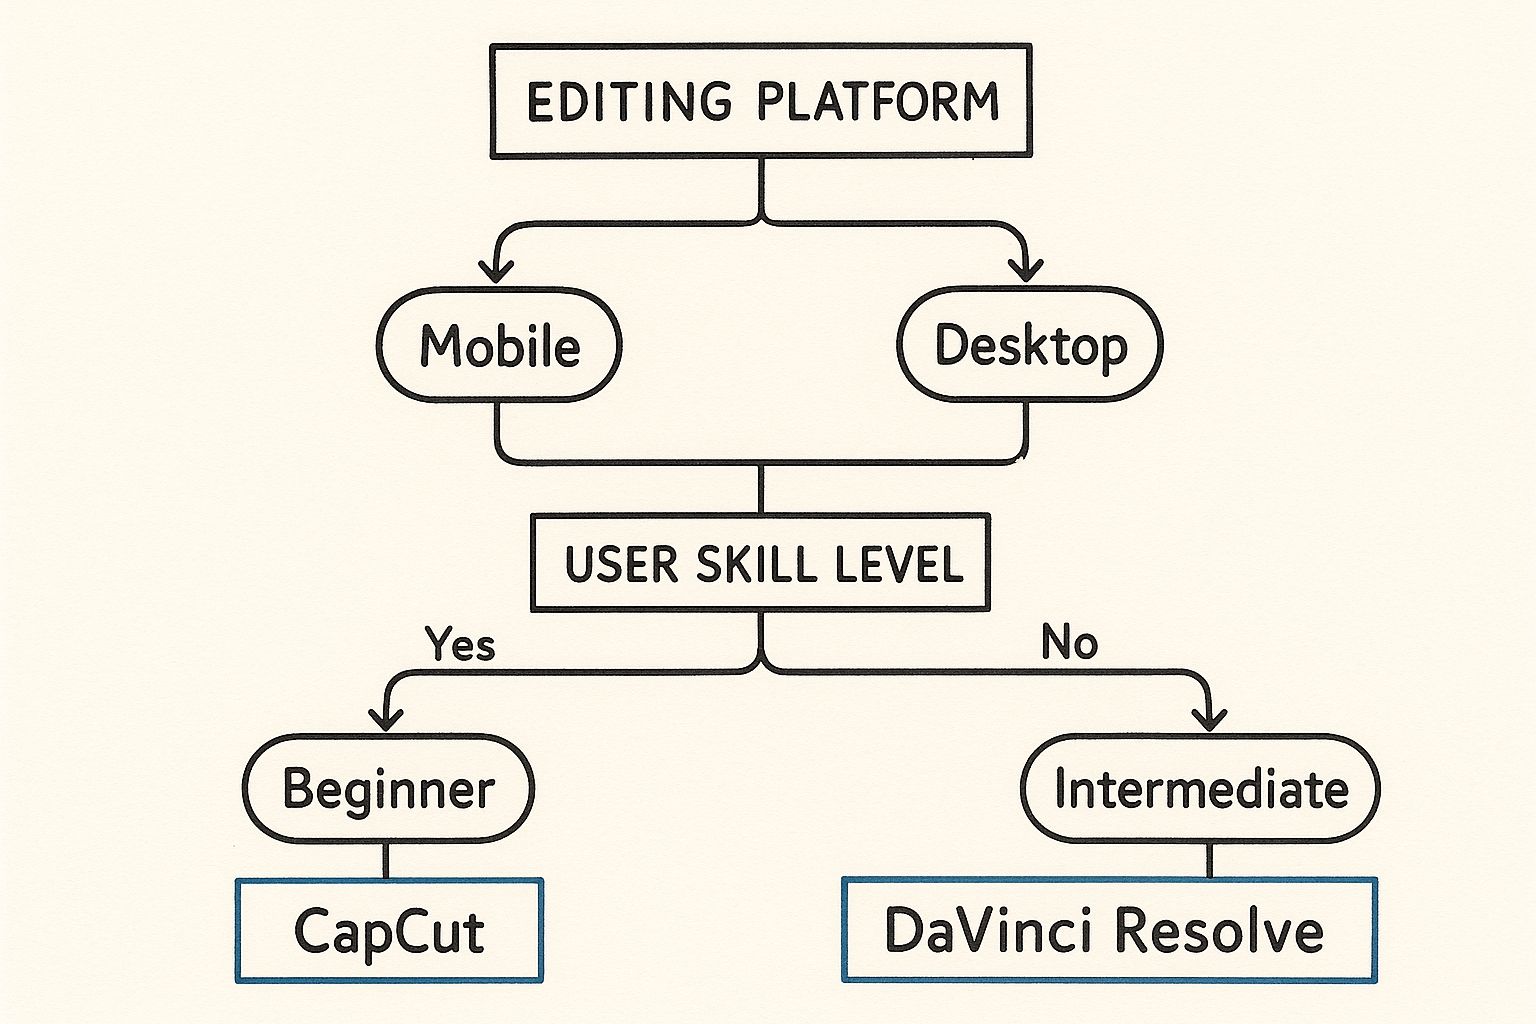
As you can see, it really boils down to your primary device—mobile or desktop—and your experience level. Let this guide your initial choice so you can get creating faster.
Desktop Software for Power and Precision
When you're ready to step up your game and get more granular control, it’s time to move to a desktop setup. Sure, you've probably heard of the big industry players like Adobe Premiere Pro, but they often come with a hefty subscription fee and a pretty intimidating learning curve.
That's why I almost always point beginners toward DaVinci Resolve. It started its life as a high-end tool for professional color grading, but the free version now includes a full-blown editing suite that is surprisingly easy to get the hang of.
What I love about it is that it teaches you a professional workflow from the very beginning. Tools like DaVinci Resolve 18 continue to add more and more pro-level features into the free version, which is just incredible value.
If you want to explore a few more choices, we put together a detailed guide on the best video editing software for beginners that breaks down several great options for different budgets and creative needs.
My Personal Tip: Don't get stuck in "analysis paralysis." Just pick one and run with it. If you're all about your phone, download CapCut. If you’re at a computer, grab DaVinci Resolve. Commit to learning just that one program for a solid month. You'll learn far more by doing than by constantly shopping around for the "perfect" tool.
Mastering the Core Editing Techniques
Alright, you've picked your software and have your footage neatly organized. Now for the fun part—actually editing. This is where the magic happens, where you take a jumble of raw clips and weave them into a story that flows. Don't stress about getting everything perfect on the first try. Just focus on getting your ideas onto the timeline and building from there.
Think of it as sketching out a rough draft. You'll be making cuts, moving clips around, and just generally getting a feel for how your story is coming together. This is where you really start to learn the craft of video editing for beginners.

Making Your First Cuts and Assembling a Sequence
The very first step is what editors call a rough cut. Just drag every clip you think you might want to use directly onto your timeline. Don't even think about the order or precise timing yet—the only goal here is to get all your raw materials in one place.
Next, you'll start trimming the fat. Go through each clip one by one and use the blade tool (your new best friend) to slice away all the junk. This means cutting out the shaky camera movements at the beginning of a shot, the moments you stumbled over your words, or any long, awkward pauses. What you want are clean, usable takes.
Once you have your trimmed-down clips, you can start piecing them together to tell your story.
Let's say you're editing a quick tutorial on making coffee. Your sequence might look something like this:
- Start with a wide shot of your kitchen setup.
- Cut to a close-up of the coffee beans being ground.
- Follow with a few medium shots of pouring the water and the coffee brewing.
- End with a beautiful, steamy shot of the finished cup.
This initial assembly forms the skeleton of your video. It won't be polished, but it will have a clear beginning, middle, and end that you can start refining.
The Art of the J-Cut and L-Cut
With your clips in a basic order, it's time to introduce two simple techniques that will instantly make your edits feel more professional: J-cuts and L-cuts. They get their names from the shape they literally create on the editing timeline.
J-Cut: The audio from the upcoming clip starts playing a moment before you see the video for that clip. This is a fantastic way to introduce a new scene or speaker before they appear on screen, pulling the viewer smoothly into the next moment.
L-Cut: The video cuts to the next clip, but the audio from the previous clip continues to play. This is perfect for showing someone's reaction while another person is still talking, making conversations feel much more natural.
These "split edits" are a staple in professional editing because they help guide the audience's attention without jarring them with one hard cut after another.
Pro Tip: Resist the urge to use cheesy transitions like star wipes or page peels. 99% of the time, a simple, clean cut is the most powerful tool you have. If you need to show a passage of time or a change in location, a quick crossfade is usually all you need.
Balancing Your Audio for Clarity
Here’s a hard truth: Viewers will forgive mediocre video quality, but they will not tolerate bad audio. If they can't hear what's being said, they're gone. Your top priority should always be clean, clear sound.
Start by getting your main audio track—whether it's someone talking or a voiceover—to a consistent, audible level. Then, if you want to add background music, you need to "duck" it way down in volume so it sits under the dialogue, not on top of it. A solid rule of thumb is to set your music -18dB to -25dB lower than your primary audio. It’s a simple tweak that separates amateur edits from polished ones.
Adding Polish with Color and Audio
Okay, you’ve pieced together your story on the timeline.## Adding Polish with Color and Audio
Okay, you’ve pieced together your story on the timeline. The cuts are in place, and the narrative flows. Now for the fun part—the polish that takes a simple edit and makes it feel truly professional. This is where we’ll dive into color and sound to shape the mood and make sure your video really connects.
Don't get spooked by industry jargon like "color grading." When you're just starting, the real goal is color correction. It's all about making your footage look natural and consistent, as if every clip was shot under the exact same conditions.
Making Your Footage Pop with Basic Color Correction
Your first pass on color should always be about achieving balance. Pretty much any editing software you use will have some basic controls, and honestly, a few small tweaks here can make a world of difference.
You can get 90% of the way there just by focusing on these three settings:
- Brightness (or Exposure): This is simply how light or dark the image is. Adjust this first to make sure your shot isn't too dark or completely blown out.
- Contrast: This controls the difference between your blacks and whites. Bumping up the contrast gives your image more punch and definition. Lowering it creates a flatter, softer, more muted look.
- Saturation: This is the intensity of your colors. A little boost can bring a dull scene to life, but go easy. Overdo it, and your video will look garish and unnatural in a hurry.
My Personal Tip: Subtlety is key. The best color correction is the kind an audience feels but doesn't consciously see. I always aim for a clean, true-to-life look before even thinking about adding creative styles or filters. You can learn more with our detailed guides on color correction techniques.
Elevating Your Project with Sound Design
If color sets the visual mood, audio absolutely dictates the emotional tone. I've seen amazing-looking videos completely ruined by bad audio. On the flip side, great sound design can make a good video unforgettable.
Your top priority is making sure the primary audio—usually dialogue or a voiceover—is crystal clear and easy to understand.
Once that’s handled, adding some royalty-free background music can completely change the vibe. Websites like Epidemic Sound or Artlist have massive libraries where you can find the perfect track. Just remember to keep the music low enough to support the scene, not overpower the important audio.
The good news is that modern software is making all of this easier, especially with new AI features. Tools that handle automatic color matching or instantly enhance dialogue are saving professionals an estimated 200 hours per year. For a beginner, these tools are a shortcut to getting polished results without a steep learning curve. If you're curious, you can explore more about how AI is shaping the video editing market to see where this is all headed.
Getting Your Finished Video Out Into the World
https://www.youtube.com/embed/AroeEgpwY7M
Alright, you’ve done the hard work. You’ve sliced and diced your clips, tweaked the audio, and got the colors just right. Now for the final hurdle: exporting.
This last step turns your project into a single video file you can actually share with people. It might sound technical, but it’s really just about telling the software how to package everything up so it looks great wherever it ends up.
The trick is to find that sweet spot between amazing visual quality and a file size that won't take all day to upload. A massive file is a pain for you and your viewers, but compress it too much, and all your hard work will look like a pixelated mess.
Nailing the Export Settings
When you click "Export," you'll probably see a screen full of confusing options. Don't sweat it. For most projects, you only need to pay attention to a few key settings to get a professional-looking result.
These are the big ones you'll want to get right:
- Resolution: This is all about clarity. For almost anything you post online, 1920x1080 (or 1080p) is your best bet. It’s the standard for a reason. If you shot in 4K and your destination is YouTube, you can export in 3840x2160 (4K), but just know the file will be significantly bigger.
- Frame Rate (fps): This just needs to match whatever you filmed in. There’s no reason to change it. Most of the time, that’s going to be 24 fps for a more film-like feel or 30 fps for that classic, smooth digital video look.
- Bitrate: Think of this as the amount of information packed into every second of your video. More information (a higher bitrate) means better quality but also a larger file. For a 1080p video, starting somewhere between 8-12 Mbps is a great rule of thumb.
My Takeaway: Honestly, don't overthink this part. For 95% of what you'll create for the web, exporting at 1080p, 30 fps, and using the default H.264 codec will give you an excellent-quality video that's easy to manage.
Smart Sharing for Different Platforms
Every social platform has its own preferences for video. If you can, use the built-in export presets your software offers for places like YouTube or Instagram—they take a lot of the guesswork out of it.
What if your final file is still too chunky? Sometimes, even with the right settings, a long video can be huge. In that case, an MP4 file compressor can be a lifesaver, shrinking the file size without totally wrecking the quality.
Once your video is exported and ready to go, it's time to share it. If you're aiming for a professional audience, learning how to post a video on LinkedIn is a great way to get your work in front of a different crowd.
Answering Your Burning Questions About Video Editing
Once you start editing, the questions pop up fast. It's one thing to watch a tutorial, but it's another to have your own footage on the timeline. Feeling a little stuck or uncertain is totally normal—every editor has been there. Let's clear up some of the most common questions right now.
"How long should my video be?" This one comes up all the time. The real answer? As long as it needs to be to get your point across, and not a single frame longer. A punchy 7-second clip can hit just as hard as a 20-minute deep dive if it serves its purpose. Your focus should always be on the story or message, so be ruthless and cut anything that doesn't add value.
And then there's the music dilemma. It's so tempting to drop your favorite pop song into the timeline, but that's a fast track to getting your video muted, taken down, or demonetized. Stick to royalty-free music from reputable sources. It saves you a massive legal headache later on.
What’s the Best Way to Actually Learn This Stuff?
Honestly? The best way to learn video editing is to just start editing. Seriously. You can watch tutorials for weeks, but nothing sinks in until you get your hands dirty.
Pick a tiny, low-stakes project you can finish. A one-minute montage of your dog at the park, a simple clip of you making coffee—anything. The goal isn't to create a masterpiece; it's to go through the entire process from import to export. That hands-on experience is where the real learning happens. You'll hit a wall, search for a solution, and that new skill will be locked in your brain forever.
Key Insight: Your first fifty videos probably won't be great, and that's okay. The goal is progress, not immediate perfection. Every edit you complete, no matter how small, is a step forward in your journey.
Do I Really Need a Super-Expensive Computer?
Not at all. While a beast of a machine is nice, you absolutely don't need one to get started. Most modern computers and laptops can handle basic 1080p editing just fine, especially if you're using user-friendly software like DaVinci Resolve or CapCut.
If you notice your computer is starting to chug, there's a pro-level trick called proxy editing. It sounds complicated, but it's not. Your software just creates temporary, low-resolution copies of your files for you to edit with. It’s way less demanding on your system, so everything feels snappy. When you go to export the final video, the software automatically switches back to the full-quality original files.
A few other quick-fire questions I hear all the time:
- What’s the "3-2-1 rule"? It's a lifesaver for backing up your work. Keep 3 copies of your data on 2 different types of media (like an external hard drive and cloud storage), and make sure 1 of those copies is off-site.
- Can I fix my shaky footage? Yes! Almost all editing programs have a built-in stabilization feature. It's often just a one-click fix that can smooth out wobbly shots and make them look much more professional.
- How do I get my audio to sound better? Get a decent microphone. Even an inexpensive one makes a world of difference. Audiences will forgive grainy video, but they will not tolerate bad audio. If they can't hear you, they're gone.
Ready to create stunning, professional-looking videos without the hassle of a green screen? With VideoBGRemover, you can remove or replace any video background in minutes using powerful AI. Perfect for creators, marketers, and educators who need clean, polished results fast. Try it for free and see the magic for yourself at https://videobgremover.com.
Tagged with
Ready to Remove Your Video Background?
See a free preview before you buy.
No credit card required • Free preview on every video