How to Compress a MOV File Without Losing Quality
Discover how to compress a MOV file while preserving quality. This guide covers the best tools and settings for reducing file size on any device.
Ever tried to send a video from your iPhone or an export from Final Cut Pro, only to be stopped in your tracks by a massive file size? You're not alone. Those beautiful MOV files, especially pro-level formats like ProRes 4444, are incredible for editing because they hold onto every bit of data. But for sharing? They're a nightmare.
Their sheer size is a common bottleneck for anyone working with video. Compressing a MOV file isn't just a technical chore—it's the practical fix for everyday problems that slow you down and burn through your budget.
Navigating Common Digital Roadblocks
Think about how often these situations pop up. Each one is a great reason to make video compression a standard part of your workflow.
Social Media Upload Limits: Platforms like Instagram and TikTok have tight restrictions on file size. A single minute of 4K video from an iPhone can easily top 500 MB, which is way too big for a quick post. Compression is the only way to get your content to fit. Getting a handle on MOV compression makes uploading MOV files to Twitter and other platforms a breeze.
Email Attachment Caps: Ever hit that 25 MB limit on Gmail or Outlook? Trying to email even a short, high-quality MOV clip is a non-starter unless you shrink it down first.
Cloud Storage Costs: Storing terabytes of uncompressed video on Dropbox or Google Drive adds up fast. Compressing your project archives and final deliveries can slash those monthly storage bills.
The core idea is simple: you only need maximum quality during the editing phase. For delivery, sharing, or archiving, a smaller, compressed file is almost always the smarter choice.
Streamlining Your Professional Workflow
Beyond just sharing, compression is crucial for professional collaboration. When you need a client to review a cut, sending a multi-gigabyte MOV file is a huge pain. It means a long upload for you and an equally long download for them, creating friction and delaying feedback.
By learning to compress your MOV files effectively, you can send lightweight previews that clients can watch almost instantly. This simple step tightens your feedback loop, helps you close out projects faster, and makes the whole process feel more polished and professional. It turns a technical hurdle into a real workflow advantage.
What's Really Happening When You Compress a Video?
Before you jump into settings and start sliding bars, it helps to understand what's going on under the hood. Think of video compression less like a magic trick and more like a highly efficient packing strategy. The goal is to shrink your MOV file's "suitcase" without throwing out the essential items that make your video look sharp and professional.
Getting a handle on these core concepts will empower you to make smarter decisions in any compression tool you use. It's the key to striking that perfect balance between a manageable file size and the visual quality your project deserves.
The diagram below lays out the most common reasons you'd need to compress a MOV file in the first place—from hitting email attachment limits to simply saving on storage.
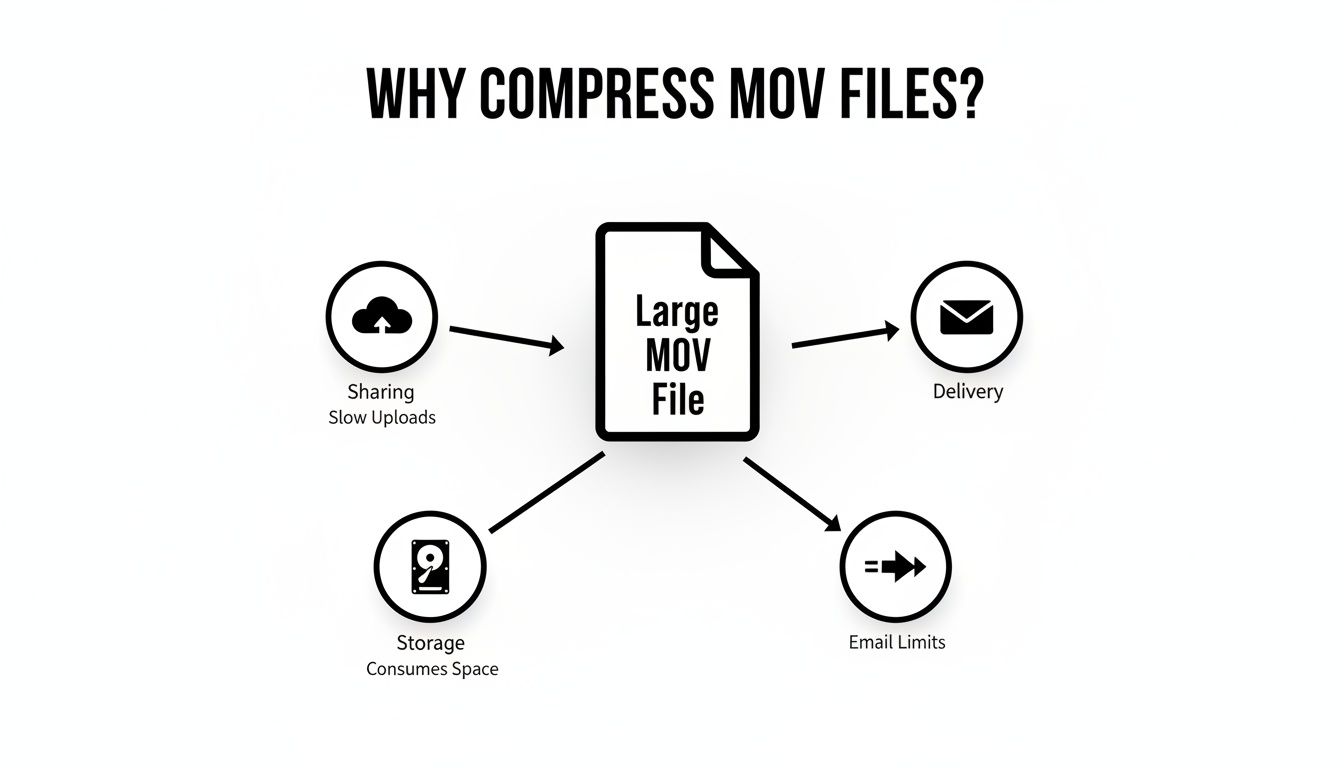
As you can see, massive MOV files can create frustrating bottlenecks in everyday workflows. That’s why knowing how to compress them effectively is such a critical skill.
Codecs vs. Containers: What's the Difference?
At the heart of any video file are two components that people often mix up: the codec and the container. They sound similar, but they do completely different jobs.
The Container: This is the file format itself, like .mov, .mp4, or .mkv. It's just the digital "box" that holds all the different pieces of your video together—the video stream, the audio track, subtitles, and other metadata. If you want to dive deeper into the container, our guide to MOV file formats has you covered.
The Codec: Short for "coder-decoder," this is the real workhorse. It's the sophisticated algorithm that physically shrinks (compresses) and then unpacks (decompresses) the video data stored inside the container. It's the method used to pack everything tightly.
Choosing the right codec can make a monumental difference. For example, moving from the older but still common H.264 codec to the more modern H.265 (HEVC) can slash your file size by up to 50% with virtually no perceivable loss in quality. This efficiency is why so many streaming platforms and production houses have made the switch.
Bitrate: Your Video's "Data Budget"
If the codec is the packing method, then bitrate is your "data budget" for every second of video. It’s measured in kilobits or megabits per second (kbps or Mbps) and directly dictates how much information is used to render the video on screen.
A high bitrate means more data per second, which translates to a cleaner, higher-quality image but a much larger file. Conversely, a low bitrate shrinks the file size but can introduce unwanted visual artifacts like blockiness or blurriness, especially in scenes with fast action or complex textures.
Expert Tip: When you absolutely have to shrink a MOV file, adjusting the bitrate is your most powerful tool. It’s a direct trade-off: you sacrifice a little data to gain a lot of space. This is often the first setting I tweak.
Key Compression Factors and Their Impact
To quickly see how different settings affect your video, here's a handy table that breaks down the most important factors.
| Parameter | How It Reduces File Size | Impact on Quality | Best For |
|---|---|---|---|
| Bitrate | Reduces the amount of data allocated to each second of video. | High: The most direct way to introduce artifacts if lowered too much. | Quickly hitting a specific file size target for online platforms or emails. |
| Resolution | Decreases the total number of pixels in each frame. Fewer pixels = less data. | Medium: Downscaling (e.g., 4K to 1080p) is very effective, but quality loss is permanent. | Adapting high-res footage for smaller screens like phones or web players. |
| Codec | Uses more advanced algorithms to pack the same visual data more efficiently. | Low: A modern codec like H.265 can significantly reduce size with minimal quality loss. | Archiving footage or delivering high-quality video at lower bitrates. |
| Frame Rate | Removes entire frames from each second of video, reducing the total data. | Varies: Dropping from 60 to 30 fps is often fine, but going lower can look choppy. | Reducing file size for videos with limited motion, like interviews or presentations. |
Ultimately, a combination of these adjustments will give you the best results. Start with the codec, then fine-tune the bitrate and resolution to meet your needs.
The Other Levers: Resolution and Frame Rate
Finally, let's look at two other settings that play a huge role in your final file size.
Resolution is simply the dimensions of your video in pixels (e.g., 1920x1080 for 1080p). It's easy to underestimate its impact. Dropping from 4K (3840x2160) to 1080p doesn't just cut the pixel count in half—it reduces it by a massive 75%! This is why downscaling is one of the most effective ways to dramatically shrink a file. Fewer pixels simply require less data.
Frame rate, measured in frames per second (fps), determines how many individual images are displayed each second to create the illusion of motion. A video shot at 60 fps contains literally twice the image data of the same clip at 30 fps. For many projects, especially those without fast-paced action, dropping from 60 to 30 is an easy win for reducing file size without most viewers ever noticing the difference.
Compressing MOV Files with HandBrake
When you need a serious, no-nonsense tool for compressing MOV files, HandBrake is the gold standard. It's free, open-source, and runs on pretty much everything (Mac, Windows, Linux). What I love about it is the perfect mix of "just-get-it-done" presets and deep, granular control for when you need to be precise.
Let’s run through a common scenario: you’ve just exported a massive MOV file from your video editor, and now you need to shrink it down for the web without turning it into a pixelated mess.
This is the "Video" tab in HandBrake—it's your command center. The video encoder and quality settings are the two most powerful levers you have for controlling the final file size and visual fidelity.
Getting Started with a Smart Preset
First things first, grab HandBrake from its official site and get it installed. When you fire it up, it’ll ask you to open a source file. Just point it to your hefty MOV file.
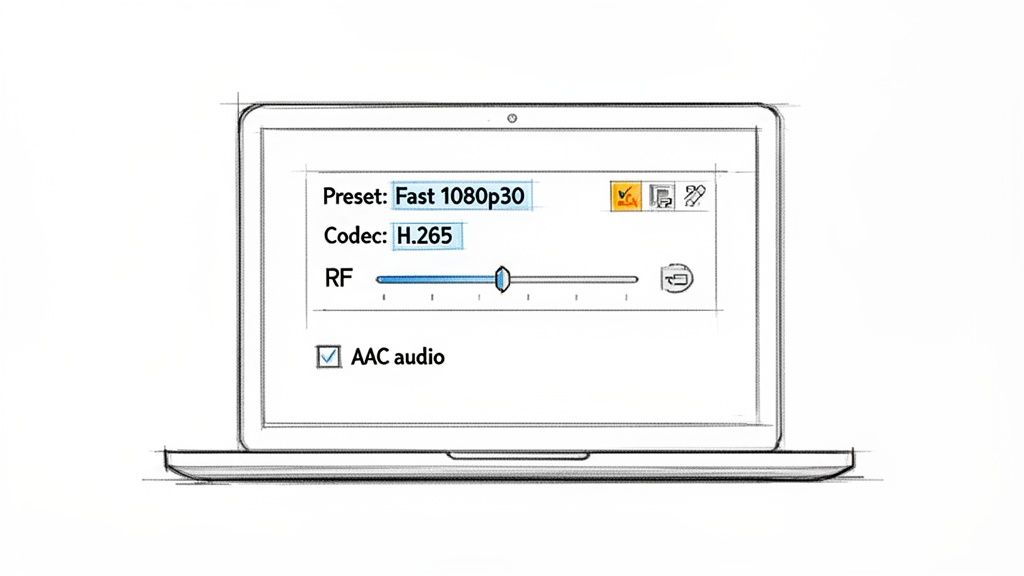
HandBrake's presets are your best friend, especially when you're starting out. They’re located in a panel on the right (or a drop-down at the top). For just about any web-based need, the presets under the "Web" category are fantastic. A great, all-around choice is Fast 1080p30.
This single click does a lot of the heavy lifting for you:
- It scales the video down to a maximum of 1920x1080.
- It sets the frame rate to a web-friendly 30 fps.
- It automatically sets the output to a universally loved MP4 container.
This gives you an excellent baseline. Now, let’s get into the tweaks that really make a difference.
Fine-Tuning Your Compression Settings
With the preset loaded, click on the "Video" tab. This is where we’ll make two key adjustments to get the most bang for our buck in file size reduction.
The first setting to look at is the Video Encoder. Most presets default to H.264 (x264), which is a fantastic and widely compatible codec. But for pure efficiency, switch this to H.265 (x265). This newer codec can often deliver the same visual quality at up to 50% less file size than H.264. It’s a game-changer.
Next up is the Constant Quality slider, labeled with RF (Rate Factor). This is the single most important setting for the quality-to-size trade-off.
A lower RF number means higher quality and a larger file. A higher RF number means lower quality and a smaller file. It feels backward at first, but you'll get used to it.
For 1080p video, the sweet spot is usually between an RF of 20 and 24. This range is often considered "visually lossless," meaning you'd be hard-pressed to spot the difference from the original in a side-by-side comparison. My personal starting point is an RF of 22. I'll often encode a short 10-second clip with this setting just to make sure I'm happy with the quality before letting it run on the entire video.
Finalizing Audio and Kicking Off the Encode
Don’t forget the audio! Jump over to the "Audio" tab. You’ll want to make sure the codec is set to AAC (CoreAudio), which is the standard for MP4 files. A bitrate of 128 kbps or 160 kbps is plenty for crisp stereo sound on the web.
With all your settings dialed in, you're ready to go.
- Down at the bottom, click Browse to choose a save location and give your new file a name. It’s a good habit to add something like "_compressed" to the filename so you don’t overwrite your original.
- Hit the big green Start Encode button up top.
HandBrake will get to work, and you can track its progress at the bottom of the window. How long it takes depends entirely on your video's length and your computer's horsepower.
If you really want to become a HandBrake pro, our in-depth HandBrake tutorial dives into even more advanced techniques. By going beyond the defaults, you gain complete control over your compression, ensuring you get the perfect result every time.
Using FFmpeg for Granular Control Over Compression
Sometimes, a graphical interface just doesn't cut it. For anyone who needs to automate a compression workflow or wants surgical precision over every setting, tools like HandBrake can feel restrictive. This is exactly where FFmpeg comes in.
FFmpeg is the free, open-source engine powering a huge number of video apps you probably already use. It's a command-line tool, which means no fancy buttons or sliders—just pure, unadulterated power for those willing to pop open a terminal. Learning it is like ditching a recipe book and learning to cook by instinct; you control every single ingredient. This makes it perfect for scripting batch jobs to process dozens of MOV files with absolute consistency.
With FFmpeg, you can chain multiple operations—like compressing, resizing, and changing formats—into a single, clean command.
Getting to Grips with an FFmpeg Command
An FFmpeg command might look like gibberish at first, but it follows a pretty logical pattern. Once you get the hang of the basic components, or "flags," you can start piecing together your own custom compression recipes.
Here are the essential flags you'll be using most of the time:
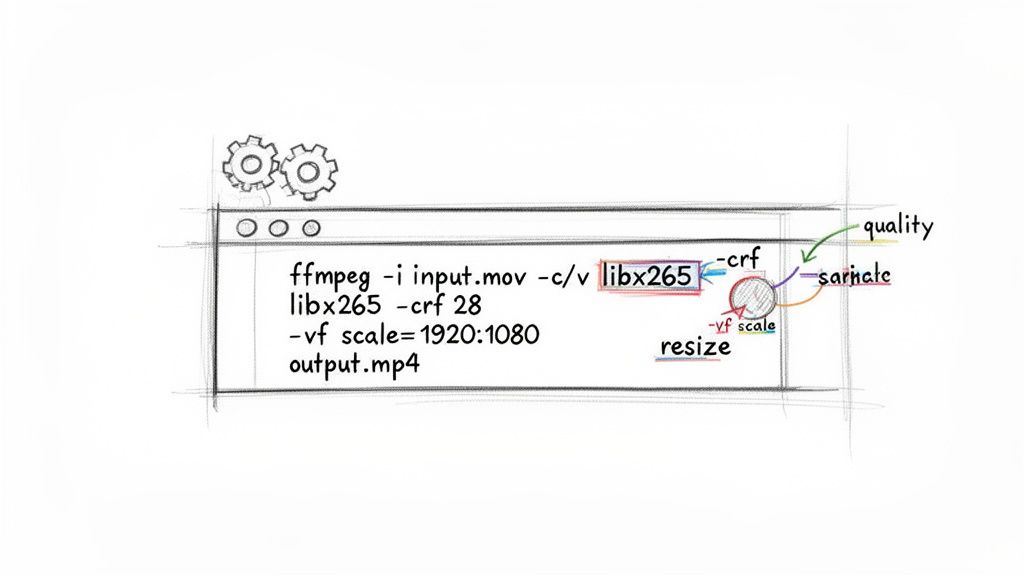
-i: This points to your input file (e.g.,my-video.mov).-c:v: This sets the video codec. Your main choices will belibx264(for H.264) andlibx265(for H.265/HEVC).-crf: The Constant Rate Factor. This is FFmpeg’s version of a quality slider. The key thing to remember is that a lower value means higher quality. Forlibx264, a sane range is 18-28.-vf: This stands for video filter and lets you perform actions like resizing (e.g.,scale=-1:1080sets the height to 1080p while maintaining aspect ratio).-c:a: This sets the audio codec. You'll almost always wantaacfor maximum compatibility.
Combining just these few flags gives you the power to build one-line scripts that do the work of a multi-step process in a GUI program. It’s all about efficiency.
Real-World Commands for Common Scenarios
Let's look at some practical, copy-and-paste examples you can adapt. Just swap input.mov and output.mp4 with your own filenames.
Your Go-To H.264 Compression
This is the workhorse command for creating a universally compatible MP4. A CRF of 23 is my usual starting point, as it strikes an excellent balance between file size and visual quality.
ffmpeg -i input.mov -c:v libx264 -crf 23 -c:a aac output.mp4
High-Efficiency H.265 Compression
When you need to squeeze out the maximum file size savings, H.265 is the answer. This command will give you a significantly smaller file than the H.264 version above, at a roughly equivalent quality level.
ffmpeg -i input.mov -c:v libx265 -crf 28 -c:a aac output.mp4
Compressing and Resizing 4K to 1080p
Here’s a great example of FFmpeg’s power: doing two jobs at once. This single command takes a 4K MOV file, resizes it down to 1080p, and compresses it with H.264.
ffmpeg -i input.mov -vf scale=-1:1080 -c:v libx264 -crf 23 -c:a aac output_1080p.mp4
Preserving Transparency with WebM
One of the biggest headaches is compressing a MOV file that has an alpha channel (transparency)—think of an animation exported as ProRes 4444. You can't just save it as an MP4, because the MP4 format doesn't support transparency. The solution is the WebM format.
Our own tool, VideoBGRemover, is fantastic for creating videos with transparent backgrounds in the first place. Once you have that transparent MOV, you need a way to compress it for the web without losing that critical alpha channel.
This FFmpeg command converts your transparent MOV to a web-friendly WebM file, keeping the transparency perfectly intact using the libvpx-vp9 codec.
ffmpeg -i transparent_input.mov -c:v libvpx-vp9 -b:v 1M -c:a libopus output.webm
This specific recipe is a lifesaver for web designers and motion graphics artists who need to overlay animations on a website. It’s a perfect example of how FFmpeg solves complex problems with elegance, proving why it's an essential tool for anyone serious about how to compress a MOV file.
Quick Compression with VLC and QuickTime
Sometimes, you just need to get the job done without diving into a sea of complex settings. For a quick, no-fuss compression, the perfect tool might already be sitting on your computer. Both VLC Media Player and Apple's QuickTime Player offer surprisingly effective ways to shrink a MOV file without downloading anything new.
These methods are my go-to for one-off tasks—like making a screen recording small enough to email or prepping a clip for a quick presentation. You're trading the fine-tuned control you get with HandBrake for sheer speed and convenience, which makes them fantastic tools to have in your back pocket.
Using VLC Media Player for Fast Conversions
Everyone knows VLC as the media player that can handle any file you throw at it. But hidden away in its menus is a powerful conversion tool that’s perfect for applying a simple preset to get a smaller file, fast.
Here’s how you do it. First, open up VLC.
- From the top menu, navigate to File > Convert / Stream.
- Drag and drop your big MOV file into the window, or use the Open Media… button to locate it.
- Click the Convert / Stream button to proceed.
Now for the important part: the Profile dropdown. This is where you pick your compression settings. For a solid, all-around choice that works everywhere, select Video - H.264 + MP3 (MP4). This profile will convert your MOV into a universally friendly MP4 format, which is exactly what you want for easy sharing.
Choosing a preset like this is the easiest way to let the software handle the heavy lifting. It automatically picks a reasonable bitrate and resolution, which are the two biggest factors affecting your final file size.
Once you've picked the profile, click Save as File, then Browse to choose where you want to save the new, smaller video. Give it a name, hit Save, and VLC will get to work.
Trimming File Size with QuickTime on a Mac
If you're on a Mac, the process is even simpler. QuickTime Player, the default video app on macOS, has a straightforward export function that doubles as a lightweight compressor. This is what I use all the time when I need to send a client a quick preview right from my MacBook.
Just open your MOV file in QuickTime Player. Head up to the menu bar at the top of your screen and click File > Export As. You'll see a few resolution options, usually 1080p, 720p, and 480p.
Which one should you pick? It really depends on what you need it for:
- 1080p: Go with this if you need to maintain high quality for platforms like YouTube or Vimeo.
- 720p: This is a great middle-of-the-road option. It slashes the file size but still looks plenty sharp on most screens, making it ideal for emails.
- 480p: Choose this when file size is the absolute priority and you can live with lower visual quality.
After you select a resolution, QuickTime asks where to save the file. It handles all the compression behind the scenes, creating a much smaller MOV or MP4. One of my favorite features here is that it shows you the estimated file size right in the save dialog—super handy when you're trying to hit a specific size limit.
Even though these tools feel simple, they're still fundamentally changing your video, mostly by adjusting the bitrate. The connection between bitrate and file size is direct and powerful. For example, a 10-minute video encoded at 5,000 kbit/s might be around 400 MB. If you double that bitrate to 10,000 kbit/s, the file size balloons to nearly 775 MB.
While these quick-and-dirty methods are great, you might eventually need more control. When that time comes, our guide to the best video compressors can help you explore more advanced software.
Common Questions on Compressing MOV Files
Once you get the hang of compressing MOV files, a few key questions always seem to come up. Let's tackle them head-on, so you can handle any curveballs in your workflow.
How Can I Compress a MOV File Without Losing Quality?
This is the big one, right? While truly lossless compression won't shrink a video file by much, achieving a result that's "visually lossless" is totally doable. The trick is to use modern tools and settings smart enough to produce changes the human eye can't easily spot.
Your best bet is to use a modern codec like H.265 (HEVC). When you're in a tool like HandBrake, don't just crank the bitrate down. Instead, focus on the Constant Quality (RF) setting. For a typical 1080p video, an RF value between 20-24 usually hits the sweet spot—it dramatically shrinks the file size with almost no perceptible loss in quality. One more pro tip: always work from your original, high-quality source file to avoid re-compressing an already compressed video, which just magnifies artifacts.
Getting a great result is all about striking the right balance. It's worth a moment to learn about the specific techniques for preserving MOV file quality during compression to ensure your final video looks sharp and professional.
What Is the Best Format to Compress a MOV File To?
For almost every scenario you can think of—from sharing on social media to sending a preview to a client—MP4 is the answer. Paired with an H.264 or H.265 codec, it's the gold standard. MP4 is universally compatible, so you'll never have to second-guess if someone can open and play your file. It just works.
The one major exception? Transparency. If your MOV file has a transparent background (an alpha channel), MP4 won't cut it. In that case, your go-to should be a WebM file using the VP9 codec. This combo is one of the few that preserves that crucial alpha channel, making it perfect for web animations or video overlays where the background needs to show through.
Can I Compress a Large MOV File Online?
Yes, you can, and there are plenty of free online tools that get the job done. They can be a lifesaver when you're in a pinch with a small, non-sensitive file. But they come with some serious trade-offs you need to be aware of.
- Privacy Risks: You're uploading your footage to someone else's server, which isn't ideal for confidential projects.
- File Size Limits: Most free services cap uploads, often at 1GB or even less.
- Watermarks: Some will slap their logo on your final video unless you pay.
- Limited Control: You won't find the granular quality controls that desktop software offers.
For any professional work, large files, or projects where quality is paramount, sticking with dedicated software like HandBrake or FFmpeg is always the smarter, more reliable choice.
At VideoBGRemover, we make creating professional-looking videos easy. Our AI-powered tool lets you remove or replace your background in minutes, then export a high-quality, lightweight MP4 or a transparent MOV ProRes 4444 for advanced editing. Start creating stunning videos today at videobgremover.com.
Ready to Remove Your Video Background?
See a free preview before you buy.
No credit card required • Free preview on every video