Remove Background Noise From Video for Flawless Audio
Learn how to remove background noise from video with our expert guide. Discover the best software and pro techniques for crystal-clear, professional audio.
The best trick for clean audio has nothing to do with fancy software or post-production wizardry. It all happens before you even hit the record button.
Taking a few minutes to choose the right gear and set up your recording space properly is the single most effective way to remove background noise from video. Think of it as your first line of defense—one that will save you hours of headaches in the editing bay.
Winning the Noise Battle Before You Record
Too many creators fall into the trap of thinking they can "fix it in post." The reality is, a clean initial recording is the foundation of great audio. This goes beyond just finding a quiet room; it’s about being deliberate with your entire recording process.
This proactive approach is a cornerstone of high-quality production. In fact, you can learn more about how to improve video quality in our complete guide, which ties together both audio and visual best practices. At the end of the day, professional video is impossible without clean audio.
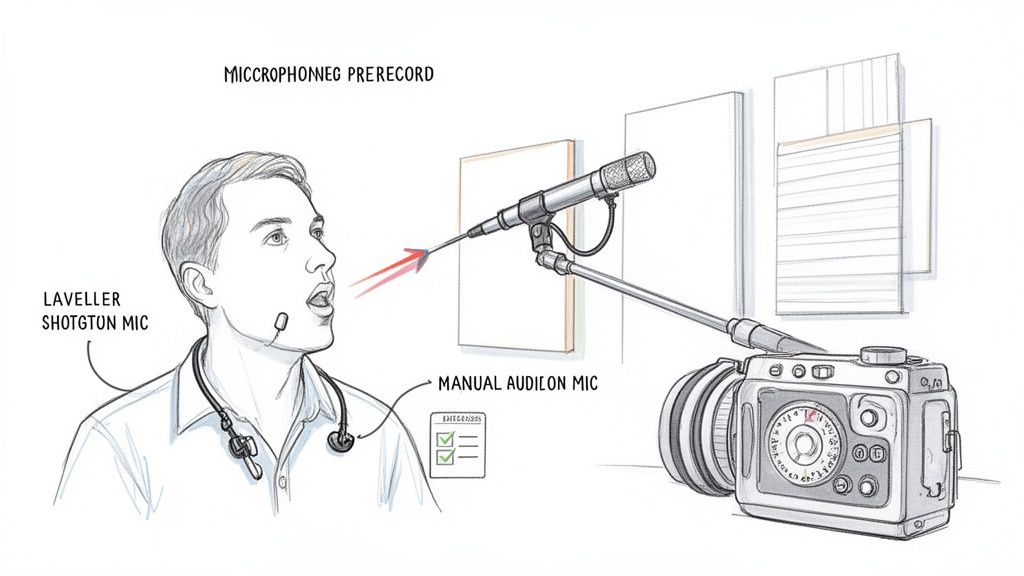
Pick the Right Microphone for the Job
Your camera's built-in mic is a jack-of-all-trades and master of none. It’s designed to capture everything happening around it, which is precisely why it’s so terrible at isolating your voice. Using an external microphone isn't just a suggestion; it's essential.
- Lavalier Mics: I love these little clip-on mics for interviews, tutorials, or any kind of talking-head video. Pinning one to your shirt gets it close to your mouth, which makes your voice the dominant sound and pushes everything else into the background.
- Shotgun Mics: These are my go-to for vlogging or any situation where I need to reject noise from the sides. They're highly directional, meaning they hear what you point them at and ignore the rest.
Master Your Mic Placement
Even the best microphone will sound bad if it's in the wrong spot. The goal is simple: get the mic as close to your mouth as you can without it getting in the shot or picking up plosives (those ugly pops of air from "p" and "b" sounds).
For a lavalier, a good starting point is clipping it to a collar or shirt about 6-8 inches from your chin. If you're using a shotgun mic, position it just outside the camera's view, aimed directly at your mouth. This one tweak can drastically improve your signal-to-noise ratio.
Pro Tip: Your recording space is an instrument, and hard surfaces are your enemy. Bare walls, tile floors, and large windows reflect sound, creating nasty echo and reverb. You can deaden a room for free by throwing down some blankets, pillows, or a rug to absorb those sound waves. It makes an instant difference.
Tame Your Camera's Audio Settings
Don't let your camera’s automatic settings undermine all your hard work. Most cameras have an "Auto Gain Control" (AGC) feature that tries to be helpful by boosting volume during quiet moments. The problem? It also cranks up the volume on any background hiss, hum, or air conditioning noise.
Dive into your camera menu and switch the audio to manual. You'll want to set the recording level so that your voice peaks somewhere between -6dB and -12dB. This gives you a strong, clean signal without any risk of distortion and, crucially, stops the camera from amplifying noise when you're not speaking. Understanding the fundamentals of AV Production is key to nailing these technical details from the start.
Choosing the Right Tool for Audio Cleanup
Alright, you’ve got your footage. Now comes the crucial part: picking the right software to clean up your audio. The tool you land on will define your whole editing process, forcing you to weigh precision against speed. There's no one-size-fits-all answer here; it really depends on what you're working on, your own skill level, and how much time you've got.
Your options generally fall into three buckets. Each one offers a different path to help you remove background noise from video, and they’re all built for different kinds of creators.
H3: Dedicated Digital Audio Workstations (DAWs)
If you need absolute, granular control, nothing comes close to a dedicated audio editor. I'm talking about powerhouses like Adobe Audition or iZotope RX. Think of these as the surgical scalpels of audio repair. They let you visually pinpoint and carve out specific unwanted sounds—a single cough, a humming fridge, a distant siren—using incredible features like spectral editing.
This kind of precision is a lifesaver for professional filmmakers, serious podcasters, or anyone producing high-stakes content where pristine audio is everything. The catch? There's a steeper learning curve, and you'll have to get comfortable with separating your audio and video tracks to do the work.
H3: Integrated Tools in Video Editing Suites
Most professional video editors already have some seriously powerful audio tools baked right in. Think of the Fairlight page in DaVinci Resolve or the Essential Sound panel in Adobe Premiere Pro. These give you a fantastic middle ground, offering solid noise reduction, EQs, and compressors without forcing you to leave your video timeline.
For most creators—from YouTubers to marketing video producers—this integrated approach is the sweet spot. It keeps your workflow streamlined and prevents the headache of round-tripping files between different programs, which can be a huge time-saver.
Key Takeaway: The best workflow is the one you’ll actually use. For over 80% of video projects, the tools already inside your video editor are more than capable of delivering clean, professional-sounding audio without overcomplicating things.
H3: One-Click AI Denoise Tools
The new kids on the block are AI-powered denoise tools, and they're quickly changing how we approach audio cleanup. These tools use machine learning to intelligently tell the difference between human speech and background noise, often producing amazing results with just a single click. Let’s face it, bad background noise is a huge problem, affecting over 70% of user-generated videos, especially with the creator economy exploding.
This problem has created a massive demand for AI solutions, with the market projected to skyrocket from $2.31 billion in 2025 to over $45 billion by 2034. You can read more about this growth in AI noise reduction software and its impact on content creation.
These AI tools are perfect for social media managers, UGC creators, and anyone on a tight deadline who needs fast, solid results for platforms like TikTok or Instagram Reels.
Comparing Your Audio Denoise Software Options
To help you decide, let's break down how these different types of tools stack up against each other. Each one serves a purpose, but knowing where they shine will save you a lot of time and frustration.
| Tool Category | Best For | Key Features | Learning Curve |
|---|---|---|---|
| Dedicated DAW | Filmmakers, Audio Engineers, Podcasters | Spectral editing, advanced repair modules, multi-track mixing | High |
| Integrated NLE Tools | YouTubers, Content Creators, Corporate Video | Convenient workflow, essential noise reduction, EQ, compression | Medium |
| AI Denoise Tools | Social Media Managers, UGC Creators, Quick Turnarounds | One-click automation, speech isolation, speed | Low |
Ultimately, the best tool is the one that fits your project's needs. If you're just starting, the tools in your video editor are a great place to begin. As your needs become more complex, you can always explore a dedicated DAW for those high-stakes projects.
The Pro-Level Workflow for Cleaning Up Your Audio
Alright, you've got your software picked out, so let's get our hands dirty. Cleaning up audio isn't a one-click fix; it's a methodical process. A professional approach means first identifying the specific problem, then applying the right tool for the job, and finally, polishing the sound without gutting the quality of the original voice. Following these steps is how you truly remove background noise from video without making it sound worse.
The first move I always make is to separate the audio from the video. While you can do some basic edits inside a video editor, exporting the audio as a standalone WAV file gives you so much more power and control. It lets you bring it into a dedicated audio editor where you can apply more precise tools without your computer grinding to a halt trying to render video previews. Trust me, this simple export sets the stage for a much cleaner result.
Use a Noise Print to Kill Constant Hums
One of the most powerful tricks in the book is using a noise print to handle steady, consistent background noise. Think of things like an air conditioner hum, a buzzing refrigerator, or the whir of a computer fan. This technique literally teaches your software what the bad sound is so it can go in and surgically remove it from the entire track.
To make this work, you need a clean sample of just the noise. This is why you'll often hear professionals talk about recording 5-10 seconds of "room tone" before they start talking. They're capturing that noise print intentionally.
Here’s how you put it to work:
- Find a section of your audio that has only the background hum you want to get rid of.
- In your software (like Adobe Audition or DaVinci Resolve's Fairlight page), highlight that small section.
- Look for a function called "Capture Noise Print" or "Learn." This tells the software to analyze the frequency signature of that unwanted sound.
- Once it's learned the noise, select your entire audio clip and apply the noise reduction effect.
The software will then intelligently subtract those "hum" frequencies from your recording. A word of caution: don't get too aggressive. Pushing the reduction to 100% often creates weird, watery artifacts. A reduction of 80-90% usually sounds far more natural.
A rookie mistake is trying to achieve complete silence. Your goal isn't to create a sterile, dead-sounding void. It's to push the distracting noise so far into the background that the listener's brain just tunes it out. Always aim for reduction, not total elimination.
Performing Audio Surgery with Spectral Editing
But what about those sudden, one-off sounds? The dog barking, a car horn, someone coughing in the next room? A standard denoiser that's listening for a constant hum won't touch those.
This is where spectral editing becomes your secret weapon. It’s a tool that lets you see the audio as a visual spectrogram, where frequency and time are laid out like a map. Different sounds create unique visual shapes and colors.
Once you see it this way, spotting problems becomes ridiculously easy. A sharp clap or a click shows up as a bright vertical streak. A persistent whine looks like a solid horizontal line. With a spectral editor, you can literally use a selection tool—almost like a healing brush in Photoshop—to "paint out" the offending sound, removing it cleanly without messing up the dialogue right next to it. It’s a game-changer for fixing otherwise unsalvageable audio.
The Final Polish: EQ and Gating
Once the big, obvious noises are gone, it's time for the final polish. This is where two classic tools come in: an Equalizer (EQ) and a Noise Gate.
An EQ helps you shape the tonal quality of the voice itself. For instance, you can gently cut out muddy, low-frequency rumble below 80 Hz, which is often just machine noise and adds nothing to the voice. Then, you could add a slight boost in the 2-4 kHz range, which is where vocal clarity and presence live. This little tweak can make dialogue really pop and cut through the mix.
This chart gives you a quick visual of how these different toolsets fit into the overall picture.
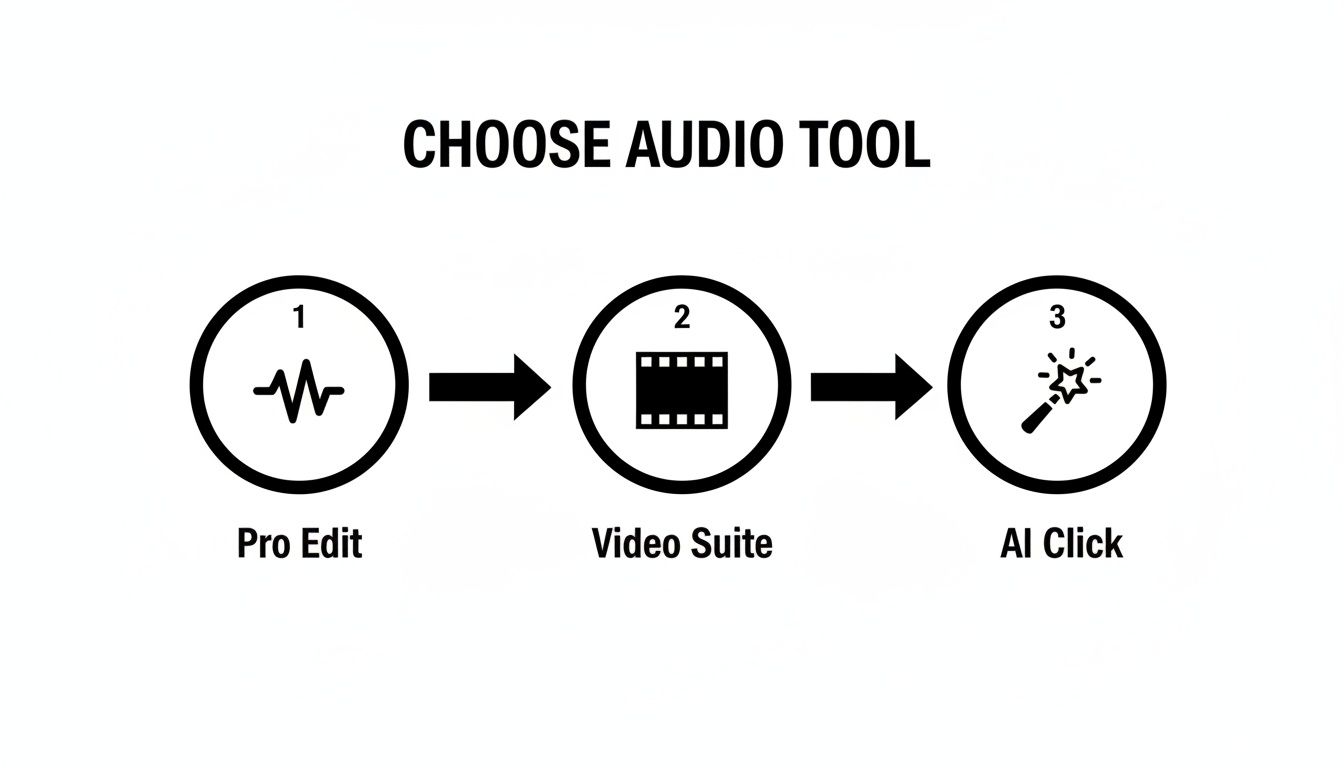
Whether you're using a pro editor, a video suite's built-in tools, or a dedicated AI plugin, the core mission is always the same: isolate the noise and treat it effectively.
Finally, a Noise Gate acts as an automated volume knob. You set a volume level (the "threshold"), and any time the audio signal drops below that level—like in the pauses between sentences—the gate automatically mutes the sound. This is fantastic for killing any last bit of low-level hiss that might still be lurking, giving you those clean, sharp silences that make a recording sound truly professional.
How AI Denoise Can Get You Incredible Results in a Single Click
While the manual techniques we've covered give you incredible control, let's be realistic—they take time and a bit of practice. If you're churning out content for TikTok, Reels, or YouTube Shorts, you just don't have that luxury. This is where AI-powered denoise tools have completely changed the game for creators.
Instead of hunting for a clean noise print or painstakingly painting out individual sounds, you let the AI do the heavy lifting. These tools have been trained on mountains of data—literally thousands of hours of crystal-clear speech and every kind of noise imaginable. This is what allows the algorithm to brilliantly distinguish a human voice from annoying background distractions like traffic, wind, or that dreaded room echo.
It's All About Intelligent Isolation
At its heart, an AI denoiser is a speech isolation machine. It scans your entire audio file, figures out the specific frequencies and patterns of human speech, and then gets aggressive about getting rid of everything else.
This is a totally different beast from traditional noise reduction. The old-school methods worked by subtracting a specific "noise profile" you gave them. But AI models are smarter; they actually rebuild the vocal track while throwing out everything that isn't speech. The result is often a much cleaner and more natural sound, without those robotic, "underwater" artifacts that scream "I over-processed my audio!"
AI denoise isn't just about cutting out the bad stuff; it's about saving the good stuff. The real goal is to isolate and boost vocal clarity, making sure your voice is front and center.
Why This is a Lifesaver for Modern Creators
This one-click approach is perfectly built for the breakneck speed of social media. The constant demand for quick, polished edits has sent the market for creator-focused software into overdrive.
Just look at the video background remover market, which serves the same audience of creators who need fast, powerful AI tools. It was valued at $10 million in 2025 but is expected to rocket to $723 million by 2033. That’s a staggering 46.4% CAGR, which shows just how much demand there is for tools that give professional results without the steep learning curve. You can dig deeper into these trends and what they mean for video editing over at Archive Market Research.
We're seeing this exact same explosion in audio tools. AI denoise is no longer a niche plugin; it’s baked right into the software we use every day:
- Video Editors: Tools like CapCut and Adobe Premiere Pro have simple but powerful "Enhance Speech" or "Denoise" buttons that can fix an entire audio track in seconds.
- Standalone Online Tools: A ton of web-based services now let you upload a video, let their AI work its magic on the audio, and download a clean file without installing a thing.
For any UGC creator, marketer, or educator, this tech is a huge win. It gives you the power to remove background noise from video and make sure your message lands, no audio engineering degree required.
Putting It All Back Together: Syncing and Finalizing
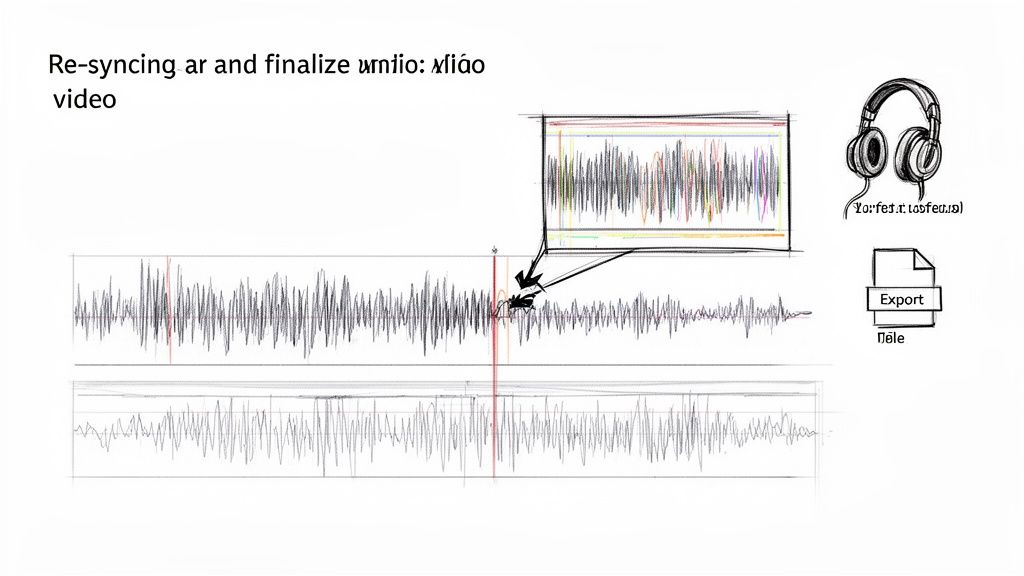
You’ve wrestled with the audio, and now it sounds fantastic—clean, clear, and professional. Great work. But there's one last, crucial step: reuniting that polished audio with its original video. This is where precision is everything. Even a tiny mismatch can make your final video feel off and completely undermine all your hard work.
Getting this right is what separates the amateurs from the pros. If you're also adding narration into the mix, our guide on how to add a voice over to a video has some great tips that will help with the final sound design. The ultimate goal is to make it seem like the audio was never touched at all.
Nailing the Perfect Audio Sync
The most common headache at this stage is mismatched lip-sync. When a speaker's words don't quite match their mouth movements, it's incredibly distracting for the viewer. It just feels wrong. Luckily, there are a few simple tricks to get it spot-on.
The whole game is about finding a sharp, clear reference point in both your original scratch audio and your new, cleaned-up track.
- Hunt for "Plosives": Words that start with hard consonants like "p," "b," or "t" create big, spiky peaks in the audio waveform. These are your best friends. Find one of these distinct peaks on your original audio, find the same one on your new track, and line them up perfectly.
- Use That Slate Clap: Remember that clap you did at the beginning of the recording? Now's the time to use it. That clap creates an unmistakable spike in the waveform that's incredibly easy to sync to. It's the most reliable marker you'll have.
- Zoom In, Way In: You can't sync audio properly by looking at the entire timeline. You need to zoom in close—so close that you can see the individual shapes of the waveforms. This lets you nudge the audio clip left or right with surgical precision until it’s perfect.
Pro Tip: Once you think you have the start of the clip aligned, jump all the way to the end and check the sync there, too. If it's perfectly synced at the start but off by the end, you probably have a frame rate mismatch between your audio and video project settings. This causes a slow "drift" over time. Always make sure your project settings match your source footage to avoid this.
Export Settings That Won't Ruin Your Work
After all that effort to remove background noise from video, the last thing you want is to ruin it with the wrong export settings. Aggressive compression can introduce new hiss or digital artifacts, essentially undoing all your careful editing.
When you're ready to export the final video, take a moment to double-check the audio settings.
- Codec: Always go with AAC (Advanced Audio Coding). It delivers fantastic quality without bloating your file size and is the universal standard for online video.
- Bitrate: For most stuff you'd post online, 192 kbps is the sweet spot. It offers a great balance of high quality and manageable file size. If your project is very audio-focused, like a podcast or music performance, you can bump it up to 320 kbps for maximum fidelity.
- Sample Rate: Just stick with 48 kHz. It's the standard for professional video and guarantees your audio will play back correctly on any platform or device.
Got Questions About Noise Removal? We've Got Answers.
When you're diving into audio cleanup, a lot of the same questions tend to pop up. It doesn't matter if you're a seasoned pro or just getting started; everyone hits similar roadblocks on the way to crystal-clear sound. Let's tackle some of the most common questions I hear about getting rid of background noise in video.
Can You Really Denoise a Video on a Phone?
Absolutely. It's actually surprising how good mobile apps have gotten. Tools like CapCut and InShot pack some seriously powerful AI noise reduction features.
They might not give you the same fine-tuned control as a dedicated desktop program, but their one-click "Denoise" or "Enhance Speech" functions work wonders for social media content. If you're cranking out Instagram Reels or TikToks, these apps are your best friend for a quick and effective audio fix.
What’s the Toughest Noise to Get Rid Of?
Hands down, the hardest noise to remove is anything that's constantly changing and sits in the same frequency range as human speech. A steady, predictable hum from an air conditioner? That’s fairly easy to isolate and remove with a noise print.
The real nightmares are the unpredictable sounds:
- Wind that gusts and dies down.
- City traffic with cars and sirens coming and going.
- A chatty coffee shop with overlapping voices.
These are a massive headache because their audio signature is a moving target. If you get too aggressive trying to remove them, you'll inevitably start eating into the dialogue, leaving it sounding warped and unnatural. This is exactly why getting it right during the recording phase is so important.
A key piece of advice: Aim for reduction, not total elimination. A classic rookie mistake is cranking the noise reduction so high that the main dialogue sounds thin and robotic. The goal is to push the distracting noise into the background, not to create a sterile, dead-silent environment.
Will Noise Reduction Degrade My Audio Quality?
It certainly can, especially if you overdo it. I like to think of noise reduction like salt in a recipe—a little bit enhances everything, but too much ruins the entire dish.
Every time you run a denoiser, you risk stripping away some of the subtle frequencies that give a voice its natural warmth and richness. The best approach is to apply the effect in small, gentle increments. Put on a good pair of headphones and listen intently after each adjustment.
You're looking for that perfect balance where the background buzz is no longer distracting, but the speaker's voice still sounds full and human. Trust your ears on this one—they're your best tool.
Ready to make your videos look as clean as they sound? The AI-powered tools from VideoBGRemover let you instantly remove or replace your video background, giving you a studio-quality look in minutes. Start creating for free at videobgremover.com.
Ready to Remove Your Video Background?
See a free preview before you buy.
No credit card required • Free preview on every video