How to Make Green Screen Video: how to make green screen video tips
Discover how to make green screen video with our practical guide covering gear, lighting, shooting, and editing for standout results.
To pull off a convincing green screen video, you really only need three core things: a non-reflective green backdrop, separate lights for the screen and your subject, and editing software with a chroma key tool. The real secret is creating flat, even lighting on that green screen. If you get that right, replacing the background in post-production becomes almost effortless.
Mastering these basics is what lets you convincingly place yourself in any virtual environment you can imagine.
Building Your Green Screen Toolkit
Before you can transport yourself to another world, you need the right tools on the ground. Putting together a green screen kit is about more than just grabbing a green sheet; it's about choosing gear that works in harmony to give you a clean, believable final shot. A solid setup is your best insurance against a frustrating, time-sucking edit.
Think of it this way: your camera captures the raw data, your lights sculpt the scene, and your screen is the canvas. If any one of those pieces is weak, the whole illusion can crumble. I've seen it a hundred times—even a high-end camera can't fix a poorly lit, wrinkled backdrop.
Choosing Your Green Screen
First things first, you need the screen itself. What you choose here is going to come down to your space, your budget, and how often you'll be packing it up and moving it around.
- Fabric Green Screens: These are usually the most budget-friendly way to get started. You can buy them in big rolls, which is great for full-body shots, but you'll need a stand and some clamps to stretch the material tight. The biggest headache with fabric is wrinkles. They cast tiny shadows that make getting a clean key a real pain.
- Collapsible Pop-Up Screens: These are a lifesaver for small spaces or creators on the move. They have a flexible frame that pulls the fabric taut for you, getting rid of most wrinkles instantly. They're typically smaller, so they're perfect for head-and-shoulders or mid-body shots.
- Painted Walls: If you have a dedicated studio space, this is the way to go. Painting a wall with official chroma key green paint gives you a perfectly smooth, non-reflective surface that you never have to steam or stretch. It's the set-it-and-forget-it solution.
Pro Tip: No matter what type of screen you buy, color consistency is king. Look for one made of a non-reflective material like cotton, muslin, or a special polyester blend. This helps you avoid "hot spots," which are shiny areas that bounce light right back into your camera lens and ruin the key.
Before we dive into lighting, let's look at how these components stack up across different budgets. It helps to see where you can save and where it's worth investing a bit more.
Essential Green Screen Gear Breakdown
| Component | Budget-Friendly Option | Mid-Range Option | Professional Choice |
|---|---|---|---|
| Green Screen | Fabric roll & clamp stand | Collapsible 5'x7' pop-up screen | Painted chroma key wall or large cyclorama |
| Key & Fill Lights | 2x Softbox lighting kit | 2x Bi-color LED panels with stands | High-CRI LED Fresnels or panels (e.g., Aputure Light Storm) |
| Screen Lights | Basic clamp lights with daylight bulbs | 2x Small LED panels with diffusers | Dedicated LED space lights or fluorescent banks |
| Camera | Smartphone with manual controls | Mirrorless camera (e.g., Sony a6400) | Cinema camera with high bit-rate recording (e.g., Blackmagic Pocket 6K) |
| Stand/Tripod | Basic aluminum tripod | Fluid-head video tripod | Heavy-duty tripod with a professional fluid head |
This table should give you a good starting point. You don't need the "Professional Choice" in every category to get great results; a mid-range screen with good budget lighting can work wonders if you know what you're doing.
Lighting Your Scene for a Clean Key
If the screen is your canvas, then lighting is the brush. Honestly, this is the most critical part of the whole setup. Your main goal is to light the screen and your subject separately and evenly.
For your subject, the classic three-point lighting setup is still the industry standard: a Key Light (your main light source), a Fill Light (to soften shadows), and a Back Light (to create separation from the background).
But here’s the part people often forget: you need at least two more lights just for the green screen. You'll want to place one on each side, aimed at the screen, to wash it in a perfectly flat, even layer of light. Doing this erases the shadows and subtle color shifts that can trip up your editing software.
The demand for these tools has absolutely exploded. The global market for Green Screen Production Kits hit around $1.2 billion in 2023 and is projected to reach $2.8 billion by 2032. While pro-level kits can run into the thousands, you can find a perfectly decent starter bundle with a collapsible screen and a couple of LED lights for under $300, making it more accessible than ever to get started.
For a deeper dive into the entire process, from shooting to final edit, check out this complete guide on making green screen videos.
Mastering Your Setup and Lighting
If you want a truly convincing green screen effect, the real work happens long before you ever hit record. It’s all in the physical setup. A smooth, wrinkle-free screen and perfectly even lighting are the two absolute must-haves for a clean, professional-looking final video.
Think of it like this: your editing software is looking for a single, uniform shade of green to remove. Every wrinkle creates a tiny shadow, and every "hot spot" from a poorly placed light creates a brighter shade. This chaos of different greens confuses the software, leaving you with a patchy, amateur-looking result that’s a nightmare to fix later.
This diagram breaks down the essential components you'll be juggling.
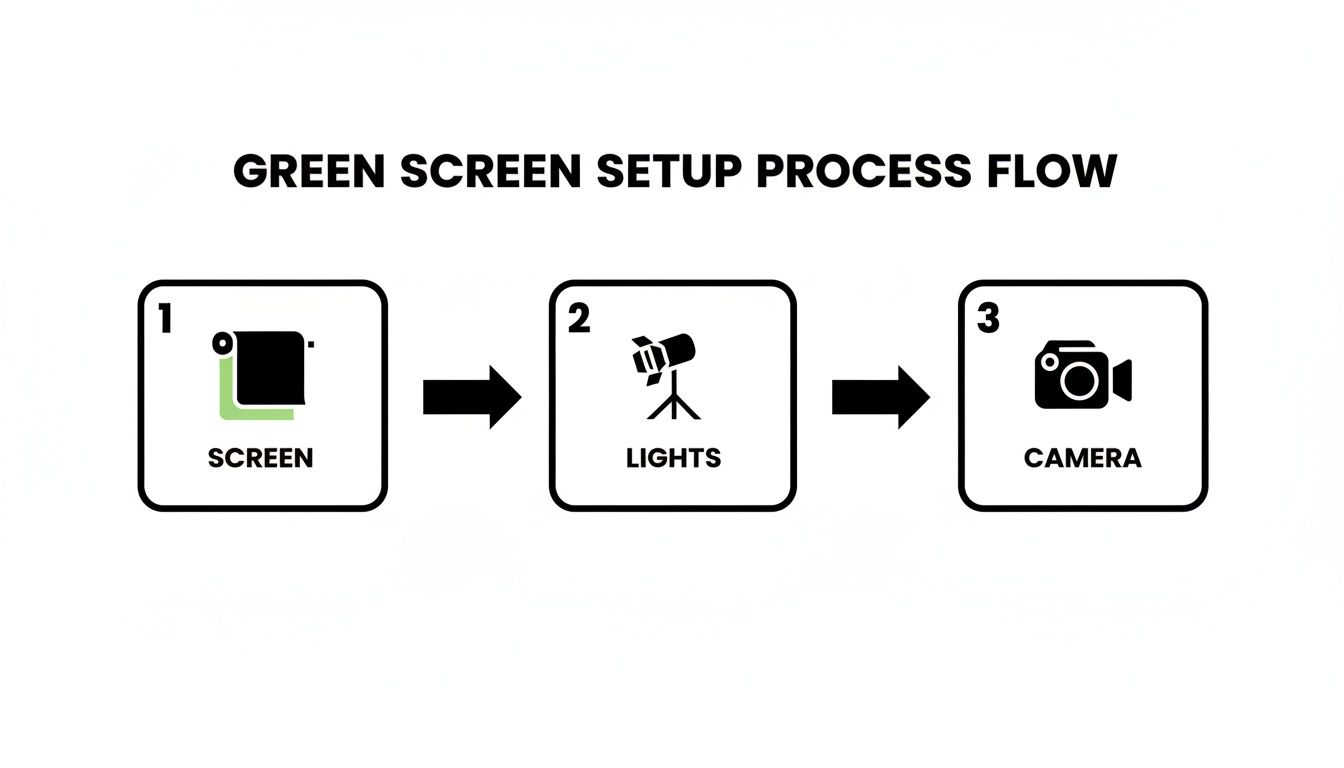
It reinforces a simple but critical order of operations: get the screen right, then the lights, and only then should you start worrying about the camera.
Prepping Your Green Screen for a Flawless Key
Your number one enemy is wrinkles. Whether you're using a fabric backdrop or a collapsible pop-up screen, every single crease casts a shadow that will fight you in the edit. Your mission is to eliminate them.
For fabric screens, grab some clamps and pull the material taut on its stand. Stretch it from all four corners until it's perfectly smooth. A handheld steamer is your absolute best friend here—a few minutes with it can save you hours of post-production headaches. Of course, if you've painted an entire wall green, you've already won this battle.
Pro Tip: Treat your green screen like a painter's canvas. It has to be a pristine, uniform surface before you do anything else. If you can see a wrinkle with your own eyes, your camera will see it ten times worse.
Once your screen is smooth, hunt for reflections. Some cheaper screens have a bit of a sheen to them. If you see any glare, try adjusting your lights or the angle of the screen to kill it. A matte surface that evenly absorbs light is always the goal.
The Art of Separate and Even Lighting
Here is the single most important rule for lighting a green screen: light your background and your subject separately. This is the number one mistake people make, and it’s the root cause of most keying problems. The screen needs flat, shadowless light, while your subject needs dynamic, three-dimensional lighting to look natural.
To pull this off, you need at least two lights dedicated only to the green screen.
- Placement: Put one light on the left and one on the right, aimed squarely at the screen.
- Diffusion: Use big softboxes or diffusion panels on these lights. This scatters the light, creating a soft, even wash instead of a harsh, focused beam.
- Consistency: Make sure both lights are the same model, set to the same power, and placed at the same distance from the screen. This ensures you get a consistent color and brightness across the entire surface.
For a closer look at different lighting arrangements, you can find great info on how to use a green screen effectively.
Positioning Your Subject to Avoid Green Spill
With a beautifully lit screen, it’s time to bring in your subject. The distance between them and the backdrop is absolutely critical for avoiding what we call green spill. That’s the ugly green halo you sometimes see on a person's hair or shoulders, caused by green light bouncing off the screen and onto them.
Thankfully, the fix is simple: distance.
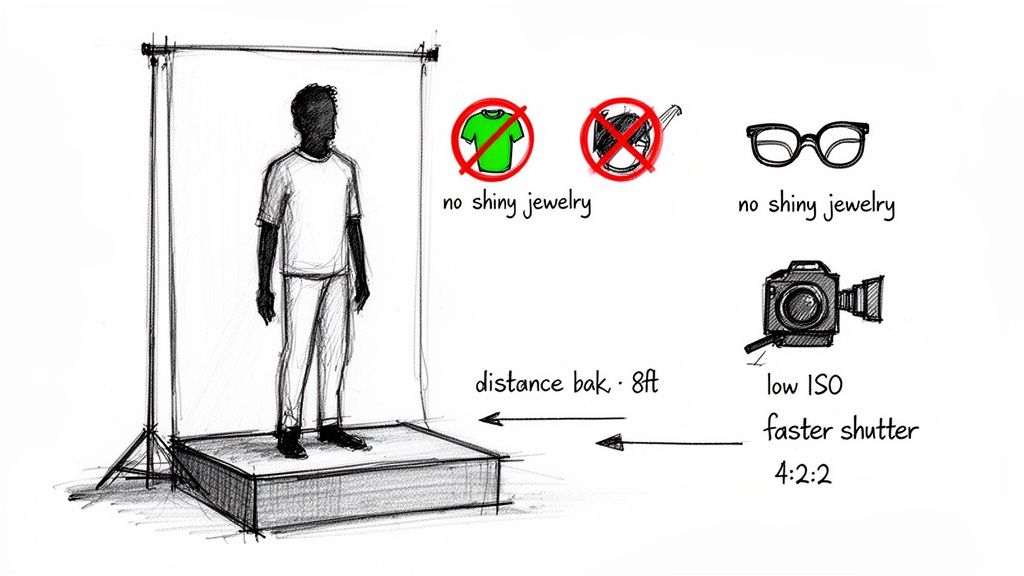
- Create Separation: Place your subject at least eight to ten feet away from the green screen. This physical space is your best defense against that reflected green light.
- Add a Backlight: Light your subject with a standard three-point setup (key, fill, and back lights). The backlight is your secret weapon against spill. When placed behind your subject (out of frame, of course), it creates a crisp rim of light on their hair and shoulders. This not only makes them pop but also overpowers any green light trying to sneak in.
By nailing these physical details—a smooth screen, separate lighting, and proper subject distance—you’re doing all the hard work upfront. This careful preparation makes the final keying process in your editor smooth, fast, and incredibly believable.
Nailing the Shoot for a Flawless Key
Okay, you’ve wrestled with the backdrop, and it’s now a beautifully lit, wrinkle-free sea of green. Fantastic. Now, the focus shifts to what’s in front of it: your subject. This is the moment where smart decisions about wardrobe and camera settings separate a clean, professional composite from a glitchy, amateur-looking mess.
Trust me, getting this right in-camera will save you from a world of hurt in the editing room. The camera only knows what it sees, so our job is to feed it the cleanest possible image. Every little choice, from the fabric of a shirt to your shutter speed, directly affects how easily your software can say, "This is green, and this isn't."
Wardrobe Rules for a Clean Composite
Choosing the right outfit is about more than just dodging the color green. We need to eliminate anything that can reflect, blend, or otherwise confuse the software.
Let's get the obvious one out of the way first: do not wear green. Anything even close to the shade of your screen will vanish when you apply the key, leaving you with a floating head or disembodied hands. And don't forget to check for sneaky green tones in patterns or logos!
But the real silent killer of a good key is reflection. Shiny surfaces are your enemy because they can catch that bright green light from the backdrop and bounce it right back into the lens.
Here's a quick hit list of things to ban from the set:
- Shiny Jewelry: Polished metal on necklaces, earrings, and watches are basically little green mirrors.
- Eyeglasses: The lenses can create a nasty green glare that’s a nightmare to fix without messing up the eyes. If glasses are a must-have, play with the angle of your talent and lights to kill the reflection.
- Glossy Fabrics: Things like leather, silk, or certain polyesters can create subtle green hotspots. Stick to matte fabrics like cotton or wool for a much cleaner result.
Dialing in Your Camera for Success
Your camera is the final gatekeeper. Even with perfect lighting and wardrobe, the wrong camera settings can introduce noise, blur, and color issues that will absolutely sabotage your key.
The entire goal here is to record the cleanest possible image with the maximum amount of color data. Think of it this way: you’re giving your editing software the best possible raw materials to work with.
A Pro's Insight: I like to think of a video file as a block of marble. A high-quality recording gives your software a big, solid block to carve a clean statue from. A compressed, low-quality file is like a crumbly piece of sandstone—try to carve that, and the edges just fall apart.
To get that pristine block of data, you need to nail three critical settings.
The Three Most Important Camera Settings for Keying
- Chroma Subsampling: If you can, shoot in a format that records at 4:2:2 chroma subsampling or better. That technical jargon just means your camera is capturing more color information. A lot of consumer cameras record in 4:2:0 to save space, which throws away a ton of color detail. When you try to key 4:2:0 footage, you often get those ugly, blocky edges.
- Shutter Speed: Use a faster shutter speed than you might normally. A good rule of thumb is to go at least double your frame rate (e.g., 1/125 for 60fps). Why? It kills motion blur. While motion blur can look cinematic in a normal shot, on a green screen it creates semi-transparent pixels around your subject as they move. The keying software gets confused, and you end up with a blurry, ghosting outline.
- ISO: Keep your ISO as low as your camera will go. High ISO creates digital noise, which looks like a swarm of angry, flickering pixels. That grain makes it impossible for the software to find a consistent, clean edge to key. It’s always, always better to add more light than to crank up the ISO.
Putting It All Together: Editing and Keying Your Footage
All that work you did—steaming the wrinkles out of the fabric, setting up those lights just so, and nailing your camera settings—all leads to this. Now we head into post-production, where the real magic happens and we transport your subject into a whole new world.
The process of removing the green background is called chroma keying, or just "keying" for short. Pretty much any modern video editor has this feature built right in.
The goal here isn't just to make the green vanish. We want to do it cleanly, without leaving a nasty green halo or creating jagged, pixelated edges around your talent. Because you took the time to capture high-quality footage, this part of the process becomes way less of a headache and more of a creative exercise. Let's walk through how it’s done in the most popular editing software.
The Basic Chroma Keying Workflow
No matter what software you're using, the fundamental steps for keying are surprisingly similar. You’ll point the software to the color you want to eliminate, then you'll dial in the settings until the result looks totally seamless.
Here’s a quick rundown of the go-to tools in the big NLEs (Non-Linear Editors):
- Adobe Premiere Pro: The effect you’re looking for is Ultra Key. It’s a workhorse—powerful but also pretty intuitive, which is why it's a favorite for so many editors.
- Final Cut Pro: Apple's NLE has a robust tool simply called Keyer. Honestly, it often does an incredible job with just one click.
- DaVinci Resolve: This powerhouse suite gives you a few options. Most people start with the 3D Keyer on the Edit page or jump over to the Fusion page for the more advanced Delta Keyer.
Your first move is always the same. Drag your green screen clip onto a timeline track above your background footage. Then, find your editor's keying effect and apply it directly to that green screen clip.
Selecting Your Color and Refining the Key
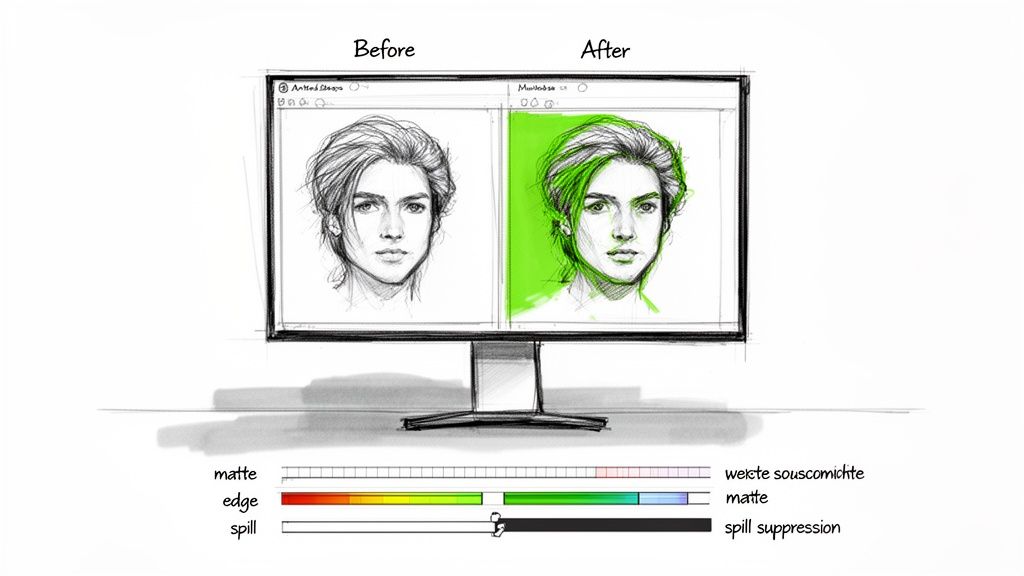
With the effect applied, you’ll see an eyedropper tool. Your job is to use it to click on a patch of the green screen in your preview monitor. The software instantly identifies that specific shade of green and makes it transparent, revealing the background video you placed on the track below.
This first click will probably get you about 80% of the way there. But the real artistry lies in the fine-tuning that comes next. This is where you compensate for subtle lighting variations and get those edges looking crisp and clean.
Key Takeaway: A perfect key isn't about finding one magic setting. It's a delicate balance of multiple adjustments. If you push any single slider too far, your subject can start looking transparent or get unnaturally sharp, "cut-out" edges.
To really see what you’re doing, you need to switch your view to the matte. This is a special black-and-white display of your key. In this view, solid white represents what's opaque (your subject), solid black is what's fully transparent (the background), and any grey areas are semi-transparent. Your goal is a high-contrast matte: a solid white subject against a field of pure black.
Tackling Spill and Getting the Details Right
Even with perfect lighting, you’ll almost always have some green spill to deal with. That’s the faint green light that reflects off the screen and onto your subject's hair, shoulders, or clothing. Every keying tool has a "spill suppression" feature designed specifically for this. It works by analyzing the footage and neutralizing the green tones that have contaminated your subject.
If you’re just starting out, a dedicated guide on how to use chroma key in Premiere Pro can give you a really focused look at these settings.
My advice? Go easy on the spill suppression. Cranking it up too high can desaturate your subject, making their skin tones look grey and lifeless. A little bit truly goes a long way.
For tricky details like fine hair, wisps of smoke, or motion blur, you'll need a bit more finesse. Look for controls with names like "Matte Finesse," "Soften," or "Edge Thin" to gently clean up the boundary between your subject and the new background. This is where shooting in a high-quality 4:2:2 format really pays dividends, as the software has much more color information to work with to create a clean separation.
Compositing: Selling the Illusion
Once your key is clean, the final job is to make the whole composite believable. This means blending your foreground subject with the background so they actually look like they belong in the same space.
There are three essential tricks to sell the effect:
- Color Matching: Your subject and background were probably shot under totally different lights. Use your editor’s color correction tools (like Lumetri Color in Premiere or the Color Wheels in Resolve) to tweak the color temperature, saturation, and contrast of your foreground to match the background plate.
- Adding Shadows: Nothing screams "fake green screen" like a subject who seems to be floating in space. In the real world, people cast shadows. You can create a simple drop shadow by duplicating your keyed-out subject layer, making it black, adding a blur, and then positioning it to match the light source in your background.
- Subtle Blurring: A real camera lens has a specific depth of field. If your background image is a little soft and out of focus, your perfectly sharp subject will stick out like a sore thumb. Adding a tiny bit of blur (like a Gaussian Blur set to just 1-2 pixels) to your foreground clip can help it sit much more naturally in the scene.
The Rise of Screenless Setups: Using AI Tools Instead
What if you could get that perfect, isolated subject look without ever setting up a single light or backdrop? That’s where AI-powered tools are completely changing the game. These platforms analyze your video frame by frame, intelligently separating you from whatever is behind you.
This is a massive shortcut, especially if you're short on space or just need to turn content around fast. You can film in your office, living room, or even on the go, and still end up with a clean, transparent background. For creators pumping out content for TikTok, Reels, or YouTube Shorts, this kind of speed is a huge advantage. It lets you skip the tedious parts and get right to the creative work.
So, Why Ditch the Green Screen?
The practical benefits are pretty hard to ignore. For starters, you're immediately saving hours of setup and teardown time. But more importantly, you get to sidestep all the technical headaches that come with traditional chroma keying.
Think about what you're avoiding:
- Zero Green Spill: That annoying green halo that reflects onto your hair, shoulders, and clothes? Gone. You never have to worry about it.
- Simpler Lighting: Good lighting always helps, of course, but you no longer need that perfectly even, multi-light setup just to illuminate the background.
- Total Flexibility: You can shoot high-quality footage literally anywhere, without being chained to a dedicated studio space.
This move toward faster, more efficient production is happening everywhere. The virtual production market, which is all about background replacement, is expected to jump from $1.52 billion in 2024 to an incredible $8.76 billion by 2030. This boom is driven by the need for speed and reliability, especially when you consider that production surveys show traditional green screen shoots can fail up to 40% of the time because of lighting issues alone.
How Does AI Background Removal Actually Work?
The process is refreshingly simple. Instead of painstakingly keying out a specific color, you just let a trained algorithm do the heavy lifting for you.
You typically just upload your video clip, let the AI work its magic, and download a new file with the background already removed.
The real beauty of this is the output format. Most professional AI tools will give you a file like a MOV ProRes 4444 or a PNG sequence. These formats preserve the alpha channel (the transparency), so you can drop the clip directly into Premiere Pro, Final Cut Pro, or DaVinci Resolve and layer in any new background you want—exactly like you would with properly keyed green screen footage.
This approach gives you the best of both worlds: the raw speed of AI automation combined with the creative control you get from a professional editor. If you want to see a tool that does this well, you can explore this AI video background remover that produces high-quality transparent files.
And for those who want to take it a step further, some incredible AI tools like Text To Video models can now generate entire videos from a simple text description, bypassing the need for a camera altogether.
Traditional Green Screen vs. AI Background Removal
Still on the fence? This table breaks down the key differences to help you decide which method is the right fit for your next project.
| Factor | Traditional Green Screen | AI Background Removal (e.g., VideoBGRemover) |
|---|---|---|
| Setup Time | High (Requires space, stands, lighting for the screen) | None (Film anywhere with decent subject lighting) |
| Technical Skill | Moderate to High (Lighting, keying settings, spill suppression) | Low (Upload, process, download) |
| Common Issues | Green spill, uneven lighting, shadows, wrinkles in fabric | Occasional edge artifacts with complex motion or messy backgrounds |
| Flexibility | Low (Tied to a physical studio or location) | High (Shoot on location, in small spaces, or outdoors) |
| Post-Production | Manual keying process in NLE software | Automated processing, followed by standard editing |
| Best For | High-end studio productions, live broadcasting, VFX work | Fast-turnaround content, social media, remote interviews, fixing poorly shot footage |
Ultimately, both methods have their place. Traditional green screens still offer unparalleled precision for high-budget film and broadcast work. But for the vast majority of creators, AI offers a faster, more flexible, and often frustration-free path to the same creative result.
A Few Common Green Screen Problems (And How to Fix Them)
Even with the best-laid plans, things can go wrong on set. When you're learning how to shoot on green screen, you're bound to run into some frustrating issues that can leave you scratching your head.
Let's walk through some of the most frequent hangups I see and the quick fixes that will get you back on track, whether you're on set or in the edit.
"Why does my background look all splotchy and weird?"
A patchy or blocky key is the classic sign of an unevenly lit screen. Your editing software is looking for one very specific shade of green to remove. If your screen is a mess of bright spots and dark shadows, the software can't isolate that one color, so it leaves bits and pieces behind.
The fix? Light the screen and your subject completely separately. Use big, soft light sources pointed just at the screen to create a smooth, even wash of color. Before you even hit record, check your camera’s "zebra stripes" or "false color" exposure guides. These tools will instantly show you if the entire screen has the same brightness. Nail this, and your keying job will be ten times easier.
"How do I get rid of this green halo around my actor?"
Ah, the dreaded green fringe. That's called spill, and it’s what happens when green light from the screen bounces back onto your subject, contaminating their hair, shoulders, and clothes. You can fight it in post, but it's way better to solve it during the shoot.
Here’s how to crush spill before it starts:
- Create Distance: This is the big one. Get your subject as far from the screen as you possibly can. A gap of 8 to 10 feet is a great target, as it massively cuts down on how much green light can bounce back.
- Add a Backlight: A light placed behind your subject, aimed at the back of their head and shoulders, works wonders. It creates a crisp little rim of light that physically overpowers the green spill and helps separate them from the background.
When you're editing, most tools have a "spill suppression" feature. Use it carefully. If you push that slider too far, it can start desaturating your subject's skin tones, making them look grey and unnatural.
"Can I actually do this with just my phone?"
Absolutely. Modern apps like CapCut and KineMaster have surprisingly capable chroma key tools built right in. But all the rules about good lighting and separation still apply—in fact, good lighting becomes even more critical.
The thing is, smartphone cameras use aggressive compression to keep file sizes small, which can make for a messy key. Honestly, this is a perfect scenario for an AI-powered tool. You can shoot your video without a screen at all and just use an AI background remover to get a clean cutout. It can save you a massive headache.
Expert Tip: If you're shooting on your phone, you have to lock the focus and exposure. On most native camera apps, you just tap and hold on your subject. This stops the phone from auto-adjusting the brightness mid-shot, which would completely change the shade of green and ruin your key.
"What if I can't afford a fancy green screen?"
No problem. You don’t need pro-level gear to get started. A big piece of bright lime-green fabric from a craft store, or even a few sheets of matte poster board taped together, can work just fine. The two most important things are the color and the texture.
Look for the most saturated, vibrant green you can find with a completely non-reflective, matte finish. Then, stretch it as tight as you can to get rid of every single wrinkle. Wrinkles create tiny shadows, and your software sees those shadows as a totally different color, which is the number one killer of a clean key. While bright blue can also work, modern camera sensors are more sensitive to green, which usually makes it the easier color to pull a clean key from.
Ready to skip the setup and get straight to creating? VideoBGRemover uses AI to remove your video background with no green screen required. Just upload your clip, let our tool do the work, and download a production-ready file with a transparent background in minutes. Create professional videos from anywhere by visiting https://videobgremover.com.
Tagged with
Ready to Remove Your Video Background?
See a free preview before you buy.
No credit card required • Free preview on every video