How to Use a Green Screen Like a Pro
Learn how to use a green screen for flawless video. This guide covers setup, lighting, and editing for professional chroma key results on any budget.
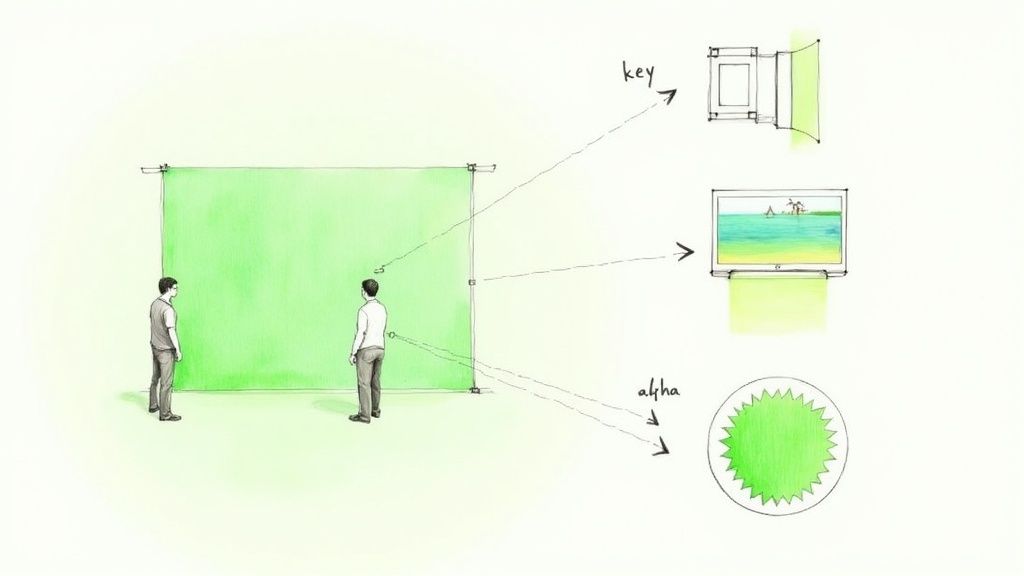
So, what's really happening when you use a green screen? In a nutshell, you're filming yourself in front of a solid green background, and then using software to make that specific color invisible. This process is called chroma keying. Once the green is gone, you can drop any image or video you want behind you, placing yourself anywhere in the world (or out of it!).
The real trick is lighting the screen evenly and making sure you're standing far enough away from it. This helps avoid any green light bouncing off the screen and onto you, which is known as "color spill."
How the Magic Actually Works
Before you even think about setting up a light, it pays to understand why this whole thing works. It's not just some Hollywood wizardry; it's a clever technical process that hinges on isolating a single color. Think of chroma keying as a super-specific digital filter.
Your editing software goes through your video frame by frame, hunting for every single pixel that matches that "chroma key green." When it finds them, it makes them transparent. This essentially cuts you out from the background, leaving you perfectly isolated. From there, you just layer your footage on top of your new background. Simple as that.
Why Green? The Science Behind the Screen
Ever wonder why it's almost always a bright, obnoxious green? It’s not random—it’s a very practical choice. Green is one of the colors furthest away from human skin tones on the color wheel. This is a huge advantage because it prevents the software from getting confused and accidentally erasing parts of your face or hands.
On top of that, modern digital cameras are incredibly sensitive to green. They capture more detail in the green channel, which gives the software a cleaner, sharper edge to work with when cutting you out.
This hasn't always been the standard, though. The tech has its roots in early filmmaking, where blue screens were the go-to because they worked better with film stock. The big shift to green happened as digital video took over. Green’s higher luminance (it’s brighter) means you can get a clean key with less light, making it a more efficient choice for today's creators.
Key Takeaway: If you remember one thing, it's this: even lighting is everything. If your screen has bright spots and dark shadows, the software can't find one consistent "green" to remove. This is what causes those blotchy, amateur-looking results.
Ultimately, getting a grip on how this works is your first step toward using powerful visual storytelling techniques to create scenes that would be otherwise impossible. Knowing the "why" is your best tool for fixing problems and getting a final shot that looks believable.
For a more detailed breakdown, you can learn more about the process here: https://videobgremover.com/chroma-key
Your Green Screen Setup From Bedroom to Studio
Getting that polished, professional look with a green screen really boils down to your physical setup. And here’s the great news: you don't need a Hollywood budget to nail it. The whole point is to get a smooth, consistently green surface behind you. How you get there just depends on your space, your budget, and how permanent you want this whole thing to be.
For most creators just starting out, a simple fabric green screen is the way to go. They’re cheap, portable, and perfect for turning a corner of your bedroom into a makeshift studio whenever you need it. The biggest headache? Wrinkles. Seriously, take the time to steam or iron the fabric before you shoot. Every little crease casts a tiny shadow, and those shadows are a nightmare to deal with in editing.
Now, if you've got a dedicated space, think about getting a paper roll. It gives you a flawless, smooth surface right out of the box, so you can forget about wrinkles completely. The downside is that paper is delicate. It can tear, and one misplaced footprint might mean you have to chop off a section and roll out a fresh piece.
Choosing the Right Material for Your Space
The screen material you pick is going to have a real impact on your workflow. A pop-up collapsible screen, for instance, is fantastic for quick talking-head videos. But if you’re filming every day, a permanent, painted wall is going to save you a ton of setup time.
To help you figure out what's best for you, let's look at the most common options side-by-side.
Green Screen Material Comparison
| Material Type | Pros | Cons | Best For |
|---|---|---|---|
| Fabric | Affordable, portable, easy to store. | Prone to wrinkles, can be hard to light evenly if not stretched tight. | Beginners, creators with limited space, on-the-go shooting. |
| Paper Roll | Perfectly smooth surface, consistent color. | Tears easily, not portable, can get dirty and require replacement. | Dedicated home studios, product shoots, full-body shots. |
| Paint | Permanent, durable, no wrinkles, can cover a large or custom-shaped area. | Not portable, requires wall prep and careful painting, can scuff over time. | Permanent studio setups, creators with a dedicated filming room. |
| Collapsible | Extremely portable, quick setup, often double-sided (green/blue). | Usually smaller in size, can develop creases over time from folding. | Live streamers, video calls, head-and-shoulders shots. |
Ultimately, the "best" material is the one that fits how you create content. Don't overspend on a giant paper roll if a simple pop-up screen will do the trick.
Perfecting Your Placement and Spacing
Once you’ve got your screen, where you put it—and where you stand in relation to it—is everything. Job number one is to make it as flat and smooth as you possibly can. If you're using fabric on a stand, grab some clamps or gaffer tape and pull it taut until there are absolutely no sags. If you’re painting a wall, take the time to sand it first to get rid of any little bumps that could cast micro-shadows.
Next up is distance. This is the step everyone seems to skip, but it's crucial for avoiding color spill. That's the faint green halo you sometimes see around a person's hair or shoulders in a poorly shot green screen video.
A good rule of thumb is to position yourself at least six feet (about two meters) away from the green screen. This separation minimizes the amount of green light bouncing off the screen and onto you, making the editing process so much easier.
Putting that space between you and the background also makes lighting a breeze. It lets you light the screen and yourself as two separate things, which is the secret to a clean, believable result. The farther away you are, the easier it is to get soft, even light on your green screen without your own body casting a shadow on it.
Nailing Your Lighting and Camera Settings
If there’s one thing that will give you a massive headache in the editing room, it’s bad lighting. I’ve seen it happen time and time again. The secret is to stop thinking of it as one big lighting job and break it down into two distinct tasks: light your screen first, then light your subject. Nail these two, and your post-production life will be a whole lot easier.
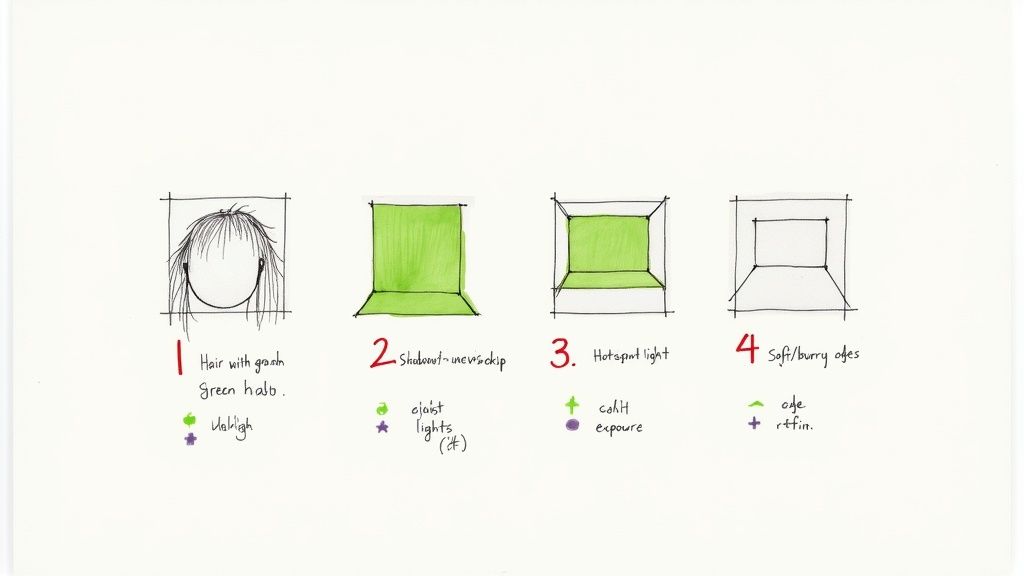
The main goal for your green screen is to make it look like a perfectly flat, even sheet of color. That means you need to hunt down and destroy every single shadow and hotspot. Any little variation in the green—whether it's a dark patch from a wrinkle or a bright glare from a light—is going to confuse your editing software and make for a messy key.
This quick overview breaks down the essential steps for a solid setup.
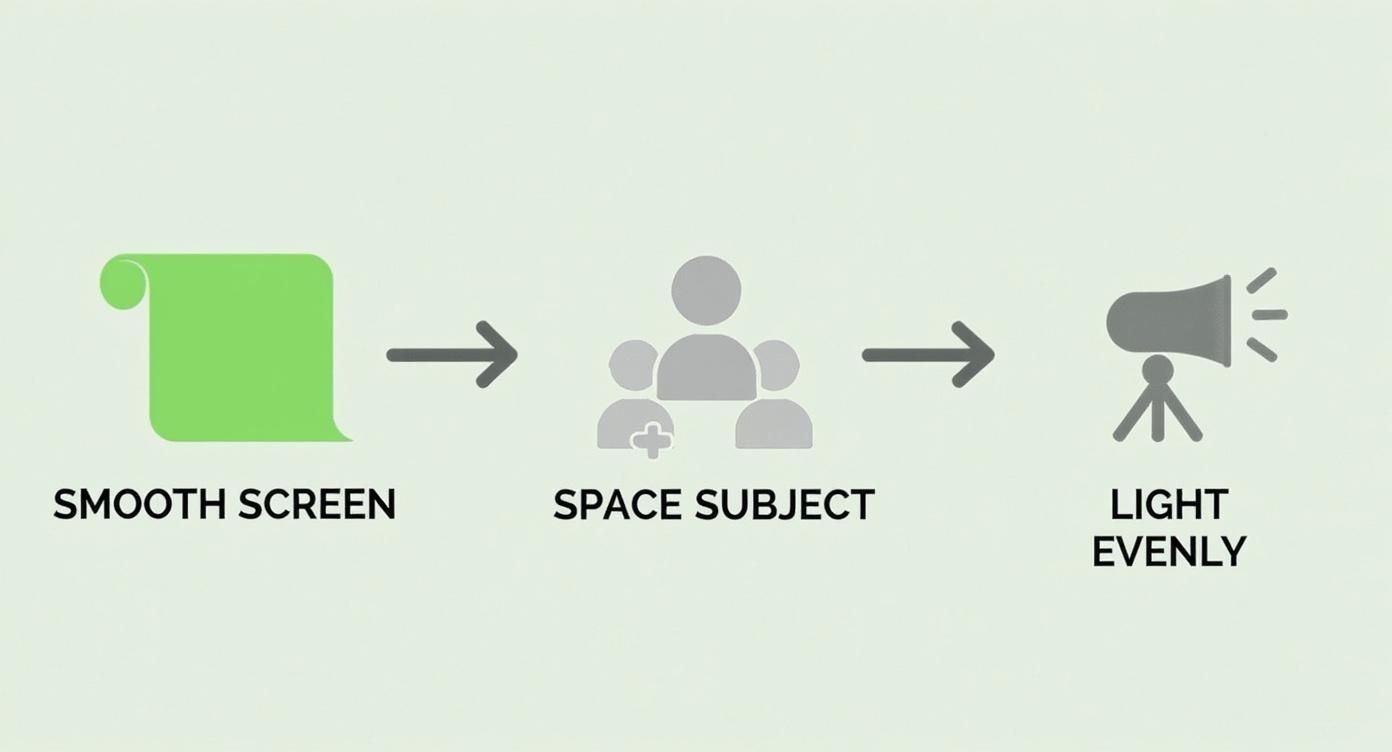
As you can see, it really boils down to three core pillars: getting the screen smooth, giving your subject some distance, and, of course, achieving that even lighting. Get these right before you even think about hitting record.
Light Your Green Screen First
To get that perfectly even glow, you're going to need at least two identical lights. The classic setup is to place one on each side of the screen, aiming them at a 45-degree angle. This creates a crisscross lighting pattern that effectively cancels out shadows and smooths the color across the entire surface.
Soft, diffused light is your best friend here. If you have softboxes, fantastic—use them. If not, don't worry. You can get a similar effect by simply bouncing your lights off a white wall or ceiling. The main thing is to avoid harsh, direct light, which is notorious for creating those ugly, reflective hotspots on the screen.
The whole point is to film against a backdrop that’s so evenly lit, the color won’t spill onto your subject or cast weird shadows. If you want to get technical, industry pros aim for a luminance value of around 40–60 on an 8-bit scale, which helps the keying software do its job optimally. It’s no surprise that over 70% of professional chroma key setups now use continuous LED lighting to keep everything consistent.
Then Light Your Subject
Okay, once your screen is looking good, it's time to turn your attention to the star of the show: you. A classic three-point lighting setup is the gold standard for a reason. It makes your subject look natural and, most importantly, helps them pop right off the background for a clean separation.
Here’s how it works:
- Key Light: This is your main, brightest light. Position it off to one side of the camera to illuminate your subject.
- Fill Light: A secondary, less powerful light goes on the opposite side. Its job is to soften any harsh shadows created by the key light.
- Back Light: Placed behind your subject (and out of the camera's view!), this light creates a subtle halo around their hair and shoulders. This little touch, often called a "rim light," is what really defines their edge and separates them from the green.
Pro Tip: Your lighting should always match the background you plan to key in later. If you're dropping yourself onto a sunny beach, your lighting needs to be bright and warm. If it's a moody, nighttime cityscape, go for something cooler and more dramatic. Mismatching the lighting is a dead giveaway that you're using a green screen.
Dial In Your Camera’s Manual Settings
Last but not least, take your camera off auto. This is non-negotiable. If you let the camera automatically adjust settings, it can cause flickering or color shifts mid-shot that will completely ruin your footage.
Here’s a good starting point for your settings:
- Set Your White Balance: Ditch the auto white balance. Use a preset like "Daylight" or, for the best results, set it manually using a grey card to get your colors spot on.
- Keep ISO Low: Set your ISO as low as it will go (think 100 or 200). This minimizes digital noise and grain, which makes the keying process so much cleaner.
- Use a Faster Shutter Speed: A faster shutter speed, like 1/100 or higher, is crucial for reducing motion blur. When your subject is moving, this will give you those sharp, crisp edges you need for a believable effect.
Getting comfortable with these settings is a fundamental part of filmmaking. For a deeper dive into this topic, you can explore our comprehensive guides on video lighting.
Bringing Your Vision to Life in Post-Production
https://www.youtube.com/embed/OCt1ijvfVr8
You've got your perfectly lit footage in the bag. Now it's time to head to the computer and start working the real magic. This is the post-production stage, where we use a process called chroma keying to digitally erase that green screen and drop in whatever background you can dream up.
Just about every video editor out there has a tool for this. The basic idea is always the same: you tell the software which color to remove (in our case, green), and it makes every instance of that color transparent. The true skill comes in finessing the details to create a composite that looks completely natural.
Keying Software and Tools
Here’s a quick rundown of some popular editing software and the specific tools you'll be using to pull off a clean chroma key. While the names might change, the core functions are surprisingly consistent across the board.
| Software | Primary Tool | Best For | Learning Curve |
|---|---|---|---|
| Adobe Premiere Pro | Ultra Key | All-around users, from beginners to pros. Great for quick, effective keys with powerful refinement options. | Low to Medium |
| DaVinci Resolve | 3D Keyer | Intermediate to advanced users who want granular, node-based control for professional results. | Medium to High |
| Final Cut Pro | Keyer | Mac users looking for a highly optimized and surprisingly powerful built-in keying tool. | Low to Medium |
| CapCut | Chroma Key | Mobile creators who need fast, simple keying for social media content. | Very Low |
No matter which tool you choose, remember that the initial key is just your starting point. The real work is in the cleanup.
Getting a Clean Key: The First Pass
Whether you're working on a high-end desktop or just editing on your phone, the first step is always the same. You need to create a clean "key" or "matte," which is essentially an invisible cutout of your subject that you can place over a new background layer.
- In Adobe Premiere Pro, you'll grab the Ultra Key effect, drop it on your clip, and use the little eyedropper tool to click on the green screen. Most of the time, it does a shockingly good job right out of the box.
- Over in DaVinci Resolve, the 3D Keyer in the Color page is your go-to. It gives you an incredible amount of control right from the start.
- Even mobile apps like CapCut make it easy. Just select your clip, tap the Chroma Key option, pick the green, and you're most of the way there.
Once you’ve selected the color, your subject will be floating in a black void. But don't celebrate just yet—now we have to make it look believable.
Your raw footage is just the starting point. The believability of your final video depends on how well you clean up the small details—the edges of your hair, the subtle green reflections, and the overall color harmony.
Refining Your Key for a Flawless Composite
This is what separates the amateur-hour green screen videos from the ones that look truly professional. Look closely at your subject after the initial key. You’ll probably see a faint green halo around their hair or shoulders, or maybe the edges look a little jagged. This is totally normal, and this is where you dive into the settings.
Get familiar with these three concepts:
- Matte Cleanup: These are your tools for tightening up the edges. Settings like "Choke" will shrink the edges of your matte inward, which is great for getting rid of thin, problematic outlines. "Soften" does the opposite, feathering the edge for a less harsh look.
- Spill Suppression: This is your secret weapon against that nasty green halo. "Spill" is the term for the green light that has bounced off the screen and "spilled" onto your subject. Spill suppression tools are designed to find those green-tinted pixels and neutralize them, shifting their color to something more natural. It's an absolute game-changer.
- Edge Refinement: Think of this as the next level of matte cleanup. More advanced keyers give you specific controls for the edge's contrast and feathering, which is crucial when you're dealing with tricky details like flyaway hair or semi-transparent fabrics.
Think of it like this: the initial key is like using regular scissors for a rough cutout. The refinement tools are like pulling out a precision X-Acto knife for the intricate, detailed work. Don't be afraid to push and pull these sliders until the composite feels right.
If you're looking for some high-quality backgrounds to practice on, there's a great collection of video backgrounds for green screen that can really help you sell the effect.
Once your video is polished and ready, getting it seen is the next hurdle. It's worth learning a bit about embedding YouTube videos for SEO, as it can make a real difference in how many people find your content.
Fixing Common Green Screen Problems
Even with the most careful setup, you’ll inevitably run into a few green screen hiccups. It just comes with the territory. The good news is that most of these headaches have surprisingly simple fixes, whether it's a quick adjustment on set or a clever trick in your editing software. Getting good at spotting and solving these issues is what separates the pros from the amateurs.
One of the most common—and annoying—problems is that faint green outline or "halo" that loves to cling to your subject, especially around their hair. This is almost always caused by color spill, which is just a fancy term for the green light from your screen bouncing back and hitting your subject.
If you spot this happening, your first move should be to create more space. Try to move your subject further away from the screen. If you have the room, aim for at least six to ten feet of separation. Another secret weapon against spill is a backlight. Popping a light behind your subject (just out of the camera's frame) creates a sharp little rim of light that tells your software exactly where the subject ends and the background begins.
Diagnosing and Solving Keying Issues
Sometimes, the problem isn't your physical setup but how the software is interpreting it. If your background is flickering or showing weird, blotchy transparent spots after you apply the keying effect, the culprit is almost certainly uneven lighting on your screen. Your editing app gets confused when it has to remove a dozen different shades of green instead of one solid, consistent color.
Take a hard look at your screen for hotspots (areas that are too bright) and shadows. The best fix is to adjust your lights on set, making them softer and more diffused. But if you're stuck with footage that's already been shot, you'll need to dive into your keying effect's settings. Play with the tolerance or sensitivity to tell the software to include a wider range of green tones.
Here are a few other classic green screen blunders and how to fix them:
- Jagged or Blurry Edges: This usually means your camera's resolution is too low or your shutter speed is too slow. For crisp edges, you really want to shoot in at least 1080p with a shutter speed of 1/100 or faster. This gives your editing software more detail to work with.
- Shadows on the Screen: If you see your subject's shadow creeping onto the green screen, they're simply too close. Back them up and make sure your key lights are positioned off to the sides, filling the screen with light without casting shadows from your subject.
- Disappearing Clothes: This one's an easy mistake to make. Anything that’s the same color as your screen will vanish along with the background. I once saw a travel blogger post a hilarious photo where her green pants disappeared, making her look like a floating torso. Always do a quick wardrobe check!
Remember, the secret to a painless post-production process is a solid on-set setup. Taking an extra ten minutes to adjust your lights or move your subject can save you hours of frustration when you sit down to edit.
Troubleshooting is just part of the game. Once you learn to spot these common issues, you'll be able to fix them in a snap and get back to creating clean, professional videos.
Got More Green Screen Questions? Let's Dig In.
Once you get the basics down, a whole new set of questions inevitably pops up. These are the little details that can take your video from looking "pretty good" to "how did they do that?" Let's tackle some of the most common things creators run into as they start getting serious with their green screen setup.
Wardrobe choices are a huge one. You obviously know to avoid wearing green, but what else? I always tell people to steer clear of blue, too. Even though it's the other common chroma key color, some keying software can get confused and try to remove parts of your blue shirt along with the screen. Another classic mistake is anything reflective—shiny fabrics or jewelry will bounce that green light right back into the camera, creating a nasty color spill that's a real headache to clean up later. Matte fabrics are your best friend here.
My Pro Tip: Think ahead about your final background. If you know you'll be dropping yourself into a dark, moody scene, wear darker clothing. It helps you blend in seamlessly. The opposite is true for bright backgrounds—matching your wardrobe's general brightness to the intended scene makes the final composite so much more believable.
Dealing with Tricky Details and Props
So, what about the hard stuff? What do you do with transparent objects or really fine, wispy details? This is where green screen work starts to feel like an art, but the solutions are surprisingly practical.
- Glass and See-Through Stuff: Trying to film someone holding a clear glass of water is a classic chroma key challenge because, well, you'll see the green right through it. In big-budget productions, they might add CG liquids later. A much simpler on-set trick? Fill the glass with a non-transparent, neutral-colored liquid that makes sense for the scene you're creating.
- The Problem with Fine Hair: Flyaway hairs are famous for creating a weird green halo. The best way to fight this during the shoot is to use a strong backlight (often called a rim or hair light). This creates a crisp, bright edge that cleanly separates your subject's hair from the screen. In the edit, you'll have to get cozy with your keyer's advanced settings, specifically playing with edge refinement and spill suppression tools to nail the look.
Is It Okay to Use a Blue Screen Instead?
Absolutely! In fact, for a long time, blue was the go-to color in the film industry. The choice between green and blue really just depends on what you're shooting.
A blue screen is the perfect solution if your subject has to wear green. Imagine filming a gardening show or a St. Patrick's Day special—a blue screen is a must. The main drawback is that blue screens need about one full stop more light than green ones to get a clean exposure, which can be tough in low-light setups. Green ultimately became the digital video standard because modern camera sensors are most sensitive to the color green, which gives you a cleaner signal with less noise to wrestle with in post.
Tired of all the setup and just want a perfect background? VideoBGRemover uses AI to cut you out of your background without any green screen at all. Just upload your video and get a clean, studio-quality result in minutes. Give it a try at https://videobgremover.com.
Tagged with
Ready to Remove Your Video Background?
See a free preview before you buy.
No credit card required • Free preview on every video