How to Green Screen Flawlessly A Practical Guide
Learn how to green screen with this practical guide. Master lighting, shooting, and editing for professional chroma key results, from DIY setups to AI tools.
Ever wondered how weather forecasters seem to be standing in front of a giant, moving map, or how your favorite YouTuber has a new, exotic background every week? The secret is a technique called chroma keying, and it all starts with a simple green screen.
You're essentially filming someone in front of a solid-colored background—almost always a very specific shade of bright green—and then using software to make that color invisible. Once it's gone, you can drop in any image or video you want. It’s a classic filmmaking trick that gives you total creative control over your environment.
Why Green Screen Still Dominates Video Production
Even with all the new tech popping up, the traditional green screen is still a cornerstone of video production for one big reason: it delivers clean, reliable, and professional-looking results when you get it right. From Hollywood blockbusters to corporate training videos, its precision is hard to beat.
This guide is your hands-on manual for mastering the process. We'll skip the overly technical jargon and walk you through everything you need to know to get it right, every single time.
The Power of Control and Creativity
The real magic of a green screen is the incredible control it gives you. Suddenly, you're not limited by your physical location or budget. This opens up a whole new world of creative options.
- Create any environment imaginable: You can transport your subject to a bustling New York street, a quiet beach at sunset, or even the surface of Mars without ever leaving the studio.
- Maintain brand consistency: It's perfect for creating a consistent, branded look for a series of corporate videos or online courses, no matter where they're actually filmed.
- Simplify complex productions: Instead of building and paying for elaborate physical sets, you can generate them digitally. This can save a massive amount of time, money, and hassle.
The real power of a green screen isn't just removing a background; it's about adding a new world. It gives independent creators the ability to produce content with production values that were once only accessible to major studios.
Modern Alternatives and When to Use Them
Now, while a green screen is the gold standard for quality, it's not the only game in town. Modern AI-powered tools like VideoBGRemover offer a fascinating alternative, especially when you need speed over absolute perfection.
These tools can isolate a person from almost any background without needing a special setup. If you're short on space for lights and a screen or you just need to get a video out the door quickly, an AI tool might be the smarter, faster choice.
We'll cover both paths in this guide. We’ll dive deep into the traditional workflow—from picking budget-friendly gear and lighting your scene just right to pulling a clean key in post-production. But you'll also learn when it makes more sense to skip the setup and let AI do the heavy lifting for you.
Green Screen Workflow at a Glance
To get started, it helps to understand the main stages of a traditional green screen shoot. Think of it as a three-part process: setting the stage, filming the action, and putting it all together in the edit.
| Stage | Key Objective | Critical Tip |
|---|---|---|
| 1. Setup & Lighting | Create a smooth, evenly lit backdrop. | Your number one goal is to eliminate all shadows and wrinkles on the screen itself. |
| 2. Filming | Capture clean footage with minimal green "spill." | Position your subject at least 6 feet away from the screen to avoid green light bouncing back onto them. |
| 3. Post-Production (Keying) | Isolate and remove the green color seamlessly. | Get familiar with the spill suppression settings in your editor—they're crucial for cleaning up the edges. |
Getting these three stages right is the foundation for a believable result. We'll break down exactly how to nail each one in the sections ahead.
Building Your Green Screen Kit Without Breaking the Bank
Getting that polished, professional look isn’t about dropping a ton of cash on gear. Honestly, the secret to a great green screen effect comes down to knowing where to spend your money and where you can get creative. Let's walk through the essentials for building a solid kit that actually works for your space and your goals.
First Things First: The Green Screen Itself
The screen is the star of the show, and you've got a few different options to choose from. Each has its own quirks and benefits.
A fabric green screen is where most people start. They're affordable, easy to find, and you can fold them up and tuck them away. The trick is to find one made of a non-reflective material like muslin or polyester—anything with a sheen will create bright "hotspots" that are a total nightmare to edit out later. The biggest battle with fabric? Wrinkles. Every little crease can cast a tiny shadow and mess up your key.
If you’re tight on space or constantly setting up and tearing down, a pop-up, collapsible screen is a lifesaver. These often clip to the back of your chair or come with their own stand, and they spring open to a perfectly taut, wrinkle-free surface every single time. The trade-off is size. They’re usually smaller, making them perfect for head-and-shoulders shots for streaming or video calls, but not for full-body action.
Have a dedicated spot for filming? The best long-term solution is to just paint a wall. A can of specialized chroma key green paint gives you a flawless, non-reflective surface that's always ready to go. It’s a bit more of a commitment, but it completely eliminates the headache of wrinkles and storage. For creators who are serious about their setup, this is the ultimate "set it and forget it" option. And if you're looking for cool digital backgrounds to put on your screen, our guide on free green screen backdrops has some great ideas.
The Real Secret Weapon: Lighting
If you're going to splurge on one part of your kit, make it your lighting. I can't stress this enough. You could have the most expensive screen in the world, but with bad lighting, your results will be terrible. The goal is simple: light the screen so evenly that it looks like a flat, shadowless block of color to your camera.
You'll want at least two lights just for the background. You don't need to go crazy—a couple of inexpensive softboxes or LED panels will do the job perfectly.
- Placement is Everything: Put one light on each side of the screen, pointing at it from roughly a 45-degree angle. This cross-lighting technique is the key to canceling out shadows and getting that consistent, even glow from corner to corner.
- Watch for Hotspots: A classic beginner mistake is blasting the center of the screen with light, leaving the edges dark. Tweak the distance and angle of your lights until your camera shows a perfectly even green field.
After the screen is lit, you have to light your subject separately. This is what creates that clean separation and, more importantly, prevents the green from reflecting onto your subject. That pesky reflection is called green spill, and it’s a pain to fix. A simple three-point lighting setup (key, fill, and back light) on your talent will make them pop right off the background and make your life in post-production a whole lot easier.
Take this to heart: The quality of your green screen shot is 90% lighting and only 10% software. A beautifully lit scene needs almost no cleanup and will save you hours of frustration down the road.
Nailing It with Your Camera and a Tripod
You don't need a cinema camera, but you absolutely need one that gives you manual control. If you leave your camera on "auto," it might try to "help" by adjusting the exposure or white balance mid-shot. This can change how the green looks from one second to the next, making it impossible to key cleanly.
Locking in your settings is non-negotiable:
- Go Manual Focus: Set your focus on your subject and don't touch it. Autofocus will "hunt" for something to grab onto, blurring the sharp edges you need between your subject and the screen.
- Lock Your Exposure: Dial in your ISO, aperture, and shutter speed manually so both the subject and the screen look great. This stops any weird flickering or brightness shifts.
- Set a Custom White Balance: This ensures your colors are true to life and that the green screen is rendered as pure green, not a weird teal or yellow-green.
The final piece of the puzzle is a sturdy tripod. This feels obvious, but even the slightest camera shake creates motion blur. And motion blur is the enemy of a clean key, as it makes it incredibly difficult for the software to find a sharp edge to cut out. A solid tripod locks your shot down, giving you crisp, stable footage that’s a breeze to work with.
Arranging Your Space for a Perfect Shoot
A clean green screen shot is made or broken long before you ever touch your editing software. The real work happens in the physical setup—how you arrange your screen and, most importantly, your lights. Nailing this part of the process makes everything that follows smoother, faster, and just looks better.
Think of your shooting area as two completely separate zones: the background (your screen) and the foreground (your subject). Your goal is to light the green screen so evenly that it becomes one solid, flat color with no shadows, wrinkles, or hot spots. At the same time, you have to light your subject so they pop right off that background.
This process flow shows the basic components you'll be working with.
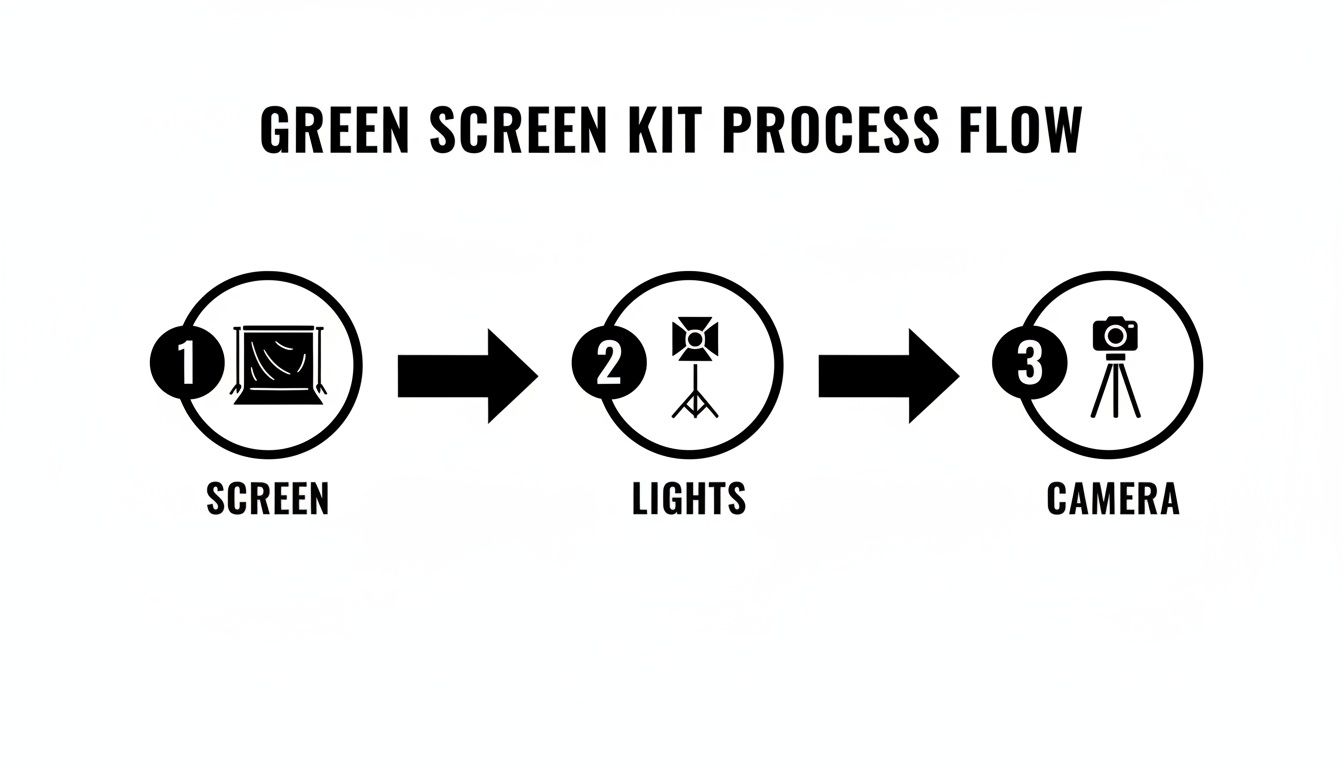
This diagram breaks down the core physical elements of your kit. The screen, the lights, and the camera all have to work together to get you the clean footage you need for post-production.
Getting the Screen Ready
For fabric screens, wrinkles are public enemy number one. Every single crease casts a tiny shadow, creating a slightly different shade of green that your software will struggle with. Your first job is to get that screen as smooth as a freshly painted wall.
A steamer is the go-to tool for pros, but here’s a fantastic trick if you don't have one:
- Grab a spray bottle and lightly mist the fabric screen with water.
- Use clamps to pull the screen taut on its stand, gently stretching it from all four corners.
- As the fabric dries, it will tighten up, smoothing out most of those stubborn wrinkles.
Takeaway: A perfectly smooth, evenly lit background isn't just a suggestion—it's essential. If you skip this, you're signing yourself up for hours of frustrating cleanup work later, trying to fix weird artifacts and spotty transparency.
Lighting the Green Screen
Once your screen is smooth, it's time to light it—separately from your subject. The mission here is to eliminate every shadow. You'll need at least two dedicated lights for this, one for each side of the screen. I highly recommend softboxes, as they produce a diffused, gentle light that prevents harsh bright spots.
Position your lights at roughly a 45-degree angle to the screen, one on each side, aiming them at the fabric. This cross-lighting technique is key; the light from the left fills in potential shadows from the right, and vice-versa. What you're looking for is a completely uniform field of green with no "hotspots" or dim corners. Don't just trust your eyes—use your camera's monitor to check for evenness.
Lighting Your Subject and Killing "Spill"
With the background perfectly lit, you can turn your attention to the subject. The most common headache at this stage is green spill. This happens when the bright green light from the screen bounces back and casts a faint green halo on your subject, especially around their hair and shoulders.
The most effective way to fight spill is simply with distance. Try to place your subject at least 6 to 8 feet away from the green screen. The farther they are, the less bounce light will find its way onto them.
From there, you'll want to use a classic three-point lighting setup for your subject:
- Key Light: Your main and brightest light, placed off to one side of the camera to illuminate your subject.
- Fill Light: Positioned on the opposite side and usually less intense, this light "fills in" the harsh shadows created by the key light.
- Back Light: This is your secret weapon against green spill. Placed behind and slightly above your subject, this light traces their head and shoulders, creating a crisp, bright outline.
This outline, often called a "rim light," does two crucial things. First, it creates a clean, defined edge that physically separates your subject from the green background, giving your editing software a clear line to follow. Second, its brightness overpowers any faint green spill that might be contaminating the edges of your subject. This step alone makes keying out tricky details like hair infinitely easier.
Filming Techniques for a Clean Chroma Key
Once your lights and screen are set, it’s time to actually capture the footage. I can't stress this enough: how you film your subject has a massive impact on how easily you can pull a clean key later on. Nailing a few key disciplines on set will save you from a world of hurt in the editing bay.

The decisions you make right now, from the shirt your talent is wearing to the numbers you punch into your camera, are the final pieces of the puzzle for a professional-looking green screen shot.
Nail Your Camera Settings
Before you even think about hitting that record button, get your camera off "auto." You need to dial in your settings manually. Why? Because automatic settings can shift mid-take, subtly changing the brightness or color of the green screen itself. That spells disaster for a consistent key.
First up, crank up your shutter speed. Something like 1/100 or faster is your best bet for killing motion blur. When your subject moves—say, they wave their hands or turn their head quickly—motion blur creates these soft, semi-transparent edges. Keying software gets really confused by that, which leads to choppy, glitchy-looking outlines. What you want is a crisp, sharp edge.
Also, always record in the highest quality format your camera offers. Formats like ProRes or high-bitrate MP4s capture way more color information (this is often referred to as color subsampling). All that extra data gives your editing software more to work with when it's trying to separate the green from your subject, which means a much cleaner, more accurate key.
Wardrobe and Prop Considerations
What your subject wears is just as critical as your lighting setup. The rules are pretty simple, but they're non-negotiable if you want to avoid a massive headache later.
- Absolutely No Green: This one’s the golden rule. Any clothing, jewelry, or prop that's green is going to vanish when you apply the chroma key effect.
- Avoid Reflective Surfaces: Shiny materials are your enemy. Think leather, silk, certain plastics, or even glossy buttons. They can bounce green light from the screen right back into the camera lens, creating nasty green "spill" that's a pain to clean up.
- Beware of Fine Patterns: Thin stripes, houndstooth, or other complex textures can look terrible on camera, creating a weird, shimmering visual artifact called a moiré pattern. They can also be tough for the keyer to process cleanly.
- Skip the Semi-Transparent Items: Things like a glass of water or thin, gauzy fabric can be tricky. The software might struggle to figure out what's transparent by design and what's supposed to be keyed out.
Pro Tip: I always keep a non-green blanket or robe on set. If an actor shows up and their costume has an unexpected green accent, you can wrap it around their lower half for any medium or close-up shots. It’s a simple trick that can save the entire take.
The Importance of Distance and Framing
The most effective way to prevent green spill is simply to create space. Put some physical distance between your subject and the screen. As we talked about earlier, 6 to 8 feet is a solid starting point. This dramatically cuts down on the amount of green light that can bounce off the screen and contaminate the edges of your talent.
When you're framing the shot, make sure your subject is completely inside the green screen area. If a hand or foot wanders out of frame, that part of the shot is basically un-keyable. It’s always better to shoot a little wider than you think you need. You can always crop in later, but you can’t magically add more green screen where it didn’t exist. These little filming habits are what separate the pros from the amateurs when learning how to green screen.
Bringing Your Green Screen Footage to Life in Post-Production
You’ve wrapped the shoot, the lights are off, and now it’s time to head to the computer. This is where the real magic happens—transforming that sea of green into a seamless new world. The technical term for this is chroma keying, and it's the process of telling your software to isolate that specific green color and make it transparent.
Every professional video editor out there, whether it's Adobe Premiere Pro, Final Cut Pro, or DaVinci Resolve, has powerful, built-in tools to get this done. They might go by different names like 'Ultra Key' or 'Delta Keyer,' but the fundamental controls are surprisingly consistent. Your goal is to move beyond a simple point-and-click and really dial in the settings for a result that looks truly believable.
Pulling the Initial Key
Getting started is usually the most satisfying part. You’ll drag your editor's chroma key effect onto your video clip, grab the little eyedropper tool, and click on the green background. Instantly, it vanishes, leaving your subject floating in a black void.
If you absolutely nailed the lighting on set, this first pass might look pretty good. But let's be realistic—most of the time, this is just your starting point. You’ll probably spot some tell-tale signs of a quick key, like a faint green halo around your subject or some fuzzy, pixelated edges. This is where the real artistry begins.
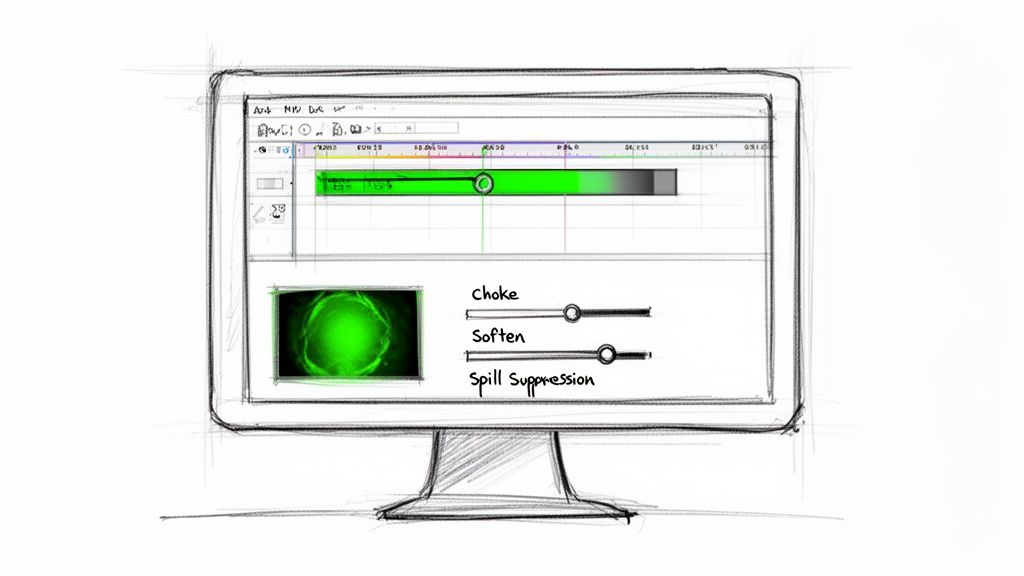
Getting to Know Your Keying Controls
To clean things up, you need to understand what those sliders and dials actually do. Let's break down the common controls you’ll be working with.
- Choke: Think of this as shrinking the edges of your cutout. If you have a thin green line around your talent, a little bit of choke will "eat" into that edge, pulling the matte inward to hide the artifact. Go easy, though. Too much choke will make your subject look unnaturally sharp and "cut out."
- Soften (or Feather): This does the opposite, subtly blurring the edge of the matte. A touch of softening helps the subject blend into the new background, avoiding that harsh, cookie-cutter look.
- Spill Suppression: This is your secret weapon for a clean key. It tackles the dreaded green spill—that green light that bounces off the screen and contaminates the edges of your subject, especially in their hair or on their shoulders. This tool intelligently finds that green fringe and neutralizes it by pushing the color toward a more neutral or complementary tone.
Expert Tip: Don't just stare at the final composite image. Every good keying tool has a "Matte View" or "Alpha Channel" display. This shows you a simple black-and-white version of your key: pure white is your subject (opaque), and pure black is your background (transparent). This view is the absolute best way to spot and fix holes or rough edges in your key.
Fine-Tuning the Tricky Details
A truly professional key is defined by how well it handles the difficult stuff: fine hair, motion blur, and semi-transparent objects. This is where patience really pays off.
For wispy hair, cranking up the choke is a disaster waiting to happen. Instead, you'll want to play with the key's tolerance and sensitivity settings. Sometimes, the best approach is to create multiple keys on different layers—one tight key for the person's body and a second, softer key just for the hair—and then composite them together.
Motion blur is another classic challenge. When a hand moves quickly across the screen, its edges become blurry and partially transparent. A hard, unforgiving key will make that motion look stuttery and fake. A little bit of softening can help that blurred edge blend naturally into its new environment.
Tackling Common Keying Problems
Even the best-laid plans can go awry. Understanding why green became the standard can help you troubleshoot. Green screens became dominant over blue by the late 1980s because digital camera sensors are most sensitive to green, resulting in a cleaner signal with less digital noise. This history provides context for a very modern problem: industry surveys show that 65% of users say lighting issues are their biggest green screen challenge, often forcing expensive reshoots.
Here’s a quick guide to some common issues you might face in the edit bay:
| Problem | What's Likely Happening | How to Fix It |
|---|---|---|
| Parts of the subject are see-through | Shadows on the screen are too dark, or the subject is wearing a color too close to the key. | Tweak the key's tolerance to be less aggressive. If it's a clothing issue, you might need to manually rotoscope (mask) that specific area. |
| Jagged or "blocky" edges | The footage was likely shot in a heavily compressed, low-quality format. | There’s no perfect solution here, but you can improve it. A bit of softening combined with a slight choke can help smooth out those rough edges. |
| Flickering or inconsistent key | The lighting on the screen is uneven, or the camera's auto-exposure was left on during the shoot. | In post, you can try to keyframe your settings to adapt to the changes, but the only true fix is a reshoot with proper, consistent lighting and manual camera settings. |
Getting a perfect key is an art form, blending technical know-how with a good creative eye. For a deeper dive into one of the most popular tools, check out our guide on how to use chroma key in Premiere Pro. Remember, every shot is unique, so don't hesitate to experiment with these controls until your subject looks like they truly belong in their new world.
When to Skip the Hassle and Use an AI Tool
Let's be honest: setting up a green screen can be a real pain. Finding the space, rigging the lights, and steaming out every last wrinkle takes time and patience. But what if you could get that clean, professional look without any of that?
That's exactly where modern AI tools come in. They completely sidestep the traditional process. Instead of needing a solid green color to key out, these smart algorithms analyze your video frame by frame, identifying the person and separating them from whatever is behind them. A messy office, a hotel room, a busy sidewalk—it doesn’t matter.
How AI Changes the Game
The advantages here are huge, especially if you're just starting out or need to move fast. You're basically skipping the most tedious part of the entire green screen workflow.
- No Gear Required: Forget the screens, stands, and special lights. You save both money and the headache of storing everything.
- Zero Green Spill: The most common green screen problem is that ugly green halo that reflects onto your subject. With AI, there's no green, so there's no spill. Problem solved.
- It's Incredibly Fast: You can go from raw footage to a finished video with a transparent background in minutes. It's often just a matter of uploading your clip and clicking a button.
This approach is a lifesaver for creators who value efficiency and flexibility. Instead of wrestling with a physical setup, you can turn to dedicated AI video tools that handle the background removal for you automatically.
Scenarios Where AI Is the Smarter Choice
A high-end studio will always have a place for a perfectly lit green screen, but for countless everyday situations, AI is simply the better tool for the job.
Think about these real-world examples:
- Quick-Turnaround Social Media: Need to bang out a TikTok or Instagram Reel? AI lets you swap your background instantly, no setup required.
- Corporate Talking Heads: You need to film an executive in their office, but the background is cluttered. AI can clean it up and add a branded background without disrupting their entire workspace.
- Filming in Small Spaces: If you're working out of a small apartment or home office, you probably don't have the 10-12 feet needed for a proper green screen setup. AI doesn't care how much space you have.
- Content on the Road: Travel vloggers and journalists can't exactly pack a full lighting rig. AI allows you to get a clean shot no matter where you are.
The table below breaks down the core differences at a glance.
Traditional Green Screen vs. AI Background Removal
| Factor | Traditional Green Screen | AI Tool (VideoBGRemover) |
|---|---|---|
| Setup | Requires screen, stands, multiple lights, and space. | Just your camera and subject. No extra gear. |
| Time Investment | Hours for setup, lighting, and post-production keying. | Minutes to upload and process the video. |
| Required Skill | Intermediate to advanced understanding of lighting and chroma keying software. | Beginner-friendly. As simple as uploading a file. |
| Common Issues | Green spill, uneven lighting, shadows, and wrinkles. | Occasional edge imperfections with complex motion or hair. |
| Best For | High-budget productions, VFX, and situations requiring pixel-perfect edges. | Social media, corporate video, tutorials, and quick-turnaround projects. |
Ultimately, AI offers a much more accessible path to professional-looking results.
AI background removal really levels the playing field. It gives anyone, regardless of their budget or studio space, the power to create clean, professional video that used to be out of reach without a ton of gear.
This technology makes it possible to get pro-level results with just a few clicks. If you want to see just how powerful this workflow can be, our guide on AI video background removal has more tips and examples. It’s a fantastic tool to have in your back pocket.
Frequently Asked Questions About Green Screen
No matter how well you plan your shoot, questions are bound to come up, especially when you're just getting the hang of green screen work. Here are some of the most common hurdles people face and my advice for clearing them.
Why Is Green the Go-To Color?
It all comes down to contrast. Green is one of the colors furthest from human skin tones, which makes it much simpler for software to distinguish between your subject and the background you want to remove. It's a clean separation.
There's a technical reason, too. The sensors in most digital cameras today are actually most sensitive to green light. This means they capture a cleaner, more detailed green channel with less digital noise, giving your editing software higher-quality information to work with for a sharper key.
Can I Just Use a Blue Screen Instead?
You absolutely can. Blue screens work on the exact same chroma keying principle and were the industry standard for a long time, particularly in the film world.
Blue is still the better option if your subject is wearing green or if you're featuring a green product—think a gardening video or a St. Patrick's Day theme. For most other projects, however, green has become more popular because it's more light-sensitive, meaning you don't need to blast as much light on it to get a good exposure.
How Do I Get Rid of That Green Halo Around My Subject?
That faint green glow bouncing off the screen and onto your subject is called "green spill," and it's a classic problem. The best way to deal with it is during the shoot itself: move your subject further away from the screen. A distance of at least 6 to 8 feet is a great starting point.
If you're still seeing it in the edit, don't panic. Look for a "Spill Suppression" or "Despill" function in your software. This tool is built specifically to target that unwanted green fringe and neutralize its color, making the halo disappear.
What’s the Absolute Minimum Gear I Need to Start?
You can get surprisingly good results without a Hollywood budget. At a bare minimum, you'll need these four things:
- A green screen: This could be anything from professional fabric to a pop-up screen or even a wall painted with the right chroma key green paint.
- Lights for the screen: Two dedicated lights, one on each side, will help you get that smooth, even lighting without hotspots or shadows.
- A light for your subject: You need at least one primary light (a key light) to make sure the person in front of the camera looks great.
- A sturdy tripod: Keeping your camera locked down is non-negotiable. It prevents motion blur and makes the keying process much cleaner.
Ready to skip the setup and get studio-quality results instantly? VideoBGRemover uses AI to remove your video background without any gear. Upload your clip and see the magic for yourself at https://videobgremover.com.
Tagged with
Ready to Remove Your Video Background?
See a free preview before you buy.
No credit card required • Free preview on every video