How to Change Video Dimensions A Creator's Complete Guide
Learn how to change video dimensions for any social platform. Our guide covers aspect ratio, resolution, and the best tools for resizing your videos perfectly.
If you've ever tried to post a video and had it look weird—squashed, stretched, or with huge black bars—you know how frustrating it can be. The fix is to change the video's dimensions, which usually means adjusting its aspect ratio (the shape, like 16:9) or its resolution (the pixel count, like 1920x1080).
You can tackle this by scaling, cropping, or adding those black bars (letterboxing) with software like Premiere Pro, HandBrake, or even simple online tools. Getting this right is one of those small details that makes a huge difference in how professional your videos look on every platform.
Why You Can't Ignore Video Dimensions
Let's be blunt: getting your video dimensions right can make or break your content. We live in a world of vertical feeds—TikTok, Instagram Reels, and YouTube Shorts—so a one-size-fits-all approach is a recipe for failure.
When you force a widescreen video into a vertical frame, platforms either crop it awkwardly (cutting off the action) or slap on distracting black bars. Both outcomes immediately signal a low-effort repost and can seriously hurt viewer engagement.
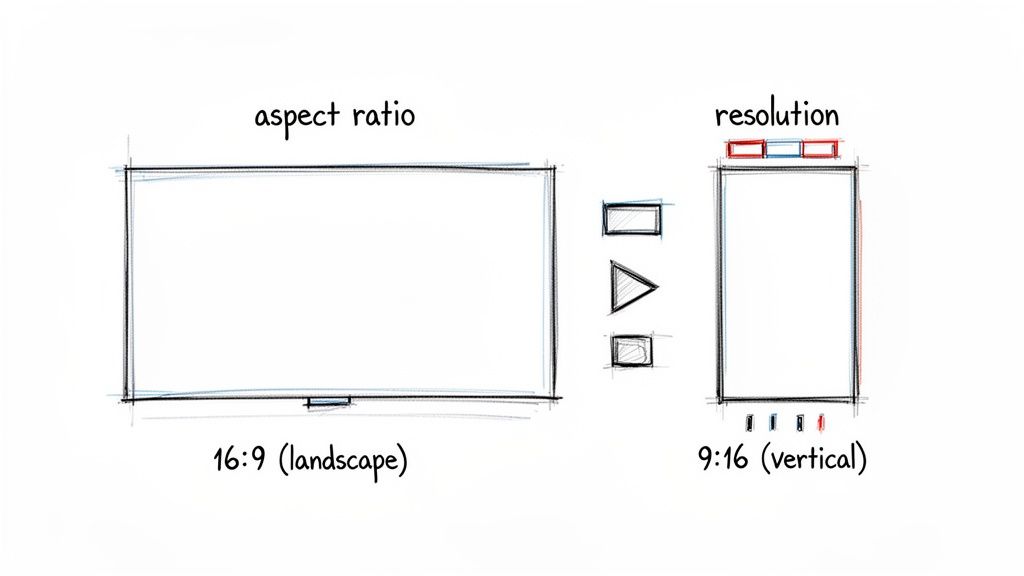
To really get a handle on this, it's helpful to understand exactly what video resolution means and how it's different from aspect ratio. They're related, but not the same thing.
- Aspect Ratio: Think of this as the shape of your video. It’s the relationship between the width and height. 16:9 is the standard for widescreen TVs and YouTube, while 9:16 is the go-to for vertical mobile viewing.
- Resolution: This is all about detail. It’s the total number of pixels packed into the frame. A 1920x1080 video has the same 16:9 shape as a 1280x720 video, but it’s going to look much sharper because it has more pixels.
A Quick Comparison: Aspect Ratio vs. Resolution
To make it even clearer, here’s a quick breakdown of the core differences between these two fundamental video concepts.
Aspect Ratio vs Resolution At a Glance
| Concept | What It Defines | Common Examples | Primary Impact |
|---|---|---|---|
| Aspect Ratio | The proportional shape of the video frame (width vs. height). | 16:9 (Widescreen), 9:16 (Vertical), 4:3 (Standard TV), 1:1 (Square) | How the video fits on different screens and platforms. Affects composition. |
| Resolution | The number of pixels in the frame (width x height). | 1920x1080 (Full HD), 3840x2160 (4K UHD), 1080x1920 (Vertical HD) | The clarity, sharpness, and detail of the video image. Also impacts file size. |
Understanding this distinction is the first step toward making informed decisions when you need to resize your footage for different uses.
The Three Core Methods for Resizing Videos
When you jump into a tool to change a video's dimensions, you'll generally have three main ways to do it: scaling, cropping, and letterboxing. Each has its place.
Scaling simply resizes the entire video frame. This works well when you're shrinking a large video, but be careful—stretching a small video to fit a larger frame will almost always result in a blurry, low-quality mess.
Cropping is when you physically cut away parts of the video to force it into new dimensions. It’s great for converting a wide shot into a vertical one, but you risk chopping out important visual information if you’re not careful with your framing.
Letterboxing (or pillarboxing for vertical bars) adds black bars to fill the empty space. This preserves your original footage perfectly but can feel out of place on mobile feeds where viewers expect full-screen content.
The numbers don't lie: Mismatched aspect ratios can slash engagement by up to 30% on social feeds. This highlights why conforming to platform standards is so vital for creators.
Tools like VideoBGRemover can make this whole process a lot easier. For instance, you can upload your clip, remove the original background, and then export it in a perfect vertical format—all in one workflow. For more on creating effective video, check out these essential video marketing best practices.
Mastering Dimensions For Social Media
Every social media platform is its own little world, with its own set of rules. If you're just spraying the same 16:9 video across every channel, you're leaving a ton of engagement on the table. To really stop the scroll, you need to think like a native of each platform.
The Rise of Vertical Video
Let's be clear: vertical video is the undisputed king of mobile. For platforms like Instagram Reels, TikTok, and YouTube Shorts, a 9:16 aspect ratio is absolutely essential. This isn't just a suggestion; it's what users expect. That full-screen, immersive experience is the price of admission, and anything less will likely get scrolled past in a heartbeat. The go-to resolution here is 1080x1920 pixels.
Beyond 9:16: Other Key Formats
But it's not all about vertical. Other dimensions have their place and can be incredibly effective. A square 1:1 aspect ratio (usually 1080x1080 pixels) is a workhorse on feeds like Facebook and LinkedIn. Why? It simply takes up more screen real estate than a traditional widescreen video, making it harder to ignore.
For the main Instagram feed, you can push that even further. The slightly taller 4:5 ratio (1080x1350 pixels) is a sweet spot that really maximizes vertical space without forcing you into a full 9:16 format. For a deeper dive into optimizing your clips, you can find great tips on how to edit videos for Instagram.
Pro Tip: When you're converting a widescreen video to vertical, don't just mindlessly crop the sides off. That's a rookie mistake. Take a moment to actually reframe the shot. Your goal is to keep the most important action locked in the center third of the screen, ensuring your subject isn't hidden by the app's interface elements.
The numbers back this up. The digital video market is on a rocket ship, projected to hit an eye-watering USD 524.06 billion by 2031. With digital video ad spending expected to climb to $207.5 billion in 2025, having your videos formatted correctly isn't just a best practice—it's a critical factor for driving clicks and engagement.
Getting your dimensions right is fundamentally about respecting the user's experience on each platform. It’s a clear signal that you get it—you understand the environment and you’ve created something specifically for them. It’s the same reason people use a dedicated Twitter photo resize tool; the principle of tailoring your visuals to the platform is universal.
Recommended Video Dimensions For Top Social Platforms
To cut through the noise, I've put together this quick-reference table. Think of it as your cheat sheet for getting your video dimensions right every single time, for all the major players.
| Platform | Placement | Recommended Aspect Ratio | Recommended Resolution (Pixels) | Notes & Best Practices |
|---|---|---|---|---|
| Reels & Stories | 9:16 | 1080x1920 | Keep key visuals in the center to avoid being cropped by UI elements. Max length: 90s. | |
| Feed Post | 4:5 or 1:1 | 1080x1350 or 1080x1080 | 4:5 takes up more vertical space in the feed, which is great for engagement. | |
| TikTok | In-Feed Videos | 9:16 | 1080x1920 | This is the native format. Anything else will be letterboxed. Max length: up to 10 min. |
| YouTube | Shorts | 9:16 | 1080x1920 | Must be 60 seconds or less to qualify as a Short. Vertical is non-negotiable. |
| YouTube | Standard Video | 16:9 | 1920x1080 (HD) or 3840x2160 (4K) | The classic widescreen format for traditional, long-form content. |
| Reels & Stories | 9:16 | 1080x1920 | Mirrors Instagram's format. Keep it vertical and immersive for best results. | |
| Feed Post | 1:1 or 4:5 | 1080x1080 or 1080x1350 | Square video (1:1) performs very well in the feed, stopping the scroll effectively. | |
| Feed Post | 1:1 or 16:9 | 1920x1920 or 1920x1080 | Square video stands out, but traditional 16:9 is also very common for professional content. | |
| X (Twitter) | In-Feed Video | 1:1 or 16:9 | 1200x1200 or 1920x1080 | Square performs best on mobile. Max length: 140 seconds. |
Bookmark this table. It'll save you a lot of guesswork and ensure your content always looks its best, no matter where you post it.
Getting Hands-On with Professional Video Editing Software
When you need total control over every single pixel, it's time to open up a professional Non-Linear Editing (NLE) program. Industry-standard tools like Adobe Premiere Pro, Final Cut Pro, and DaVinci Resolve are built for exactly this kind of precision work. This is where you graduate from simple resizing to thoughtfully recomposing your shots.
Instead of just slapping a crop on your video, these programs let you work inside a new timeline built specifically for your target dimensions. This is key. It means you can manually adjust the framing of every single clip to make sure the important action stays in the shot—an absolute must when you're turning a wide 16:9 video into a vertical 9:16 for social media.
Changing Dimensions in Adobe Premiere Pro
Premiere Pro has a really solid and straightforward workflow for this. It all revolves around your sequence settings. You can either punch in your desired dimensions when creating a new sequence or just change the settings on an existing one. For a standard vertical video, you’ll want to set your frame size to 1080x1920.
Once you’ve got your vertical sequence ready, just drop your wider footage onto the timeline. You'll then head over to the Effect Controls panel for each clip to play with its scale and position, manually reframing the action until it fits perfectly within that new vertical canvas.
The real power move in Premiere Pro, though, is Auto Reframe. This AI-powered feature is a game-changer. It analyzes your footage, figures out what the main subject is, and then automatically creates new keyframes to keep that subject centered in your new aspect ratio. It’s a massive time-saver for anyone creating social cutdowns.
To get it working, just find your finished 16:9 sequence in the Project panel, right-click it, and choose "Auto Reframe Sequence." Premiere will whip up a new, perfectly reframed sequence for you, handling about 80% of the tedious work in just a few seconds.
Resizing Videos in Final Cut Pro
Final Cut Pro users have a similarly powerful set of tools at their disposal. The process starts with modifying your project's properties. Just select your project in the browser, pop open the Inspector, and hit the "Modify" button. From there, you can change the video format and resolution to whatever you need, like 1080x1920 for vertical content.
After you've set the new dimensions, you'll probably notice your footage on the timeline looks a bit off—either cropped or letterboxed. This is where you’ll jump into the Video Inspector and use the Transform controls to tweak the position and scale of each clip.
Final Cut Pro also has its own intelligent reframing tool called Smart Conform. Here’s what it does:
- It analyzes clips to identify faces and other dominant motion.
- It automatically pans and crops the shot to keep these key elements in view.
- You can apply it to your whole project or just to individual clips.
This feature makes turning a widescreen project into a vertical one so much faster, helping you maintain a high-quality, professional look without spending hours on manual adjustments.
Adjusting Timeline Resolution in DaVinci Resolve
DaVinci Resolve might be famous for its color grading, but it’s just as capable when it comes to managing video dimensions. You can set your project dimensions right from the get-go in the Project Settings menu, under "Master Settings." This is where you’ll change the Timeline Resolution to fit any platform, such as 1080x1920 for TikTok or Reels.
Resolve also gives you a few different ways to handle how your footage fits this new resolution. You can find these options under "Image Scaling" in the Project Settings, with choices like "Scale full frame with crop" or "Center crop with no resizing."
For automated reframing, Resolve offers a feature called Smart Reframe, which you'll find in the Inspector window. When you enable it, Resolve analyzes the clip and dynamically pans and scans to keep the subject right in the middle of the new frame. It’s an incredibly effective tool for quickly adapting your content without losing the narrative focus of your shots.
This infographic breaks down the most common formats you'll be creating in these NLEs.
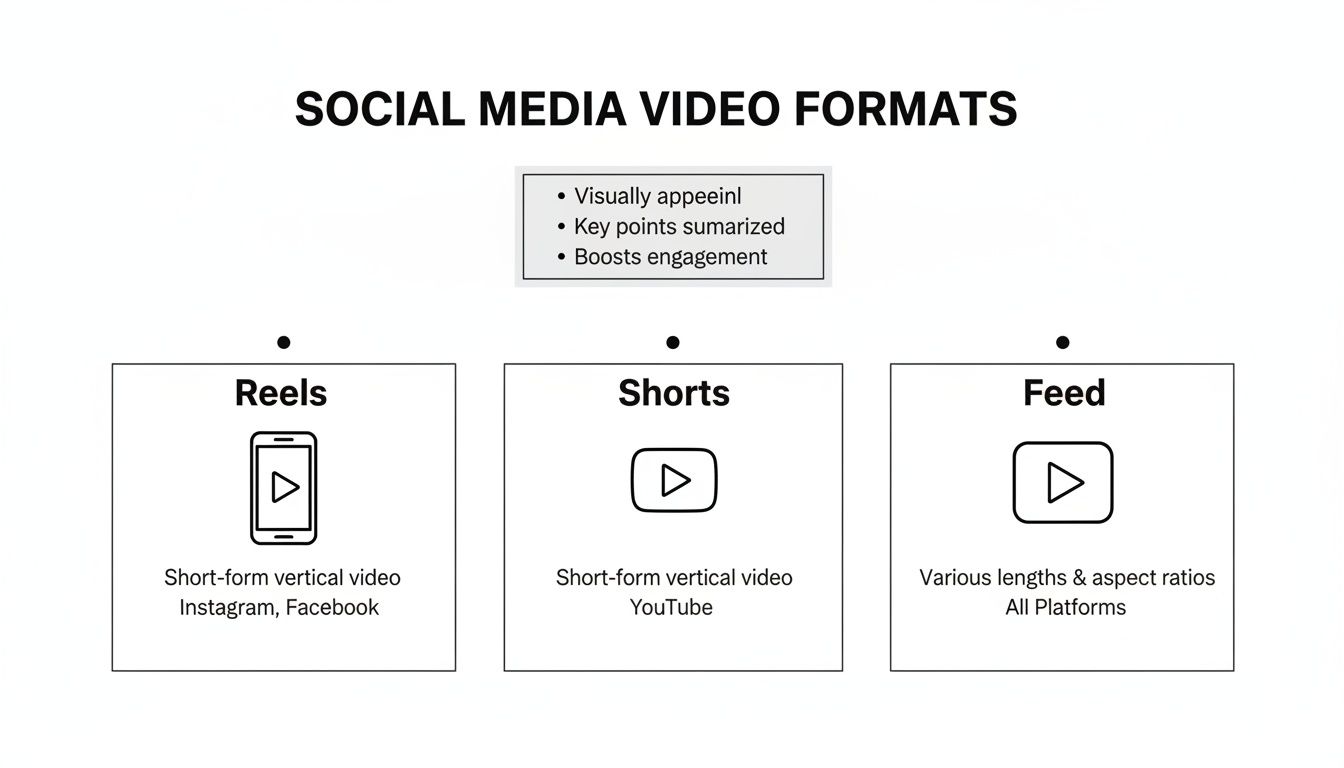
Having a visual guide like this really drives home the importance of tailoring your exports. What works for a vertical platform like Reels or Shorts is completely different from what you'd want for a more flexible in-feed post.
Quick and Easy Ways to Resize Videos for Free
You don't always need to shell out for a high-end software suite just to change a video's dimensions. In fact, some of the most powerful and efficient tools for the job are completely free.
For creators cranking out content for social media, these tools are often all you need. They're perfect for straightforward tasks like flipping a widescreen video vertical for TikTok or just shrinking a massive file down to size. Let's dig into some of the best free options you can use on your desktop, phone, or right in your browser.
HandBrake: The Desktop Powerhouse
If you're looking for a serious, no-nonsense desktop app, HandBrake is a legend in the video world. It’s a free, open-source transcoder that can handle almost anything you throw at it.
At first glance, the interface can feel a bit technical, but don't let that scare you. The easiest way to get started is with its built-in presets. HandBrake has a massive library of pre-configured settings for everything from YouTube and Vimeo to specific devices like an Apple TV or PlayStation. Just load your video, pick a preset like "Vimeo YouTube HQ 1080p60," and it does all the heavy lifting.
But if you want to get your hands dirty, head over to the "Dimensions" tab. This is where the magic happens.
- Set Custom Resolutions: You can just type in the exact width and height you need, like 1080 by 1920 for a standard vertical video.
- Crop Your Frame: The "Cropping" feature is fantastic for trimming off black bars or reframing a shot to focus on the important action.
- Handle Anamorphic Video: This ensures your video's pixel aspect ratio is correct, preventing that dreaded stretched or squashed look.
HandBrake is the tool I turn to when I need to both resize and compress a video at the same time. It’s an essential utility for anyone who works with video regularly.
Mobile Editing on the Fly: CapCut and InShot
So much of today's content is created entirely on a phone. Apps like CapCut and InShot have basically become the go-to editors for making Reels, Shorts, and TikToks.
Changing video dimensions in these apps couldn't be easier. It's usually the very first thing you do.
In CapCut, for instance, you just tap the "Ratio" button and pick 9:16. Your entire project canvas immediately snaps to the correct vertical format. After that, you can just pinch-to-zoom and slide your video clip around to get the framing just right.
This is why millions of creators live in these apps. They make it incredibly fast to produce content that looks and feels native to the platform you're posting on.
Online Tools for Pure Convenience
Sometimes you just need to resize one video, and you need to do it now without installing anything. That's where online resizers come in.
Dozens of websites let you upload a clip, pick a new size or a preset aspect ratio, and download the finished file in minutes. They're perfect for those one-off jobs where speed is everything. Many, like the tools integrated into VideoBGRemover, even let you resize as part of a larger workflow, like after you’ve changed your video’s background.
Get Your Hands Dirty with FFmpeg for Command-Line Control
If you're the type who lives in the terminal, loves automating tasks, or just wants absolute, granular control over your video files, then FFmpeg is your Swiss Army knife. It’s a powerful, free, open-source utility that can do just about anything you can imagine with video, and that absolutely includes changing dimensions with surgical precision.
What it lacks in a pretty user interface, it more than makes up for in raw power and scriptability. Let's say you have a hundred product videos shot in widescreen that all need to be reformatted for Instagram Stories. Instead of opening a video editor and clicking through the same export settings a hundred times, you could write a single FFmpeg script and let it run. It's a massive time-saver for repetitive work.
Core FFmpeg Commands for Resizing Video
Working with FFmpeg boils down to a simple formula: you give it an input file, tell it what to do (the "filter"), and then name your output file. Everything happens in one command.
Here are a few of the most useful, real-world commands you can copy and paste to get started.
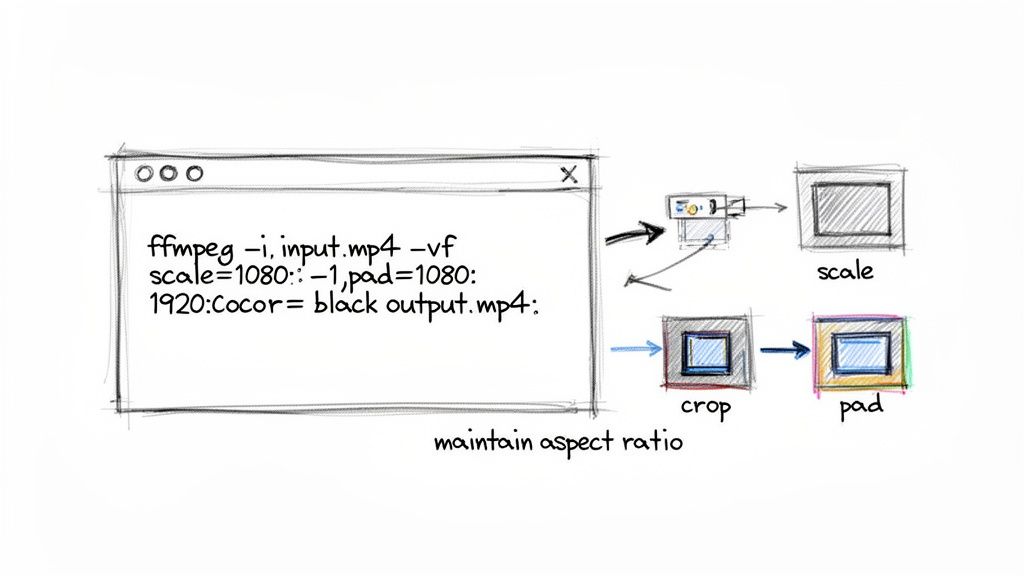
Scaling to a Set Width (Keeping Aspect Ratio) This is one of the most common tasks. The command below will resize your video to be 1080 pixels wide. The magic is the
-1in the height parameter—it tells FFmpeg to automatically calculate the height to match the original aspect ratio, so nothing gets stretched or squished. ffmpeg -i input.mp4 -vf "scale=1080:-1" output.mp4Cropping to Exact Dimensions Need to punch in and trim the edges of a video? The
cropfilter is what you're looking for. This example carves a 1080x1920 vertical video out of the very center of your source file. ffmpeg -i input.mp4 -vf "crop=1080:1920" output.mp4
With FFmpeg, you’re not just resizing a video; you're essentially re-encoding it from scratch. This gives you complete control over everything—codecs, bitrates, audio quality—letting you fine-tune the final output for any platform or purpose.
How to Add Padding (Letterboxing/Pillarboxing)
Sometimes cropping isn't an option because you'd lose important parts of the shot. If you need to fit a 16:9 horizontal video into a 9:16 vertical frame for a TikTok or a Reel, adding padding (black bars, also known as pillarboxing) is the way to go.
This command is a bit more complex, but it's incredibly useful. It first scales your video down to fit within a 1080x1920 frame while maintaining its aspect ratio, then it adds black padding to fill the remaining space.
ffmpeg -i input.mp4 -vf "scale=1080:1920:force_original_aspect_ratio=decrease,pad=1080:1920:-1:-1:color=black" output.mp4
Getting comfortable with these commands opens up a whole new world of video processing. FFmpeg's power goes way beyond just resizing; it's also a go-to tool for format conversions. For instance, the same fundamental principles apply when you need an MKV file converter to MP4. Once you master a few of these core concepts, you can build incredibly efficient, automated workflows for any video task that comes your way.
Working Smarter with AI Tools
Let's be honest, manual resizing and frame-by-frame masking feel archaic now. Modern AI can get you a better result in a tiny fraction of the time. The real win here isn't just about raw speed; it's about opening up creative options that used to be too tedious for most projects. For anyone needing to repurpose footage fast without it looking terrible, these tools are a complete game-changer.
Think about a classic scenario: you've got a great horizontal video shot in 16:9, but you need a vertical version that pops for an Instagram Reel or TikTok. The old-school way meant hours of painstaking rotoscoping to isolate your subject. Even after all that work, you'd often end up with a choppy, unnatural-looking cutout. Today, that entire headache can be solved in a couple of minutes.
A Real-World AI Resizing Workflow
So, how does this actually work in practice? It usually starts with you uploading your standard 16:9 video clip to an AI tool. From there, the AI kicks in, analyzing every frame to cleanly separate your subject from the background. We're not talking about a simple color key here; these systems are smart enough to handle tricky details like wisps of hair, motion blur, and transparent objects with impressive precision.
With the background gone, you have a clean asset. This is where the fun begins. Instead of being locked into your original shot, you can completely reimagine it.
- Drop your isolated subject onto a fresh, vertically oriented 9:16 background.
- Add in your own branding, motion graphics, or even a totally different video scene behind them.
- Freely resize and reposition the subject within the new vertical frame to get the composition just right for a phone screen.
This approach lets you completely sidestep the clumsy trade-offs of cropping or letterboxing. You don't have to awkwardly chop off parts of your subject or settle for ugly black bars. What you get is a professional-looking vertical video that feels like it was intentionally shot that way.
The big shift is this: AI transforms a boring technical chore into a purely creative task. You're no longer just trying to force a video into a new shape; you're building a new, platform-native asset from the ground up, and doing it 90% faster.
Exporting for a Pro-Level Finish
The final step is just as critical, especially if you plan on doing more edits. A solid workflow demands flexibility. The best AI tools get this and let you export your new video in formats that don't lock you in. You can grab a standard MP4 for a quick upload or opt for a transparent file for more complex editing down the line.
For example, exporting a transparent MOV ProRes 4444 file gives you a clip with a built-in alpha channel (meaning, no background at all). You can drag this file directly into Adobe Premiere Pro or Final Cut Pro and it will appear as a clean layer, ready for advanced color grading, effects, and compositing. It’s the perfect bridge between AI-powered efficiency and a professional post-production pipeline.
Ready to stop wasting hours on manual edits? VideoBGRemover uses powerful AI to remove and replace video backgrounds in minutes, giving you studio-quality results without a green screen. Try it for free and see how easy it is to create professional content.
Tagged with
Ready to Remove Your Video Background?
See a free preview before you buy.
No credit card required • Free preview on every video