Mastering the Video White Background
Learn how to achieve a flawless video white background. Our guide covers pro lighting, camera settings, and AI editing for truly professional results.
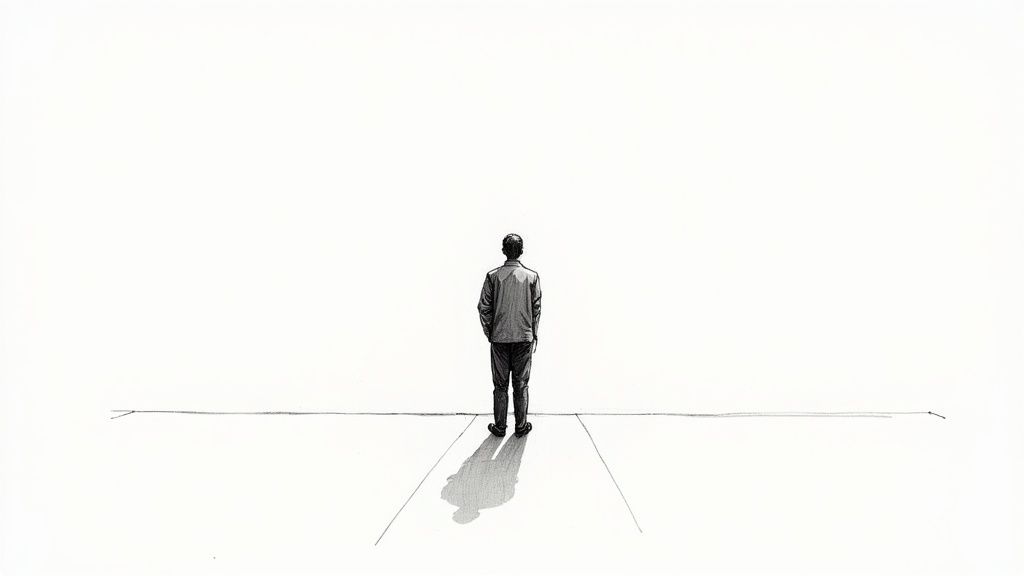
A video with a white background is one of the smartest moves you can make to instantly give your content a professional edge. It cuts out all the noise, forcing the viewer's attention right where you want it. This clean, minimalist look is perfect for just about anything—from product demos and e-commerce shots to polished corporate interviews—and gives you a perfect canvas for adding branding or text later on.
Why a White Background Is Such a Game-Changer
Before we get into the "how-to," it’s worth taking a moment to appreciate why this simple choice works so well. A white background isn't just about looks; it's a powerful visual communication tool. It acts as a blank slate, stripping away any clutter that could pull focus from your subject.
Think about the product showcases from major brands you’ve seen. Chances are, they use a clean, bright backdrop to make the product the undisputed hero of the shot. This simple technique immediately communicates a sense of clarity, sophistication, and authority. The viewer’s brain doesn’t have to waste energy filtering out distracting details, which means your message hits home with much greater impact.
The Strategic Advantages
Going with a simple white canvas gives you a few key advantages that boost both the quality of your video and how well your audience connects with it. It’s a versatile foundation that works for a huge range of content goals.
- Puts the Spotlight on Your Subject: By eliminating all that visual noise, you direct your audience's eyes exactly where you want them—on your speaker, your product, or your demonstration.
- Looks Polished and Professional: A clean, evenly lit white background screams high production value. It looks intentional and well-planned, which helps build trust and credibility with your audience.
- Makes Post-Production a Breeze: This is a huge one. A solid white background makes it incredibly easy to add graphics, text overlays, and other branding elements without them fighting for attention with a busy scene.
- Offers Timeless Appeal: Trendy backgrounds can look dated in a hurry. A white background, on the other hand, is a classic that never goes out of style. Your content will still look fresh and relevant years from now.
For creators, a video white background isn't just a backdrop—it's a strategic asset that amplifies your message and simplifies your workflow from shooting to final edit.
This same principle—using a clean, non-distracting visual—is incredibly effective online, too. For example, using a subtle background video for a website can grab a visitor's attention without overwhelming them. The goal is always to support the main content, not compete with it, and a white background does this perfectly.
Setting Up Your White Background Studio Space
Turning a corner of your room into a functional studio is probably easier than you think. The first big decision you'll need to make is the backdrop itself. This is the foundation of your shot, and getting it right from the start will save you a ton of headaches later.
You've got a few solid options here, and each comes with its own quirks. Seamless paper rolls are a classic for a reason—they give you a perfectly smooth, crease-free surface. The downside? They can be a bit delicate and take up a fair amount of space, especially with the stand they require.
A more permanent route is to just paint a wall pure white. It's cheap, effective, and always ready to go. You just have to be mindful of scuffs and marks that will eventually need touching up. Then there's fabric, like muslin, which is super portable and easy on the wallet but an absolute nightmare to keep wrinkle-free. Those wrinkles can cast tiny, distracting shadows that are a pain to deal with.
Choosing Your White Background Material
So, which one is for you? It really boils down to your space, your budget, and how often you plan on filming. A one-off project has different needs than, say, a weekly YouTube show.
To make it a bit clearer, here’s a quick comparison of the most common materials I see people use.
| Material | Pros | Cons | Best For |
|---|---|---|---|
| Seamless Paper | Perfectly smooth, non-reflective surface; professional finish. | Tears easily; requires a stand; not very portable. | Dedicated studio spaces, product shoots, and interviews. |
| Painted Wall | Cost-effective; always set up; durable against wrinkles. | Can get scuffed easily; reflects more light; immobile. | Home studios or offices with a spare, smooth wall. |
| Fabric (Muslin) | Portable and easy to store; affordable. | Extremely prone to wrinkles; can be slightly translucent. | Mobile creators or those with very limited space. |
Think of this table as a starting point. Your own setup might have unique challenges, but this covers the basics for most creators.
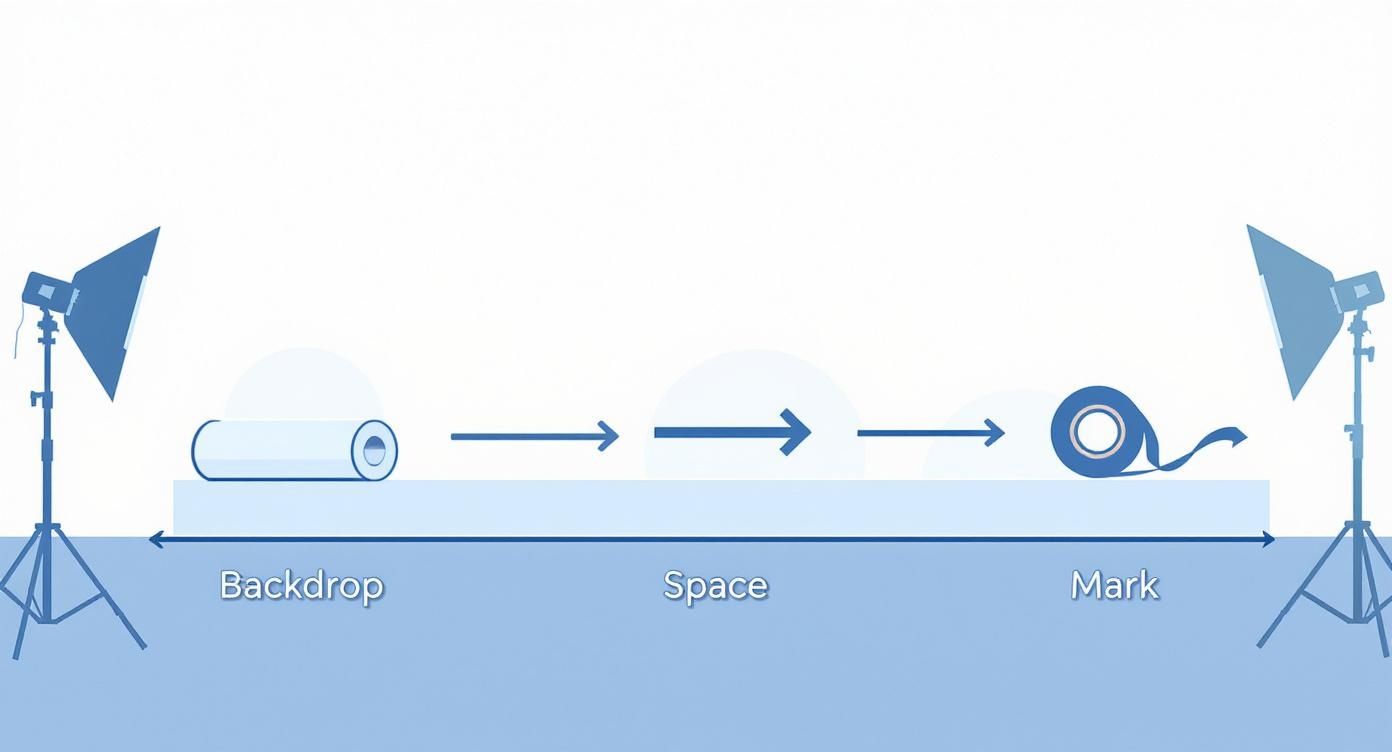
Now, once you've picked your backdrop, the next thing to nail down is distance. I can't tell you how many times I've seen people make the mistake of placing their subject way too close to the background. This is the fastest way to create harsh, ugly shadows that scream "amateur."
To get that clean, floating-in-space effect, you need separation. I always recommend placing your subject at least five to six feet in front of your white background. This space is crucial for lighting.
That separation is what lets you light your subject and your background independently—a pro technique we'll dive into next. Here’s a little trick I’ve used for years: use a small piece of gaffer tape on the floor to mark where your talent should stand and where your tripod legs go. This ensures your framing is identical every single time, which is a lifesaver for consistency.
Positioning for a Professional Look
Getting the placement right from the beginning prevents so many common problems down the line. As production workflows get faster and more efficient, this kind of consistency becomes even more critical. With 54% of marketers now using AI in their video creation process, the push is toward smarter, more streamlined setups. That all starts with getting the physical space right.
By taking a few minutes to think through your backdrop material and subject placement, you're laying the groundwork for a much better final product. This isn't just about setting up a scene; it's about controlling your environment to get that clean, professional video white background instead of one that looks muddy, gray, and unpolished.
The Secrets to Flawless White Background Lighting
When you're shooting for a video white background, lighting is everything. It’s where the real magic happens. Get it wrong, and even the most pristine backdrop will end up looking dull, gray, and just plain unprofessional. The goal isn't simply to light your scene; it's to intentionally overexpose the background until it's pure white, all without blowing out your subject.
So, what's the secret? Professionals use a two-part system. First, you light your subject so they look fantastic. Then, you light the background completely separately, making it much, much brighter than whatever is in the foreground. This dual approach is the key to creating that clean, high-end studio look.
Sculpting Your Subject with Light
Before you even think about the background, your subject has to pop. The go-to method for this is three-point lighting. It's a classic for a reason—it's a simple but incredibly powerful way to give your subject depth, separating them from their surroundings and preventing a flat, boring look.
This diagram shows a standard three-point lighting arrangement.
By placing a key light, fill light, and back light, you create a three-dimensional effect that draws the viewer's eye right where you want it.
Here’s a quick rundown of what each light does:
- Key Light: This is your main light source, and it's the brightest of the three. You'll want to place it about 45 degrees off to one side of your camera. It illuminates the main part of your subject, creating shape and dimension.
- Fill Light: Positioned on the opposite side, this light is softer and less intense. Its only job is to fill in the dark shadows created by the key light, making them less harsh and more flattering.
- Back Light: Sometimes called a rim light or hair light, this one goes behind your subject. It creates a subtle outline of light around their edges, which is absolutely essential for cleanly separating them from the white background.
Blowing Out the Background
Okay, your subject looks great. Now it's time to deal with the backdrop and get that pure white. You'll need two more lights just for this task. Aim one light at the left side of your white backdrop and the other at the right.
The trick here is to blast the background with so much light that you overexpose it. You want to "blow it out," which means it becomes so bright that your camera sees it as 100% pure white, with zero texture or shadow. Getting this balance right is crucial; for more tips on this, you can learn how to master your product photography lighting setup.
Here's a common mistake I see all the time: trying to light the subject and the background with the same lights. This is a recipe for a muddy, gray backdrop or a horribly overexposed subject. For professional results, lighting them independently is non-negotiable.
Once your lights are set, pull up your camera’s histogram. This little graph shows the tonal range of your shot. For a perfect white background, you should see a big spike pushed all the way to the far-right edge of the graph. That spike tells you you've nailed it.
Getting this right in-camera gives you a much cleaner result than trying to fix it in post. It’s the same principle as using a physical green screen versus relying on a green screen creator to build a complex scene from poorly shot footage—better input always leads to better output.
Nailing Your In-Camera Settings
After all the physical work of positioning your lights and subject, your camera settings are what lock everything in. Relying on "auto" mode here is a gamble; it might try to "correct" your intentionally bright background, turning it gray. We need to switch to full manual control to get the crisp, professional video white background you're after.
First thing's first: let's talk white balance. Your camera's brain doesn't see "white" the same way our eyes do. Depending on your light source, what should be pure white can easily end up with a subtle blue or orange tint.
The best way to get this right is by setting a custom white balance with a gray card. This simple tool gives your camera a reference point for what true neutral gray looks like in your specific lighting setup. This ensures your white background is actually white, not eggshell or icy blue.
Dialing in Your Exposure Manually
With your colors now looking accurate, it’s time to control the brightness. This is a delicate dance between three core settings: aperture, ISO, and shutter speed. Getting them right in-camera makes everything downstream so much easier and gives you a much cleaner file to work with.
Here’s the sequence I always follow for the best results:
- Lock in a Low ISO: Start by setting your ISO as low as it will go—usually ISO 100 or 200. Pushing the ISO too high introduces digital noise (or "grain"), which will ruin the clean look of your white background.
- Set Your Shutter Speed: For natural-looking motion, the golden rule is to set your shutter speed to double your frame rate. If you're shooting at 24 fps, your shutter should be 1/50. If you're at 30 fps, set it to 1/60.
- Adjust the Aperture (F-Stop) Last: Your aperture is the final piece of the puzzle. It controls how much light hits the sensor and also determines your depth of field. Adjust this setting until your subject looks perfectly exposed, separate from the background.
Remember, you lit your subject and background separately. Your goal is a perfectly exposed subject against a background that is so bright it’s pure white. Trust your histogram—if that spike is crammed against the far right side, you've nailed it.
This attention to detail during production isn't just for show; it has a real impact on how an audience perceives your brand. For instance, B2C companies have reported a 39% increase in direct sales directly tied to high-quality video content. A clean, professional look builds the kind of trust that drives those conversions. You can dig into more video marketing statistics to see just how much visual quality moves the needle.
Fixing or Faking It with AI Tools
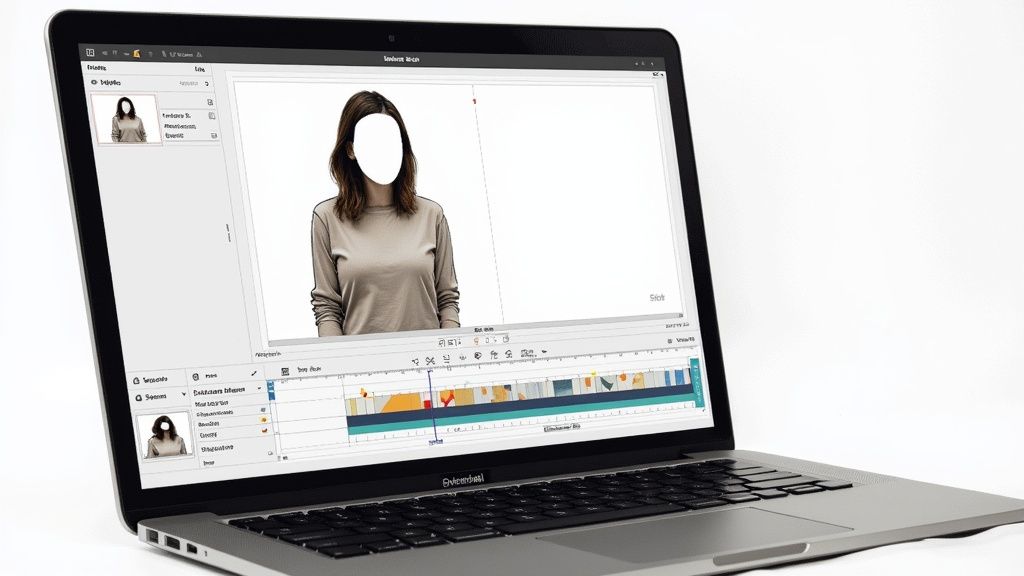
This is where the magic happens. A good AI tool can create a precise mask around your subject, cleanly separating them from the background. This clean cutout is the key to seamlessly dropping in that perfect white backdrop.
The AI Alternative to Reshoots
Let's face it, reshooting is often a luxury we don't have. The location might be gone, your talent's schedule is booked solid, or—more likely—you just didn't spot that distracting fire extinguisher in the background until you were deep into the edit. This is where AI-powered background removal tools become an absolute lifesaver, giving you a fast and surprisingly clean alternative to starting over.
These tools analyze your video frame by frame, using complex algorithms to tell the difference between your subject and everything behind them. Forget the days of tedious, manual rotoscoping that could eat up hours of your time. With a good AI tool, you can get a solid result in just a few minutes. You just upload the clip, let the software do its thing, and you’re ready to add your new, crisp white background.
The real game-changer here is accessibility. You no longer need a dedicated studio or a perfectly lit green screen to get a professional, clean look. It puts the power to create high-quality, distraction-free video into everyone's hands.
Getting a Natural-Looking Result
Once the AI has done the heavy lifting and isolated your subject, the next part is simple. You'll add a new layer behind your subject and fill it with solid white (#FFFFFF). But don't hit export just yet. The final, and most important, step is to do a quality check to make sure the final video looks believable, not like a cheap cutout.
Here's what I always look for:
- Edge Quality: Zoom way in on the edges. Pay close attention to hair and other fine details. Does the mask look sharp, or are you seeing fuzzy digital artifacts or a weird "halo" effect around your subject?
- Lighting Consistency: This one is huge. Does the light on your subject feel like it belongs in a bright, white environment? If your original shot was in a dim, moody room, the lighting on them will look completely out of place against a brilliant white background.
If you're ready to dive in and see what's out there, we've put together a detailed guide on the https://videobgremover.com/blog/best-ai-tools-with-video-background-removal to get you started.
This AI-driven approach is quickly becoming standard practice in video production. When you consider that video is expected to account for 82% of all internet traffic by 2025, the need for faster, better production methods is obvious. For those looking to take their post-production to the next level, exploring some of the best video editing automation tools can seriously speed up your entire workflow.
Answering Your Top White Background Questions
Over the years, I've seen countless creators wrestle with the same few problems when trying to get that perfect white background. Let's break down the most common questions I hear and give you some practical, no-fluff answers that actually work.
A huge one is always about cost. "Do I seriously need to drop a ton of cash on professional lights?" The short answer? Nope. Not if you're smart about it.
Your best free tool is a big window. The soft, natural light it provides is often better than cheap artificial lights for illuminating your subject. While daylight alone won't completely blow out your background to pure white, it sets you up perfectly for the next step. This is where AI tools really shine, letting you clean up an imperfect real-world setup and digitally swap in a flawless white background later.
Getting the Technical Stuff Right
Beyond the budget, a couple of key technical details trip people up all the time. Getting these sorted from the get-go will save you a world of pain during the editing process.
First up, color temperature. What's the right setting for my lights? For a pure, neutral white, you want your lights to be daylight-balanced, which sits right around 5600K. If your lights are too warm (orange) or too cool (blue), that color bleeds onto your white backdrop, and fixing it in post is a nightmare. Stick to 5600K, and your whites will actually look white.
Then there's the shadow problem. How do you get rid of those annoying gray smudges creeping onto your backdrop?
The absolute best trick in the book is creating space. You have to move your subject at least five or six feet away from the background. This physical distance is the key to preventing their shadow from falling directly onto your white screen.
If you still see some faint shadows after creating that gap, the solution is simple: more light on the background itself. Point your dedicated background lights at the backdrop to wash out any remaining gray spots. By making the background significantly brighter than your subject, you can blast away those last bits of shadow, leaving a clean, crisp canvas.
Ready to bypass the tricky lighting setups and get a perfect white background in just a few clicks? VideoBGRemover handles all the hard work with AI. Upload your video and create a stunning result today.
Tagged with
Ready to Remove Your Video Background?
See a free preview before you buy.
No credit card required • Free preview on every video